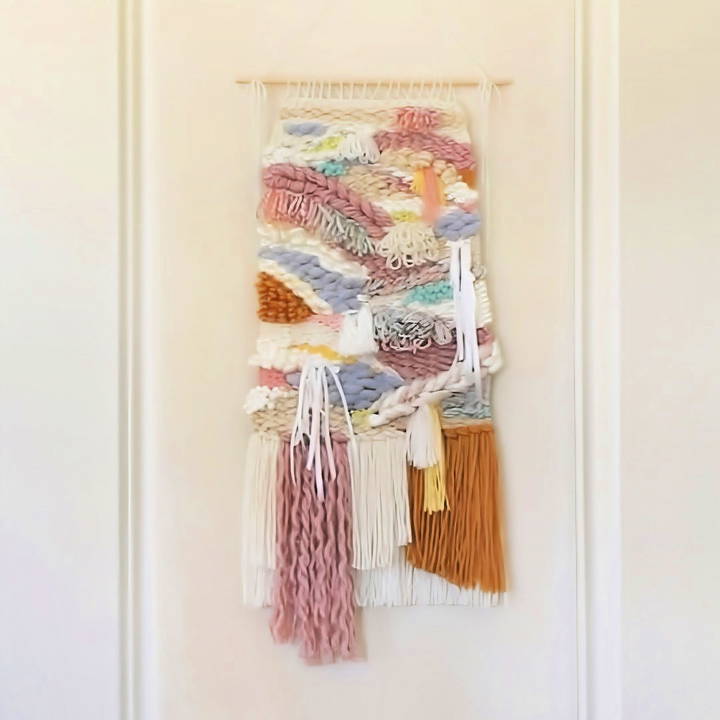
Making art can be an immensely satisfying experience, especially when it comes from your own hands. Recently, I embarked on a creative journey to bring a large tapestry to life, without the use of a traditional loom. This project was driven by my need for some vibrant wall decor and inspired by a video by the talented YouTuber With Wendy. In this article, I will walk you through my enjoyable process of making a tapestry using simple materials and guide you through each step with practical advice and personal insights.
Gathering the Essentials
Before diving into the creative process, getting the right materials is crucial. Each item plays a significant role in ensuring your tapestry turns out beautifully. Here's a breakdown of what you'll need:
Necessary Materials and Their Roles
- A Sturdy Table: This will serve as our makeshift loom. The table provides a flat, stable surface to mount our strings. Make sure it's robust enough to handle some tension, as we'll be winding yarn around it.
- Twine: This acts as the warp (the vertical lines of your tapestry). I chose twine because it has no stretch, which helps keep everything nice and tight. A non-stretch material ensures that the structure remains stable.
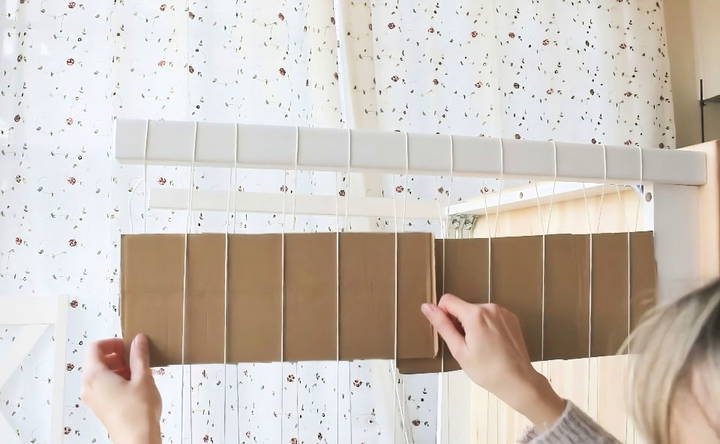
- Cardboard: Cut into strips, cardboard is used to provide spacing at the start of our weaving process. It also ensures the threads are aligned properly and remain even.
- Various Yarns: I picked a blend of chunky, thick yarns in a variety of colors and textures. They add dimension, color, and personality to your tapestry. Opt for thick yarns if you wish to quickly build up bulk.
- Crochet Hook or Plastic Needles: These tools aid in finishing the tapestry edges, and help tuck away loose threads. They render the tapestry clean-looking once completed.
- Dowel Rod: Used for hanging the tapestry. It provides support and a touch of design, making it easy to mount your artwork on the wall.
Step by Step Instructions
Learn how to make a tapestry with our step-by-step guide. Make beautiful, textured pieces, from setting up your loom to securing and displaying your finished artwork!
Setting Up Your Table Loom
Each tapestry begins with setting a solid warping frame. Here's how I did it:
Preparing the Table for Warping
- Turn the Table Sideways: I placed my kitchen table on its side and positioned a small piece of wood underneath its legs. This setup gives us space to wrap our twine around the table legs securely.
- Warping the Twine: Wrap the twine tightly around the table legs, making sure it holds without stretching. Pull one thread up while you push the other down to achieve a taut setup. Cut and tie it securely when done.
- Inserting the Cardboard: Slide a strip of cardboard through the weaved twines at the bottom. This will flatten the threads and mark the beginning of our weaving space.
The Weaving Process: Starting with the Base
Weaving can be done in numerous ways. Here's how I began my tapestry, focusing on the base:
Making the Foundation
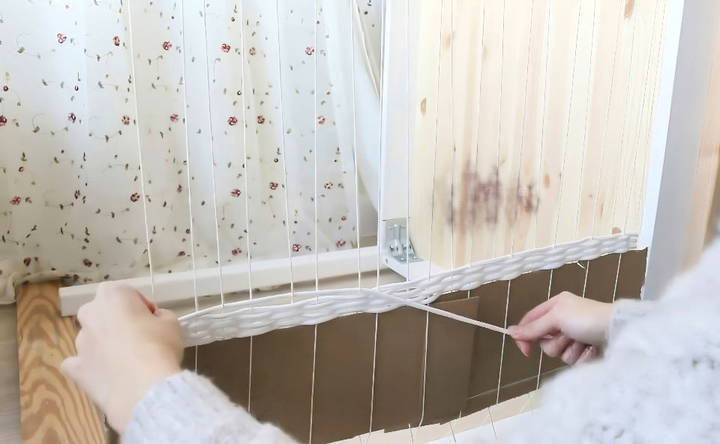
- Start with Strong Rope: I used rope to lay the first weaving rows. This ensures a firm base, as rope tends not to stretch. Weave back and forth, looping at ends to connect rows. Remember to leave a long tail at the start for finishing touches later.
- Organizing Your Yarn: Use cardboard cutouts to wrap yarn. This keeps it less tangled and easier to handle while weaving through the warp threads.
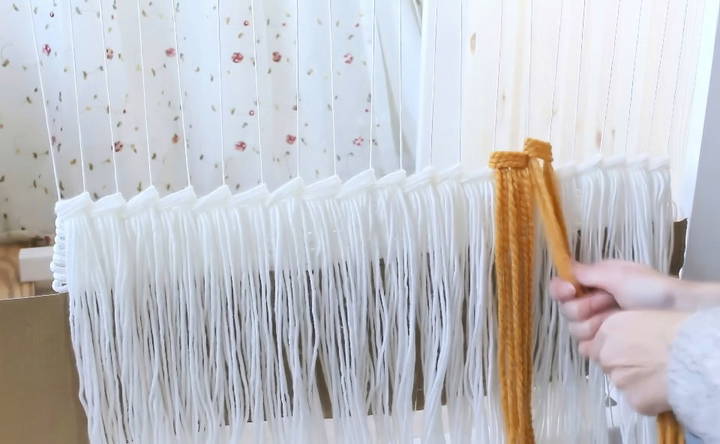
- Adding Tassels: Tassels are decorative features. I began with a row of white tassels, looping yarn multiple times to achieve desired thickness. Fold in half, securing around two adjacent threads.
Exploring Different Weaving Techniques
- Incorporate Colors and Patterns: Once the base is set, I introduced colored yarns for variety. The aim was to make dynamic textures and patterns, balancing thick and fine yarns.
- Playing with Yarn Textures: Separating yarn fibers or leaving them tangled offers different textures. This adds an intriguing visual variety to the final piece.
- Varying the Weave Style: By weaving irregular shapes and not completing full rows, you make more organic, natural shapes. Occasionally, combine patterns for flowing and erratic designs.
Advanced Techniques: Adding Depth and Texture
Making a tapestry isn't just about weaving left to right; it's about adding character with small, thoughtful details. Here are some I explored:
Crafting 3D Effects with Loops
- Looping for Volume: Looping yarn around the warp makes a braided effect. Alternate directions for each side for a consistent look, pulling tightly for definition.
- Making Fun Patterns: With thick yarn, simple loop techniques can be used to simulate pom-pom-like effects or other decorative styling.
- Mixing Different Weaving Styles: Combining looping, tassels, and regular weaving introduces varied textures and layers, making a complex and engaging visual.
Adapting As You Go
Weaving allows flexibility, inviting you to adapt and change throughout the process.
- Design Adjustments: If there are sections you aren't fond of, use tassels or additional weavings to cover or alter them. Swapping colors or textures can vastly change the tapestry's look.
- Correcting Mistakes: Should you make an error, fret not. Weaving is surprisingly forgiving. Adjust by pushing layers aside, re-weaving, or tightening loose sections.
Finishing Touches: Completing Your Tapestry
As I neared the end, it was time to secure everything and prepare to showcase my creation.
Securing and Finishing
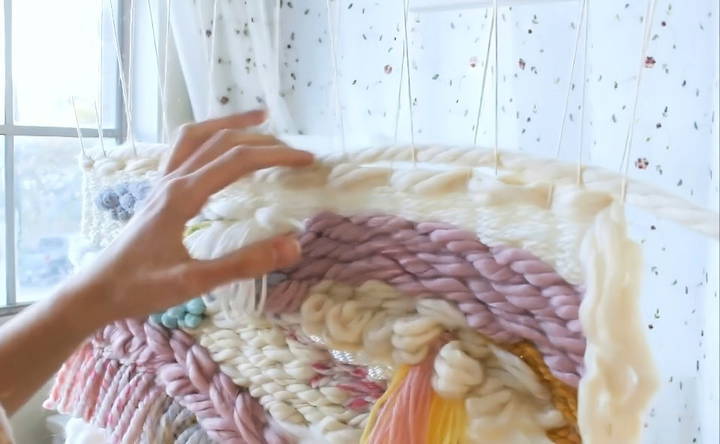
- Tucking Away Loose Ends: Use the crochet hook to pull any stray threads through the back layers of the tapestry. Tie knots where necessary, ensuring the tapestry structure stays sound.
- Cutting and Cleaning: Once all ends are secured, trim excess yarn for a neat finish. Leave tassels as desired.
- Removing from the Table Loom: Carefully release the tapestry by untying and cutting the warp ends. I interlocked the front by crossing strings and tying them to ensure everything remained intact.
Displaying Your Artwork
To hang your tapestry:
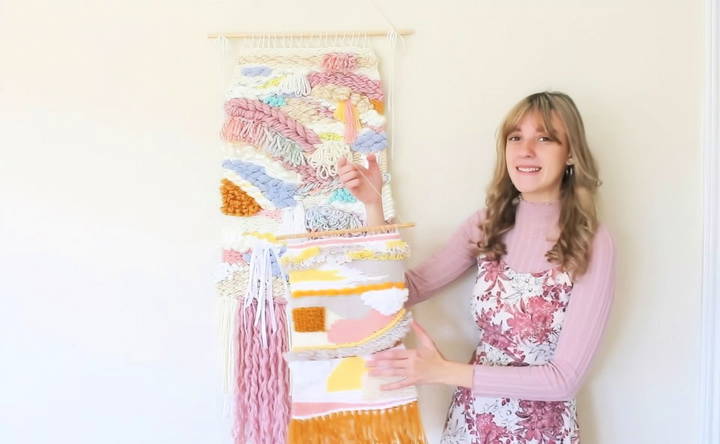
- Attaching to the Dowel Rod: Thread a string through the tapestry top, wrapping around the dowel. Secure each end and ensure it hangs evenly.
- Hanging: I opted for yarn on each side of the dowel as hanging points. Depending on the weight and style, nails or hooks under the rod ends could work elegantly too.
Creative Design Ideas
Making a tapestry is not just about weaving threads together; it's an opportunity to express your creativity and personal style. Here are some ideas to inspire your next tapestry project:
Inspiration Gallery
Explore different designs to spark your creativity. Here are a few ideas:
- Nature Scenes: Capture the beauty of landscapes, flowers, or animals. Think about a serene forest, a blooming garden, or a majestic eagle.
- Abstract Patterns: Play with shapes, lines, and colors. Abstract designs can be as simple or complex as you like.
- Cultural Motifs: Incorporate traditional patterns from various cultures. For example, you could use geometric designs from Native American art or intricate patterns from Persian rugs.
Customization Tips
Personalizing your tapestry makes it unique. Here are some ways to add your own touch:
- Color Choices: Select colors that match your home decor or your personal preferences. Don't be afraid to experiment with bold and contrasting colors.
- Textures: Use different types of yarn to make varied textures. For example, mix wool with silk or cotton to add depth and interest.
- Embroidery: Add embroidered details to your tapestry. This can highlight certain areas and add a three-dimensional effect.
Seasonal Themes
Make tapestries that reflect the seasons:
- Spring: Use pastel colors and floral designs to capture the essence of spring.
- Summer: Bright colors and beach scenes can bring a summer vibe to your home.
- Autumn: Warm tones and leaf patterns are perfect for autumn.
- Winter: Cool colors and snowflake designs can make a cozy winter tapestry.
Storytelling Through Tapestry
Tell a story with your tapestry. This could be a personal story, a myth, or a historical event. Use different sections of the tapestry to represent different parts of the story.
Incorporating Modern Elements
Blend traditional tapestry techniques with modern elements:
- Geometric Shapes: Use clean lines and geometric shapes for a contemporary look.
- Minimalist Designs: Sometimes, less is more. Simple, minimalist designs can be very effective.
- Mixed Media: Combine tapestry with other art forms, such as painting or digital prints.
Experiment with Sizes
Don't limit yourself to standard sizes. Experiment with different dimensions:
- Mini Tapestries: Small tapestries can be used as wall hangings, table runners, or even bookmarks.
- Large Tapestries: Make a statement piece that covers an entire wall.
Collaborative Projects
Work on a tapestry with friends or family. Each person can contribute a section, making it a meaningful and collaborative piece of art.
By exploring these creative design ideas, you can make your tapestry projects more exciting and personal. The most important thing is to have fun and let your creativity flow!
Common Mistakes and How to Avoid Them
Making a tapestry can be a rewarding experience, but beginners often encounter some common pitfalls. Here are some mistakes to watch out for and tips on how to avoid them:
Choosing the Wrong Materials
Mistake: Using low-quality or inappropriate materials can lead to a disappointing final product.
How to Avoid:
- Research: Spend time researching the best types of yarn and fabric for your project.
- Quality Over Quantity: Invest in high-quality materials, even if they are more expensive. They will make a big difference in the final look and durability of your tapestry.
Ignoring Tension Control
Mistake: Uneven tension can cause your tapestry to warp or have an inconsistent texture.
How to Avoid:
- Practice: Practice maintaining even tension before starting your main project.
- Check Regularly: Frequently check your work to ensure the tension is consistent throughout.
Skipping the Planning Stage
Mistake: Diving straight into weaving without a plan can lead to a chaotic and unbalanced design.
How to Avoid:
- Sketch Your Design: Make a detailed sketch of your design before you start.
- Color Planning: Plan out your color scheme and make sure you have all the necessary materials.
Not Securing Ends Properly
Mistake: Loose ends can unravel and ruin your tapestry.
How to Avoid:
- Secure Ends: Make sure to secure all ends properly as you go.
- Weave in Ends: Weave in the ends neatly to prevent them from coming loose.
Overcomplicating the Design
Mistake: Trying to incorporate too many elements can make your tapestry look cluttered and unfocused.
How to Avoid:
- Keep It Simple: Start with a simple design, especially if you are a beginner.
- Focus on Key Elements: Choose a few key elements to highlight rather than trying to include everything.
Neglecting to Block the Finished Tapestry
Mistake: Not blocking your tapestry can result in a misshapen final product.
How to Avoid:
- Block Your Tapestry: After finishing, block your tapestry to ensure it lays flat and retains its shape.
- Follow Instructions: Follow the specific blocking instructions for the materials you used.
Inconsistent Weaving Techniques
Mistake: Using inconsistent weaving techniques can make an uneven texture.
How to Avoid:
- Stick to One Technique: Stick to one weaving technique throughout your project.
- Practice Different Techniques: Practice different techniques on small samples before incorporating them into your main project.
Not Taking Breaks
Mistake: Working for long periods without breaks can lead to fatigue and mistakes.
How to Avoid:
- Take Regular Breaks: Take regular breaks to rest your eyes and hands.
- Stay Relaxed: Keep a relaxed posture to avoid strain and fatigue.
You can make a beautiful and professional-looking tapestry by being aware of these common mistakes and following these tips.
FAQs About How to Make a Tapestry
Discover top FAQs about how to make a tapestry, including essential techniques, materials, and tips for beginners and experts alike.
Here are three basic weaving techniques:
Plain weave: Over one warp thread, under the next, and repeat.
Twill weave: Over two warp threads, under one, and repeat.
Rya knots: Make tassels by tying knots with weft threads.
To add colors and patterns:
Plan your design: Sketch your pattern or use a template.
Change colors: When you want to switch colors, end the current thread and start a new one. Leave a small tail at the back to secure it.
Incorporate patterns: Use different weaving techniques to make patterns. For example, alternate colors in a plain weave to make stripes.
To finish your tapestry:
Secure the ends: Tie off the weft threads at the back.
Remove from the loom: Carefully cut the warp threads and tie them off to prevent unraveling.
Hang your tapestry: Attach a dowel or stick to the top for hanging.
Here are a few common mistakes and how to avoid them:
Uneven tension: Make sure your warp threads are evenly spaced and taut. Uneven tension can cause your tapestry to warp.
Skipping warp threads: Pay close attention to your weaving pattern to avoid accidentally skipping warp threads.
Not securing ends: Always secure the ends of your weft threads to prevent unraveling.
To keep your tapestry looking its best:
Avoid direct sunlight: Prolonged exposure to sunlight can fade the colors.
Clean gently: Use a soft brush or vacuum with a gentle attachment to remove dust.
Store properly: If you need to store your tapestry, roll it up with acid-free paper to prevent creases and damage.
Final Reflection
The tapestry-making journey without a loom proved to be an enriching artistic exercise. Not only did I end up with a stunning piece of wall art, but I also learned to embrace flexibility and innovation in art-making. The absence of a traditional loom didn't hinder the creative process, but rather, it invited new techniques and resourcefulness.
By making your own DIY tapestry, not only do you develop weaving skills, you also cultivate creativity. This experience is simple enough for beginners yet provides enough scope for seasoned crafters to experiment with. Enjoy weaving your own tapestry and the touch of handcrafted uniqueness it adds to your space.


