Starting a DIY vegetable garden was one of the best decisions I made. I remember feeling both excited and overwhelmed at the same time. The thought of growing my own food was thrilling. I began by choosing a sunny spot in my backyard, as vegetables need lots of sunlight to thrive. Planning my garden layout was crucial, ensuring enough space for all my plants.
Building the vegetable garden step-by-step made it simple. First, I prepared the soil by removing any weeds and adding compost. This gave my vegetables the nutrition they needed. I planted seeds according to each plant's needs, ensuring they had enough space to grow. Watering regularly and keeping an eye on pests helped my garden flourish.
Starting your own vegetable garden can be rewarding. Follow these steps to ensure a fruitful harvest. I'm here to help you start planting and growing your own vegetables today. Let this guide be your first step to home gardening.
Materials Needed and Why
- Two 8-foot boards: These serve as the perimeter of your raised bed. Opt for untreated wood to avoid chemicals leaching into your soil.
- One 1-by-1 stake: This will be cut into pieces to help anchor your bed into the ground, providing stability.
- Saw: To cut your wood to the correct sizes.
- Drill: For assembling the pieces together with screws.
- Two-inch deck screws: These will hold your boards and stakes together firmly.
- Pencil and Measuring Tape: Essential for marking your cuts accurately.
Each material plays a crucial role in the creation of a sturdy and durable raised bed that can withstand the elements and the weight of soil and plants.
Step by Step Instructions
Learn DIY vegetable garden with step-by-step instructions from cutting boards to planting veggies. This is the perfect guide for making your own raised bed garden.
Step 1: Cutting Your Boards
The first step involves cutting your 8-foot boards to size. Measure and mark a 12-inch section from the edge of each board; this piece will serve as the ends of your raised bed, making a rectangular shape when assembled. Remember, precision is key, so measure twice, cut once.
Step 2: Preparing the Stakes
Next, mark your 1-by-1 stake into four 12-inch pieces. Cut these out, and at one end of each, make two 45-degree angle cuts. These angled cuts will help you drive the stakes into the ground more easily, anchoring your raised bed securely.
Step 3: Assembling the Frame
Now, start assembling your frame by screwing a stake to the end of one of the 7-foot boards. Ensure the flat side of the stake is flush with the edge of the board for a neat finish. Repeat this process, attaching the other boards and stakes to form a rectangular frame. It doesn't matter which direction the pointed ends of the stakes face, but consistency can give your project a cleaner look.
Step 4: Positioning Your Raised Bed
Choose a sunny spot in your garden for your raised bed. Place your frame and lightly hammer it into the ground to mark each corner's position. Remove the frame, then hammer a dummy stake into each mark to build pilot holes. This makes placing your raised bed easier and helps to ensure it's level.
Step 5: Filling Your Raised Bed
Before filling your bed with soil, consider mixing in sphagnum peat moss and compost with your native soil to improve its structure and fertility. I recommend using a garden tiller claw to mix these components thoroughly. Proper soil preparation is critical for the health of your future plants.
Step 6: Planting Your Veggies
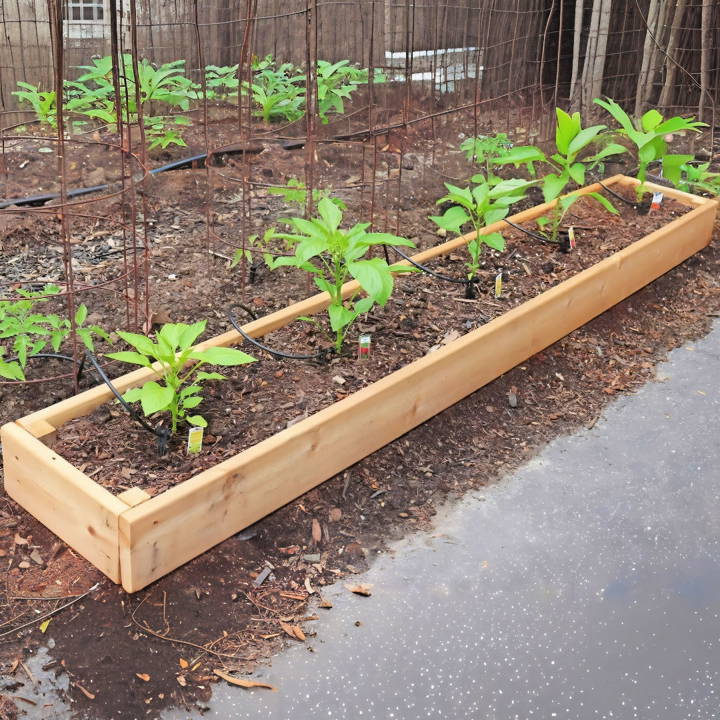
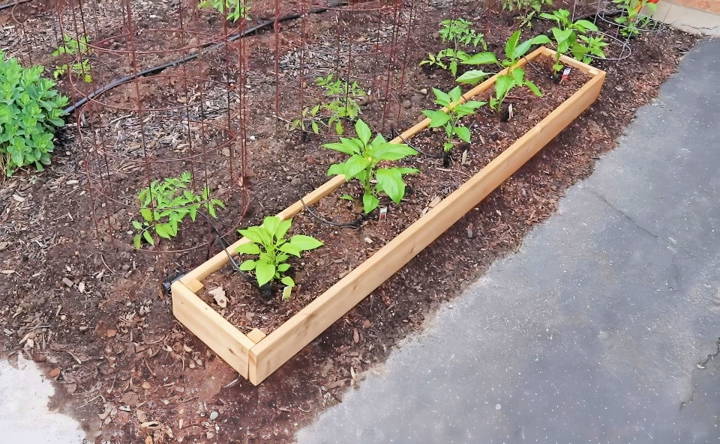
For this raised bed, I chose sweet peppers. They're a bit root bound from the garden center, but that's manageable. Plant them after loosening the soil at the bottom of your planting hole. I experimented with biodegradable pots by planting one pepper directly with the pot and removing the pot for another to observe the growth difference. Ensure pots are fully buried to prevent moisture loss.
Space your plants appropriately; I found 18 inches apart works well for sweet peppers. They'll grow to fill the space beautifully, making a lush, productive raised bed.
How to Start a Vegetable Garden
Starting your own vegetable garden is a rewarding way to enjoy fresh, homegrown produce. Follow these steps to get started:
- Choose a Location: Select a spot that receives at least 6-8 hours of direct sunlight daily. Ensure the soil is well-draining and not prone to flooding.
- Prepare the Soil: Remove any weeds or grass from the area. Loosen the soil with a shovel or garden fork and mix in compost or other organic matter to improve fertility and drainage.
- Decide What to Plant: Choose vegetables that you enjoy eating and that are well-suited to your climate and growing season. Consider factors like space availability, sunlight requirements, and water needs.
- Plant Your Vegetables: Follow the spacing recommendations on seed packets or plant labels. Water your plants regularly, especially during dry periods.
- Care for Your Garden: Weed regularly to prevent competition for nutrients and water. Mulch around plants to retain moisture and suppress weeds.
- Harvest and Enjoy: Harvest your vegetables when they are ripe, and enjoy the fruits of your labor!
Additional Tips:
- Start small and gradually expand your garden as you gain experience.
- Consider using raised beds or containers if you have limited space or poor soil.
- Protect your plants from pests and diseases using organic methods whenever possible.
- Rotate your crops each year to prevent soil depletion and disease buildup.
Starting a vegetable garden can be a fun and rewarding experience for the whole family. With a little planning and effort, you can enjoy fresh, homegrown produce all season long.
Garden Design Ideas
Building a vegetable garden is not just about planting seeds and waiting for them to grow; it's about designing a space that is both beautiful and functional. Here are some garden design ideas that can help you build a thriving and visually appealing vegetable garden:
- Choose the Right Location: Your garden should be in a spot that gets at least 6 to 8 hours of sunlight per day. Make sure it's also close to a water source and protected from strong winds.
- Plan Your Layout: Sketch out your garden layout before you start planting. Consider raised beds or containers if you have limited space. They can help improve drainage and make it easier to manage your plants.
- Incorporate Pathways: Include pathways in your design to make it easy to access your plants for watering and harvesting. Gravel, wood chips, or stepping stones can be used to build attractive and functional paths.
- Select Your Plants Wisely: Choose a mix of vegetables that you like to eat and that grow well in your climate. Consider the height and spread of each plant to avoid overcrowding and to ensure each plant receives enough sunlight.
- Use Vertical Space: If you're short on space, go vertical. Trellises, stakes, and cages can support climbing plants like tomatoes, cucumbers, and beans, adding dimension to your garden.
- Add Companion Plants: Some plants, when grown together, can help deter pests and diseases. For example, marigolds can repel nematodes, and basil can help ward off tomato pests.
- Consider Aesthetics: Your vegetable garden can be a place of beauty. Add flowers to attract pollinators and add color. Arrange plants in patterns or groupings based on color or texture for visual interest.
- Mulch Your Beds: Mulching helps retain moisture, suppress weeds, and improve soil quality. Organic mulches like straw or wood chips can also add to the aesthetic appeal of your garden.
- Rotate Crops Annually: To prevent soil depletion and reduce disease risk, rotate your crops each year. This means planting different types of vegetables in different areas of your garden each season.
- Keep It Organic: Avoid using chemical pesticides and fertilizers. Opt for organic options to keep your garden healthy and safe for consumption.
Use these design tips to turn your backyard into a productive, pleasant vegetable garden. Plan, care, and add creativity for success!
Seasonal Planting Calendar
A seasonal planting calendar is a gardener's best friend. It guides you on when to sow and transplant your vegetables to ensure they grow healthy and yield a bountiful harvest. Here's a simple guide to help you plan your vegetable garden throughout the year:
- Spring Planting: As the frost thaws, it's time to start your garden. Begin by planting cool-weather crops like lettuce, peas, and spinach. These can be sown directly into the soil as soon as it's workable.
- Summer Planting: This is the season for warm-weather vegetables. Tomatoes, peppers, cucumbers, and beans thrive in the heat. Start these indoors in early spring or plant them outside when the danger of frost has passed.
- Fall Planting: As the weather cools, you can plant a second round of cool-weather crops. Carrots, beets, and broccoli planted in late summer will mature in the fall.
- Winter Planning: Use this time to plan next year's garden. Research new vegetables you'd like to try, order seeds, and sketch out your garden layout.
Planting times can vary based on your local climate. To get the most accurate information, enter your location into a gardening calendar tool.
Troubleshooting Common Issues
When tending to a vegetable garden, encountering challenges is a part of the growing process. Here's a guide to help you identify and resolve some common gardening issues:
- Pests: Pests can be a nuisance, but they can often be managed without harsh chemicals. For aphids, a strong jet of water can knock them off plants. Neem oil or insecticidal soaps can also be effective. For larger pests like rabbits or deer, consider physical barriers such as fencing or netting.
- Diseases: Keep an eye out for signs of disease, such as discolored leaves or stunted growth. Ensure good air circulation by not overcrowding plants and water at the base to keep foliage dry. Remove and dispose of any diseased plants to prevent the spread.
- Weeds: Weeds compete with your vegetables for nutrients and water. Mulching around your plants can help suppress weeds. If weeds do appear, pull them out by hand before they have a chance to seed.
- Poor Soil: Vegetables thrive in rich, well-draining soil. If your soil is poor, consider adding compost or well-rotted manure to improve its quality. Regularly test your soil's pH and nutrient levels to ensure it's optimal for vegetable growth.
- Watering Issues: Overwatering can lead to root rot, while underwatering can stress plants. Use a rain gauge to monitor how much water your garden is getting. Water deeply and less frequently to encourage strong root development.
- Nutrient Deficiencies: Yellowing leaves or poor fruit production can indicate a lack of nutrients. Use a balanced organic fertilizer to feed your plants, and consider adding specific nutrients like nitrogen or potassium based on your soil test results.
- Sunlight Problems: Too much or too little sunlight can affect plant growth. If your garden is too shady, grow shade-tolerant vegetables like lettuce or spinach. If it's too sunny, use shade cloth to protect sensitive plants during the hottest part of the day.
Stay vigilant and proactive to keep your vegetable garden healthy. Healthy plants are less prone to issues, so care for them well from the beginning.
FAQs About DIY Vegetable Garden
Discover answers to common questions in faqs about DIY vegetable garden. Learn essentials for a thriving home-grown veggie patch.
Starting a DIY vegetable garden is a rewarding experience. Begin by choosing a sunny spot in your yard, as most vegetables thrive in full sun. Next, test your soil to understand its type and what amendments it might need. If you’re limited on space, consider raised beds or container gardening. Start small to manage your garden easily and expand as you gain more experience.
For beginners, it’s best to start with vegetables that are easy to grow and resilient. Some great options include lettuce, radishes, tomatoes, zucchini, and peppers. These vegetables don’t require too much special care and can give you a quick sense of accomplishment.
To have a productive garden throughout the year, consider using a cold frame or greenhouse to extend the growing season. You can also practice succession planting, where you plant new crops as others are harvested. Additionally, choose varieties that are suited to different seasons and use mulch to protect your soil.
The watering needs of your vegetable garden depend on the weather and soil type. A general rule is to provide 1 inch of water per week. It's important to keep the soil consistently moist but not waterlogged. Early morning is the best time to water, allowing the plants to dry before evening.
Absolutely! Compost is an excellent way to feed your soil and provide nutrients for your plants. You can make your own compost from kitchen scraps and yard waste. Spread a layer of compost on your garden beds to improve soil structure and fertility.
Final Thoughts
Taking those initial steps in making a DIY vegetable garden was easier than I thought. Follow the tips given, and you'll soon enjoy fresh, home-grown veggies.


