Making your own DIY walking stick can be a rewarding experience. I remember the first time I decided to make one for myself. I wanted something sturdy yet personal. I gathered some simple tools and a nice piece of wood. As I worked, I felt a sense of pride, knowing that I was crafting something useful with my own hands.
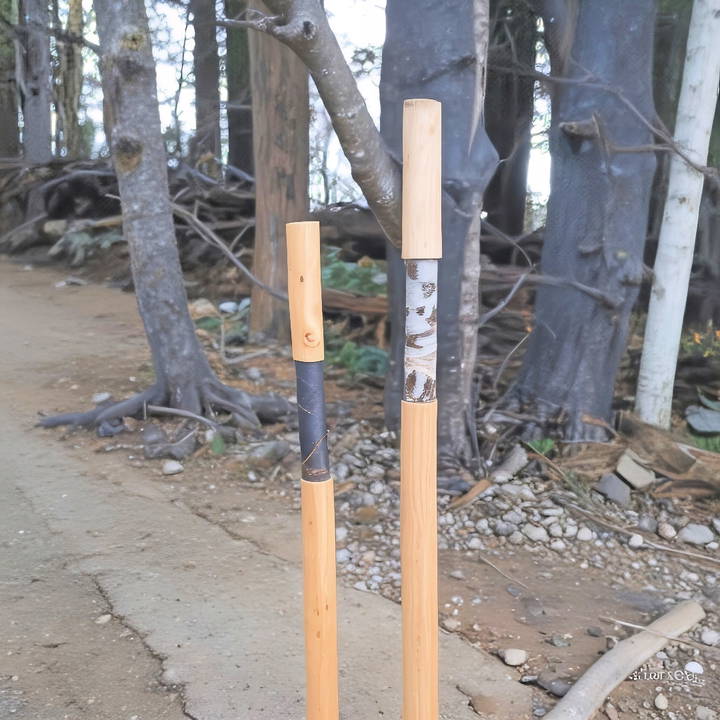
As I shaped the wood and added a comfortable grip, I realized how important it was to have a walking stick that fit me just right. The process was simple but fulfilling. I ended up with a stick that not only supported my walks but also carried memories of the time spent making it. I hope you take on this project too, as it will help you build something special.
Why Use a Walking Stick?
- Stability and Balance: Walking sticks provide an extra point of contact with the ground, enhancing stability. They are particularly helpful for individuals with balance issues, seniors, or anyone recovering from an injury.
- Reduced Strain: By distributing weight more evenly, walking sticks reduce strain on joints, especially knees and ankles.
- Support on Various Terrains: From rocky trails to sandy beaches, a walking stick offers support and confidence across diverse landscapes.
- Posture Improvement: Holding a walking stick encourages an upright posture, preventing slouching and promoting better spinal alignment.
- Dual Purpose: Beyond functionality, walking sticks can be beautiful accessories, reflecting your personal style.
Brief History of Walking Sticks
- Ancient Times: Walking sticks date back to ancient civilizations. Egyptians, Greeks, and Romans used staffs for support and status.
- Medieval Europe: Nobility and pilgrims carried ornate walking sticks as symbols of authority or spiritual journeys.
- 19th Century: The Victorian era saw a surge in decorative canes, often concealing hidden compartments.
- Modern Times: Today, walking sticks serve practical purposes while embracing creativity and individuality.
Types of Walking Sticks
Discover the different types of walking sticks: traditional wooden sticks, folding sticks, fashionable canes, and hiking poles for every need and style.
Traditional Wooden Sticks:
- Crafted from hardwoods like oak, hickory, or chestnut.
- Simple, elegant designs with natural finishes.
- Ideal for hiking, casual walks, and everyday use.
Folding Sticks:
- Convenient for travel or storage.
- Collapsible design with adjustable height.
Fashionable Canes:
- Often made of lightweight materials like aluminum or carbon fiber.
- Stylish handles, including ergonomic grips and animal-shaped tops.
Hiking Poles:
- Designed for rugged outdoor adventures.
- Feature shock-absorbing mechanisms and interchangeable tips.
Choosing Your Walking Stick
Consider the following factors:
- Height: The stick should reach your wrist when your arm hangs naturally by your side.
- Material: Opt for durability (wood), lightweight convenience (aluminum), or specialized features (hiking poles).
- Handle: Choose a comfortable grip—straight, curved, or ergonomic.
- Tip: Rubber tips provide traction on hard surfaces, while metal tips are better for trails.
Your walking stick isn't just a tool—it's part of your journey. Whether in forests, parks, or enjoying fresh air, it supports you every step.
Materials Needed and Their Purpose
- A Fallen Branch or Tree Top: Look for one that's dried out, as it's lighter and more resistant to rot. I chose a spruce tree top that had already fallen, ensuring it was environmentally friendly.
- Paint Scraper: This is useful for removing the bark easily. It's important to expose the wood beneath for sanding and finishing.
- Sandpaper: You'll need different grits, starting with a rough grit to remove imperfections and finishing with a fine grit for a smooth polish. Sanding removes splinters and prepares the wood for finishing.
- Measuring Tape: Essential for determining the length of the walking stick, ensuring it fits your height and grip comfortably.
- Saw: For cutting your chosen wood to the desired length of your walking stick.
- Paracord: For making a grip that's not only comfortable but also durable. I opted for black to match my aesthetics.
- Wood Finish: To protect the walking stick and enhance its natural beauty. I used a water-based acrylic stain and polyurethane for durability.
- Lighter: For sealing the end of the paracord to prevent fraying.
Step by Step Instructions
Learn how to make a DIY walking stick with our step-by-step guide. From selecting wood to adding a paracord grip, get tips for finishing touches.
Step 1: Selecting and Preparing the Wood
After a refreshing walk through the nearby woods, I found the perfect fallen spruce tree top. Its length allowed me to choose the straightest, most appealing part. Using a saw, I cut it down to a rough length of a little over six feet, giving me ample wood to work with.
Step 2: Measuring and Cutting to Length
For a personalized touch, your walking stick should reach about the middle of your forearm when your arm is resting at a 90-degree angle at your side. I'm about 5'9", so I measured and marked the wood to a total length of 54 inches. This took into account the handle and a little extra on top for wrist support.
Step 3: Removing Bark and Sanding
With my paint scraper in hand, I removed the bark gently. It was a satisfying process, revealing the wood's natural grain. I then progressed through various sandpapers, starting with a 60-grit to tackle the rough spots, and finishing with a 220-grit for a smooth surface.
Step 4: Refining the Design
To add a unique touch, I decided to taper the bottom of the stick slightly and carve a groove at the top for the paracord grip. Carefully, I sanded down the base to about an inch in diameter, and for the grip, I used a small carving knife to etch out a recess.
Step 5: Finishing the Wood
Choosing a finish was an essential step to protect the walking stick and bring out the wood's natural beauty. I applied a coat of the water-based acrylic stain, allowing it to dry thoroughly before adding several layers of polyurethane for a satin finish. This not only protected the wood but also enhanced its grain and color.
Step 6: Adding the Paracord Grip
For the grip, I used about five feet of black paracord. Starting with a clove hitch knot at the bottom of the handle section, I proceeded with a series of tight half hitches to build a spiral pattern around the grip area. This technique provided a comfortable, secure grip that felt great in the hand.
Step 7: Final Touches
Once the paracord grip was in place, I trimmed any excess and sealed the ends with a lighter. This prevented fraying and ensured the knots wouldn't come undone. For a personalized touch, I carved my initials at the base of the handle before applying the final coat of polyurethane.
Customization Ideas for Your DIY Walking Stick
Making a walking stick that reflects your personality and style can be a rewarding experience. Here are some ideas to help you customize your walking stick:
Choose Your Style
- Traditional: Keep it classic with a smooth finish and a curved handle.
- Rustic: Leave the bark on or lightly sand it for a natural look.
Carving and Whittling
- Patterns: Add simple rings or spiral grooves along the shaft.
- Symbols: Carve meaningful symbols or initials into the wood.
Painting and Staining
- Colors: Use wood stains or paints to add color while highlighting the wood grain.
- Designs: Paint landscapes, animals, or abstract art on your stick.
Handle Customization
- Ergonomic Grip: Shape the handle to fit comfortably in your hand.
- Decorative Tops: Attach a carved animal head or a beautiful stone to the top.
Accessories
- Wrist Straps: Add a leather or woven strap for convenience and security.
- Metal Tips: Fit a metal tip at the bottom for better traction and durability.
Personal Touches
- Inscriptions: Burn or inscribe a favorite quote or important date.
- Beads and Charms: Thread beads or charms onto a leather thong and wrap it around the stick.
Finishing Touches
- Sealant: Apply a sealant to protect your design and enhance the wood's natural beauty.
- Rubber Feet: Consider adding a rubber foot to the bottom for extra grip on hard surfaces.
Make your walking stick personal and functional. Plan carefully, execute your design, and enjoy the process. It's a reflection of your creativity and journey.
Troubleshooting Common Issues with DIY Walking Sticks
When crafting your own walking stick, you might encounter some common issues. Here's a helpful guide to troubleshoot and resolve them, ensuring your walking stick is both durable and reliable.
Wood Cracks or Splits
- Cause: Wood drying too quickly or unevenly.
- Solution: Seal the ends of the stick with wax or a wood sealer to slow down the drying process. Store the stick in a cool, dry place away from direct sunlight.
Loose Handle or Headpiece
- Cause: Inadequate gluing or wood shrinkage.
- Solution: Re-glue using a strong wood adhesive. Clamp the pieces together until the glue sets completely, usually 24 hours.
Rough or Uneven Finish
- Cause: Insufficient sanding or debris in the finish.
- Solution: Sand the stick progressively using finer grits until smooth. Clean the stick thoroughly before applying any finish.
Fading or Discoloration
- Cause: Exposure to elements or UV light.
- Solution: Apply a UV-resistant finish or varnish. Store the walking stick out of direct sunlight when not in use.
Worn or Damaged Tip
- Cause: Frequent use on hard or abrasive surfaces.
- Solution: Attach a metal or rubber tip to protect the wood. Replace the tip when it shows signs of wear.
Stick Feels Unstable
- Cause: Incorrect length or balance.
- Solution: Ensure the stick is the right height for your use. If necessary, trim the stick from the top and reattach any handle or headpiece.
Mold or Mildew
- Cause: Storing in damp conditions.
- Solution: Clean the stick with a mild bleach solution or vinegar. Allow it to dry completely in a well-ventilated area.
Insect Damage
- Cause: Wood-boring insects.
- Solution: Treat the wood with an insect repellent suitable for the type of wood. Store the stick in a dry environment to prevent infestation.
Addressing these issues ensures your DIY walking stick is sturdy and dependable for all walks and hikes.
Safety Tips for Crafting Your DIY Walking Stick
When making your own walking stick, safety is paramount. Here are some straightforward tips to ensure you craft your walking stick without any mishaps:
Selecting the Right Wood
- Choose Dead Wood: Always opt for dead but not decayed wood. Never cut from a living tree.
- Avoid Insect Damage: Inspect the wood for holes or insect damage, as this can weaken the stick.
Preparing Your Workspace
- Keep It Clean: Maintain a tidy workspace to avoid tripping or losing tools.
- Light It Up: Ensure good lighting to see what you're working on clearly.
Using Tools Safely
- Sharp Tools: Keep cutting tools sharp; dull blades can slip and cause accidents.
- Protective Gear: Wear safety goggles and gloves to protect your eyes and hands.
- First Aid: Keep a first aid kit nearby in case of minor cuts or scrapes.
Cutting and Carving
- Secure the Wood: Clamp the wood down to prevent it from moving while you work.
- Controlled Cuts: Make small, controlled cuts to reduce the risk of slipping.
- Focus: Never carve or cut while distracted. Always pay attention to your hands and the tool's path.
Sanding and Finishing
- Dust Mask: Wear a dust mask to avoid inhaling sawdust while sanding.
- Ventilation: Work in a well-ventilated area when applying stains or sealants to avoid fume inhalation.
Assembly and Customization
- Glue Wisely: Use wood glue in a well-ventilated area and clamp parts securely until dry.
- Heat Sources: Be cautious when using heat sources for wood burning or bending.
General Safety
- Know Your Limits: If a task feels unsafe, seek help or use alternative methods.
- Stay Sober: Never work with tools if you're under the influence of alcohol or drugs.
- Children's Supervision: Always supervise children and teach them tool safety if they're involved in the crafting process.
Follow these safety guidelines to enjoy making your DIY walking stick safely. Take your time and work carefully for a successful, injury-free project.
FAQs About DIY Walking Stick
Explore our FAQs about DIY walking stick for tips, materials, and step-by-step guidance to build your custom walking stick today!
Select a piece of wood that’s as tall as your armpit when standing on the ground for optimal comfort. Hardwoods are recommended due to their strength and longevity. Look for wood that’s free of insect damage and has a diameter of about 1–2 inches. Freshly fallen branches are ideal, but never cut from a live tree as this can harm the environment.
Absolutely! Personalization can range from carving your initials to intricate designs. You can also add a wrist strap for convenience and safety, and choose to stain or varnish the wood to both protect it and enhance its natural beauty. Some people even write messages or attach emblems that have personal significance.
To maintain your walking stick, keep it dry and clean. Reapply varnish or oil periodically to protect the wood from moisture and wear. If you’ve added a rubber cap on the bottom, check it for wear and replace it when necessary to prevent damage to the wood. Store your walking stick in a cool, dry place when not in use.
To ensure your walking stick withstands the elements, it’s important to finish it properly. After sanding the wood smooth, apply a coat of wood sealer to protect against moisture. Once dry, follow up with multiple coats of a weather-resistant finish like spar urethane, which offers UV protection and flexibility to prevent cracking. Allow ample drying time between coats, and consider adding a final wax polish for extra sheen and protection.
The ideal height for your walking stick depends on your personal comfort and the intended use. For general walking, the stick should reach the height of your wrist when your arm is relaxed at your side. If you're using it for hiking, a slightly taller stick, up to shoulder height, can help with navigating uneven terrain. To measure, stand up straight and let your arms hang down; the top of the stick should align with your wrist crease. If in doubt, it's better to start with a longer stick, as you can always trim it down to size.
Conclusion: Enjoying the Outcome
In conclusion, building a DIY walking stick is both enjoyable and practical. It's a chance to express yourself while making something helpful for your walks. I encourage you to try it out; it's easier than you think! Just put your heart into it and enjoy the process.


