Starting a new craft can be exciting and sometimes a bit challenging. I remember when I decided to make clay earrings. I was drawn to the idea of making something unique and personal. With simple tools and easy-to-follow steps, I found it very rewarding. The polymer clay was easy to shape and bake, making it perfect for a beginner.
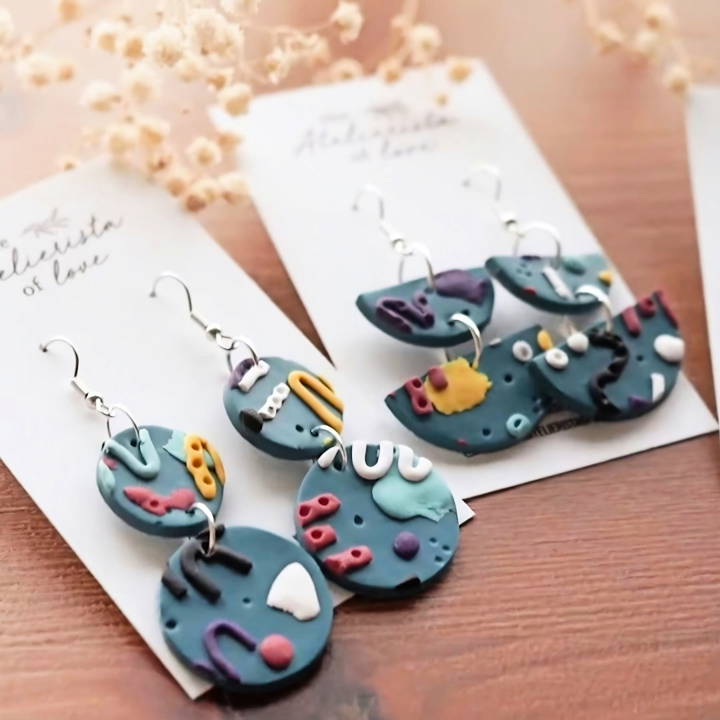
Experimenting with different colors and designs, I maked pieces for every occasion. The sense of accomplishment and joy I felt every time I wore my handmade clay jewelry was incredible. If you're eager to explore clay earring making, the following content will surely help you get started and succeed in this craft.
Get inspired and start making your own clay earrings. These tips and steps will guide you throughout the process. Enjoy the journey and make beautiful jewelry that reflects your style.
Gathering Your Materials
Before you begin, it's important to have all your materials ready. Here's what I used and why each item is necessary:
- Cutting Mat or Ceramic Tile: Provides a smooth, flat surface for working with the clay.
- Pasta Machine or Acrylic Rolling Pin: These tools are crucial for conditioning the clay, ensuring it's evenly flattened without air bubbles.
- Blade: For precisely cutting your clay.
- Dotting Tool or Old Chopsticks: These help in adding intricate details or handling small pieces of clay.
- Shape Cutters: For cutting the clay into various fun shapes.
- Sandpaper: For smoothing the edges of your clay after baking.
- Oven Thermometer: Ensures your oven is at the correct temperature to properly bake the clay.
- Pliers: Essential for attaching jump rings and findings.
- Findings (Jump Rings, Hooks, Posts, and Backings): The necessary hardware to turn your clay pieces into wearable earrings.
- Polymer Clay: I went with Premo for the base and Sculpey III for designs, as recommended in the tutorial I watched.
Step by Step Instructions
Learn how to make clay earrings with our step-by-step guide. Perfect for beginners, make unique, stylish jewelry at home with ease!
Conditioning Your Clay
The first step is conditioning your clay, which means preparing it to be molded and shaped. I chose a color for my base and ran it through my pasta machine, folding it in half and repeating the process several times. This step is vital as it removes any air bubbles that could weaken your earrings.
Designing Your Earrings
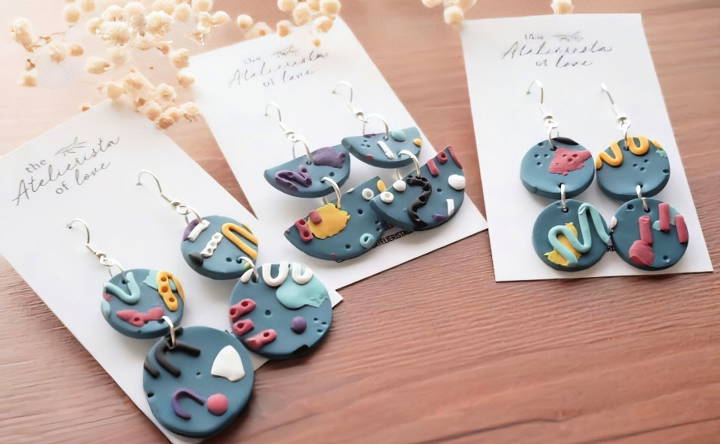
Designing was definitely the part where I could let my creativity flow. With my conditioned base ready, I began molding Sculpey III into various shapes and patterns to make a unique look. I learned that mixing colors and playing with abstract designs could really bring a piece to life. Don't be afraid to experiment here; it's all part of the fun!
Cutting and Baking
After I was satisfied with my design, I used shape cutters to cut out earring pieces, trying my best to include as much detail in each piece as possible. A critical tip to remember is to make the holes for your jump rings before baking; it's much easier than drilling post-bake.
Baking required careful attention. I preheated my oven to 130 degrees Celsius, using an oven thermometer to ensure accuracy. My pieces were baked on a ceramic tile for around 50 minutes, though keeping an eye on them was crucial to avoid any burning.
Finishing Touches
Post-baking, some of my edges were a bit rough, but sandpaper made quick work of smoothing them down. For assembling the earrings, jump rings were my best friend. I opened them with pliers, connected the pieces, and added the earring posts. This step was a bit fiddly but incredibly rewarding once I saw my earrings start to take shape.
Customization Ideas for Clay Earrings
Making clay earrings is not just about following a set of instructions; it's an opportunity to express your personal style and creativity. Here are some customization ideas to make your clay earrings truly one-of-a-kind:
Choose Your Colors
Start by selecting colors that reflect your personality or match your wardrobe. You can use a color wheel to find complementary shades or go for a monochromatic scheme with different tints and shades of the same color.
Add Textures
Textures can add depth and interest to your earrings. Use tools like toothpicks, lace, or stamps to imprint patterns onto the clay before baking. Experiment with different pressures and angles to see what effects you can make.
Mix and Match Shapes
Don't be afraid to play with various shapes. Combine circles, squares, and triangles to form geometric designs, or use cookie cutters for fun, thematic shapes like stars or hearts.
Incorporate Other Materials
Once your clay pieces are baked and cooled, consider adding other elements such as beads, feathers, or fabric. These can be glued on or attached with jump rings to add movement and contrast.
Personalize with Names or Initials
For a personal touch, etch names, initials, or meaningful dates into the clay before baking. This can make for a thoughtful gift or a special piece for yourself.
Experiment with Finishes
After baking, apply different finishes to your earrings. Glossy varnish can make colors pop, while a matte finish gives a more subtle, sophisticated look. You can also use metallic paints for a touch of glamour.
Handmade jewelry stands out for its uniqueness. Be bold and creative; your earrings will make a fashion statement.
Advanced Techniques for Crafting Clay Earrings
When you're ready to take your clay earring creations to the next level, advanced techniques can add sophistication and uniqueness to your designs. Here's how you can elevate your craft:
Using Liquid Clay
Liquid clay is a versatile medium that can be used as an adhesive, a glaze, or a painting medium. Try painting it onto your baked earrings to add a glossy finish, or mix it with pigments to make watercolor effects.
Making Canes
Canes are logs of clay that have a design running through them. You can slice the cane to reveal the pattern and apply these slices to your earrings. This technique requires precision, but the results are stunning and intricate.
Skinner Blend
The Skinner Blend is a technique used to make a seamless color gradient. By partially overlapping sheets of different colored clay and repeatedly passing them through a pasta machine, you can achieve a beautiful, blended effect.
Millefiori
Millefiori, meaning ‘thousand flowers' in Italian, is a technique where you make a complex cane that resembles a flower when sliced. This technique can be time-consuming but adds a delicate and detailed look to your earrings.
Silkscreening
Silkscreening on clay allows you to transfer intricate designs onto your earrings. You can use pre-made silkscreens or make your own to apply metallic or colored patterns.
Sanding and Buffing
After baking, sanding your earrings can remove any imperfections and make a smooth surface. Follow this with buffing, either by hand or with a machine, to achieve a glass-like finish.
Using Armatures
For larger or more complex shapes, use armatures—internal supports made from wire or foil—to maintain the shape during baking and prevent sagging.
Master these techniques to craft unique, professional earrings. Practice is key, so don't get discouraged. Your dedication will result in stunning, unique pieces showcasing your skills.
Troubleshooting Common Issues with Clay Earrings
When crafting clay earrings, you might encounter some challenges. Here's a guide to help you troubleshoot common issues in a straightforward and easy-to-understand manner.
Cracking During Baking
- Cause: Cracking can occur if the clay isn't conditioned properly or if there's a sudden change in temperature during baking.
- Solution: Ensure you're conditioning the clay thoroughly by kneading it until it's pliable. Bake your earrings in a preheated oven and avoid opening the door while baking.
Fingerprints on Clay
- Cause: Fingerprints can be left on the clay when handling it.
- Solution: To avoid fingerprints, work with clean hands and use tools like rollers or stamps for shaping. If fingerprints do appear, gently smooth them out with a rubber tool before baking.
Uneven Color After Baking
- Cause: This can happen if the clay is not mixed well or if the oven temperature is uneven.
- Solution: Mix the clay until the color is uniform. Use an oven thermometer to check for accurate temperature and consider rotating the piece halfway through baking.
Clay Earrings Are Brittle
- Cause: Brittle earrings may result from under-baking or using low-quality clay.
- Solution: Follow the recommended baking time and temperature for the clay you're using. Invest in high-quality polymer clay for better durability.
Difficulty Attaching Pieces
- Cause: Sometimes, it's challenging to attach different clay pieces securely.
- Solution: Use a small amount of liquid clay or bake-and-bond adhesive between the pieces. Press firmly and smooth the seams before baking.
Dust and Lint in the Clay
- Cause: Dust and lint can easily stick to clay, especially in a busy workspace.
- Solution: Work on a clean surface and store your clay and tools in sealed containers. You can also lightly roll adhesive tape over the clay to remove any debris.
By being aware of these common issues and knowing how to fix them, you'll be able to make beautiful, high-quality clay earrings with confidence.
FAQs About How to Make Clay Earrings
Get answers to your faqs about how to make clay earrings. Learn techniques, materials, and tips to make stunning handmade accessories.
Start by conditioning the clay, which means kneading it until it’s soft and pliable. You can use your hands or a pasta machine to roll out the clay into a thin sheet. If you’re adding designs or patterns, now is the time to do so before cutting out your earring shapes.
Once you’ve cut out your earring shapes and added any desired details, you’ll bake them in the oven. The temperature and time will depend on the type of clay you’re using, but it’s typically around 130 degrees Celsius for about 30 minutes to an hour. Always refer to the clay’s packaging for specific instructions.
After baking, you may notice some rough edges. Gently sand these down for a smooth finish. If you want to add extra shine or seal your designs, you can apply a glaze or varnish specifically made for polymer clay.
Once your clay pieces are baked and cooled, it's time to assemble them. Use a drill or a pin to make holes for the jump rings if you haven't done so before baking. Then, attach the earring backs with the jump rings using pliers, and secure them with a dab of superglue. Now your earrings are ready to wear or gift!
Selecting the appropriate clay is crucial for your earring project. Polymer clay is popular due to its durability and ease of use. Brands like Sculpey, Fimo, and Kato Polyclay offer a variety of colors and finishes. If you prefer a no-bake option, air-dry clay is a good alternative, though it may not be as sturdy as polymer clay. Consider the look and feel you want for your earrings when choosing your clay.
Final Thoughts
In conclusion, learning how to make clay earrings for any occasion is a rewarding and fun craft. You'll enjoy making unique designs that showcase your personal style. With these tips, you can craft beautiful earrings that will be perfect for every event. Happy crafting!


