Making Croc charms at home is a fun and easy activity that anyone can enjoy. The best part is, that you don't need many materials to get started, and you can make them look just the way you like. I've found that making DIY Jibbitz lets me add a personal touch to my Crocs, and it's a rewarding way to customize my footwear with unique designs.
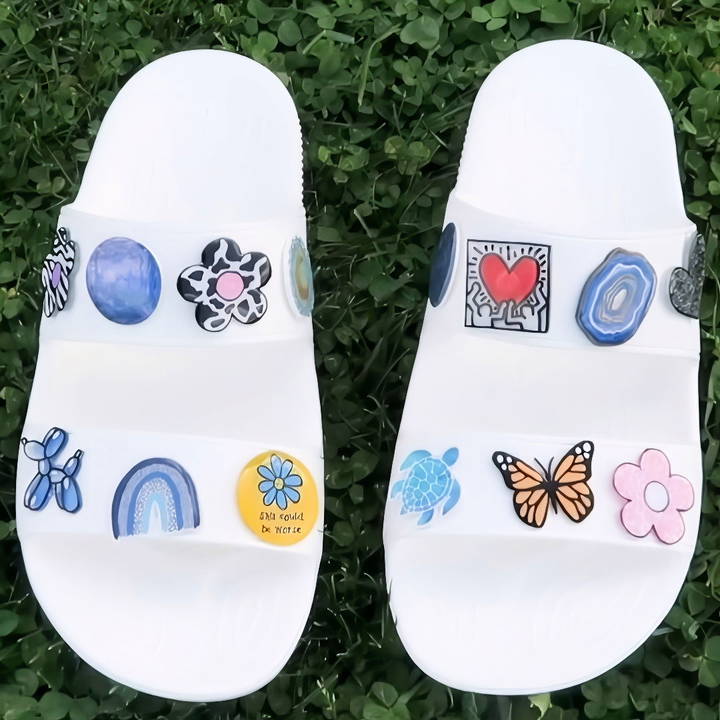
If you've ever wanted to personalize your Crocs, I'm here to help guide you through it. The steps I'll share are simple and straightforward, ensuring you can get creative without needing special skills. By following these tips, you'll be able to make your very own Croc charms in no time. I'm excited to help you make something special!
Introduction and Benefits of Croc Charms
Croc charms are decorative pieces that snap into Crocs shoes, letting you personalize your footwear. Both kids and adults enjoy them! Here's why they're popular:
- Express Yourself: Croc charms let you show off your interests, from your favorite colors and patterns to hobbies and favorite characters. It's like wearing your personality on your shoes!
- Easy to Use: Just push them into the holes on your Crocs, and voilà, you've got a new look. Want to change it up? Pop them out and swap them with different charms.
- Affordable Fashion: Unlike buying a new pair of shoes, Croc charms are a budget-friendly way to update your style. You can collect them without breaking the bank.
- Perfect for Gifts: Croc charms make excellent gifts. They're small, easy to mail, and you can find one that's just right for your friends and family.
- Durability: Made to last, these charms can go through daily wear and tear without losing their charm. They're as tough as your Crocs!
Croc charms are a fun, cheap way to jazz up your Crocs, perfect for any outing or just relaxing at home.
Materials Needed and Why
Before we jump into the crafting process, let's talk materials. Each item plays a crucial role in making durable, stylish Croc charms:
- Plastic Back Pieces: Essential for attaching the charm to the Croc holes. I chose clear ones from Amazon for their versatility, but black is a cheaper alternative.
- Shrinky Dinks: A magical material that shrinks in the oven. I used both clear and printable types for variety in design.
- Coloring Tools: Posca pens, alcohol-based markers, or Sharpies for decorating your Shrinky Dinks.
- UV Resin or Mod Podge: This seals your artwork, making it waterproof and durable.
- E6000 Glue: A strong adhesive to bond the plastic back pieces to your charms securely.
- Oven: For shrinking your Shrinky Dinks to the perfect size.
- Parchment Paper and Baking Sheet: Used in the oven to prevent the Shrinky Dinks from sticking.
Step by Step Instructions
Learn how to make DIY croc charms with shrinky dinks and polymer clay. Follow easy steps to personalize your crocs with unique, fun designs!
Step 1: Making Your Shrinky Dink Charms
I started with clear Shrinky Dinks. I found adorable images online, resized them to about 3 inches (knowing they'd shrink to about a third of their size), and printed them. Coloring on the rough side of the Shrinky Dinks is crucial; it traps the color and avoids chipping. After coloring, I cut out my designs, placed them on a parchment-lined baking sheet, and popped them in the oven at 325 degrees until they shrank and flattened.
Step 2: Sealing and Attaching the Backs
Once cooled, I coated each charm with UV resin for a glossy, durable finish. Then, using E6000 glue, I attached the plastic backs to each charm, making sure the bond was strong.
Alternative Method: Printable Shrinky Dinks
For a less hands-on coloring approach, I used printable Shrinky Dinks. I lightened my images to account for darkening during baking and printed them out. The process followed was similar to the clear Shrinky Dinks, resulting in vibrant, personalized charms after sealing and attaching the backs.
Step 3: Polymer Clay Charms
Seeking more complexity, I ventured into polymer clay, making geode-inspired designs. Mixing colors, molding, baking at 275 degrees for 15 minutes, and finally sealing with UV resin. The 3D effect was stunning and added a unique touch to my collection.
Design Inspiration
When it comes to personalizing your Crocs with charms, the possibilities are endless. Here's a treasure trove of ideas to spark your creativity and help you craft charms that are truly you:
- Nature's Palette: Draw inspiration from the great outdoors. Think about crafting charms shaped like leaves, flowers, or even your favorite animals. Imagine a tiny green turtle or a bright sunflower sitting on your Crocs.
- Characters and Icons: Are you a fan of a particular movie, book, or show? Make charms that represent your favorite characters or iconic symbols. A lightning bolt for the wizarding world fans or a small shield for superhero enthusiasts can be perfect.
- Seasonal Themes: Celebrate the seasons with your charms. Snowflakes for winter, blooming buds for spring, suns for summer, and pumpkins for fall. These timely designs can add a festive touch to your footwear.
- Personal Touch: Monograms and initials are a classic way to personalize items. Design charms with your initials or spell out your name. It's a simple yet elegant way to make your Crocs uniquely yours.
- Hobbies and Interests: Reflect your passions through your charms. If you love music, consider a tiny guitar or musical note. If you're into sports, how about a miniature ball or a tiny representation of your favorite team's logo?
- Color Play: Don't underestimate the power of color. Vibrant hues can transform the look of your Crocs. Mix and match colors to complement your outfit or express your mood.
- Texture and Material: Experiment with different textures and materials. Use glitter, metallic paint, or even fabric to add an extra dimension to your charms.
Have fun with your designs! Your Crocs are a canvas—let your imagination run wild. Make something that makes you smile every time you look at your feet!
FAQs About DIY Croc Charms
Discover answers to common questions about DIY croc charms. Learn how to make, customize, and personalize your own unique croc accessories.
Not at all! Making your own Croc charms can be a fun and easy DIY project. You can use simple methods like Shrinky Dinks, which involve printing and baking designs, or polymer clay, which you can mold and bake. Both methods allow for personalization and creativity.
Once your charms are made and fully dried or cooled, you can attach them to your Crocs. For Shrinky Dinks, you’ll glue the charm to a Jibbitz backing and let it dry for 24 hours. For polymer clay charms, ensure the back is flat and adhere them to a backing piece that fits into the holes of your Crocs.
Absolutely! Customization is the beauty of DIY. You can choose any design or color that reflects your personality. Whether it’s a favorite character, color, or pattern, your Croc charms can be as unique as you are.
Get creative with your designs! Consider making charms that represent your hobbies, like musical instruments for music lovers or paint palettes for artists. You can also commemorate special occasions with themed charms, like holiday symbols or graduation caps. Let your interests guide your creativity.
To ensure your DIY Croc charms endure, it's important to use quality materials and protective coatings. For Shrinky Dinks, use an inkjet printer for clear images and seal your charms with a clear acrylic spray to prevent fading. For polymer clay charms, bake them according to the clay's instructions for durability, and apply a clear varnish after painting to protect against wear and tear. Always allow your charms to dry completely before attaching them to your Crocs.
Final Thoughts
Now that you know the basics, it's time to get started with DIY Jibbitz and enjoy the process of customizing your Crocs. You'll find this is not only a creative activity but a relaxing one, too.


