Making custom LED tail lights is an exciting project. I remember when I first decided to change my car's look with new lights. It was an adventure that started with a vision. I wanted my car to stand out more and reflect my style. After doing some research, I discovered how DIY tail lights can be made using different materials and designs.
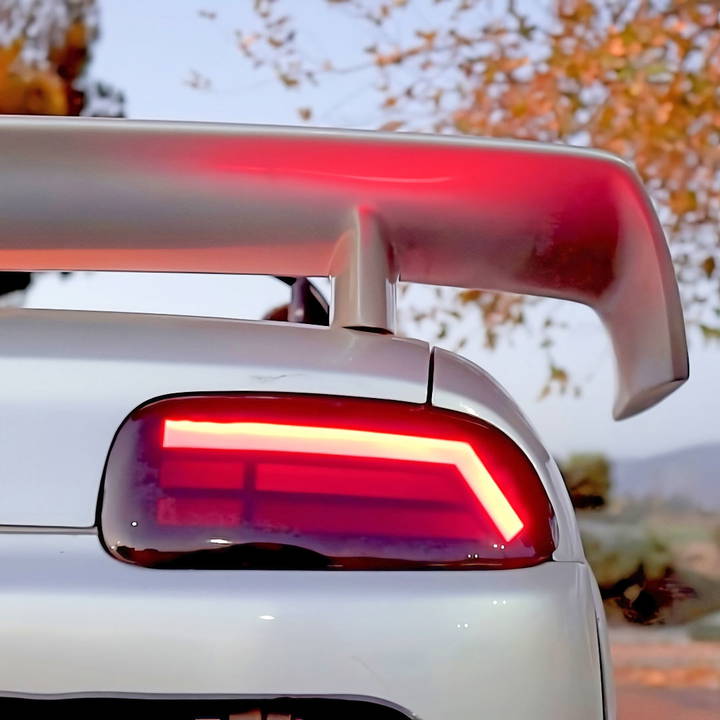
The process involved gathering supplies and carefully following steps. I learned to use LED strips, which are bright and energy-efficient. I also painted my tail light housing to match my car's color. Along the way, I faced some challenges, but it was rewarding to see my ideas come to life. If I can do it, you can too!
Start your journey into making custom DIY LED tail lights today. I'm helping with this because it can elevate your car's style and give you a sense of accomplishment.
Materials Needed and Their Purpose
Before delving into the process, it's crucial to gather all the necessary materials:
- Old Tail Light Housing: The base of our project.
- Three-Millimeter Red Acrylic Sheet: For crafting the new lens.
- Dremel Tool with Cutting Bit: For precise cutting of the housing and acrylic.
- Deburring Tool and 80 Grit Sandpaper: For smoothing cut edges.
- Oven or Heat Gun: To soften the butyl for lens removal and acrylic shaping.
- Plastic Prying Tool and Lock Ring Plier: For separating the lens from the housing.
- CA Glue and Activator: To bond the new lens to the old one.
- Painter's Tape and Adhesive Sealant: For sealing and bonding.
- LED Strips (2835 SMD): The light source for the new tail lights.
- Vinyl for Design: To make the desired light pattern.
- Wiring Supplies (22 Gauge Wire, Solder): For connecting LEDs to the car's power.
These materials were chosen for their suitability and effectiveness in making a durable and visually appealing LED tail light setup.
Step by Step Instructions
Discover how to make LED tail lights with step-by-step instructions. Ideal for DIY enthusiasts! Prep, seal, and finish your custom lights with ease.
Step 1: Preparing the Tail Light Housing
The first step involved removing the existing lens from the housing. I heated the unit to soften the butyl seal and carefully pried the two apart. Once separated, I marked and cut the housing to accommodate the new LED setup, ensuring not to compromise its structural integrity.
Step 2: Making the New Lens
Crafting the new lens required heating a piece of red acrylic until it became pliable, then shaping it over the old lens to retain the correct form. Precision was key in cutting out the new lens and ensuring a snug fit on the housing.
Step 3: Bonding the New and Old Lens
With the new lens shaped, I sanded and cleaned both it and the old lens's edges to prepare them for bonding. CA glue secured them together, and I used adhesive sealant to ensure a watertight seal.
Step 4: Designing the LED Panel
Next, I focused on the LED diffuser panel. I made a template of the housing interior to cut a clear acrylic piece, which I then frosted and shaped to fit inside the housing snugly. The design for the LEDs was cut from vinyl and applied to the diffuser to guide where the LEDs would sit.
Step 5: Assembling the LED Channels
I measured and cut roof flashing to make channels for each LED strip, ensuring separate sections for different light functions (brake, turn, reverse). After testing the LEDs, they were secured onto the diffuser panel, and I meticulously wired them, paying attention to polarity and connecting them to the car's light functions.
Step 6: Sealing and Finishing Touches
Finally, the LED assembly was placed inside the housing and sealed. I carefully reattached the modified lens to the housing, using butyl to ensure a firm seal. After reassembly, I tested the lights thoroughly to confirm proper operation.
Conclusion: A DIY Success
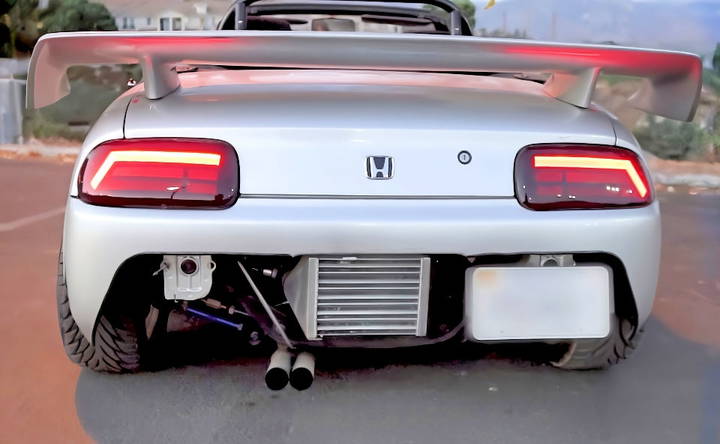
Though not a process for the faint-hearted, upgrading my Honda Beat's tail lights to LEDs was incredibly rewarding. It illuminated not just the car but also my ability to tackle such a detailed project. The result? A unique blend of old and new, making my Honda Beat stand out even more.
Troubleshooting and Common Issues
Making your own LED tail lights requires anticipating problems and knowing how to solve them. Here are common issues and solutions:
1. LEDs Not Lighting Up Properly
Discover why your LEDs are not lighting up properly. Learn about common causes and find effective solutions to get them working again.
Issue:
Your LEDs don't illuminate as expected.
Possible Causes:
- Incorrect Polarity: LEDs are polarized, meaning they have a positive (anode) and negative (cathode) lead. If you connect them backward, they won't light up.
- Faulty Wiring: Check your wiring connections. Loose or damaged wires can prevent proper current flow.
- Resistor Value: Incorrect resistor values can affect LED brightness. Ensure you've chosen the right resistor based on the LED specifications.
Solution:
- Double-check the polarity of each LED. The longer lead is typically the positive side.
- Inspect your wiring for loose connections or breaks. Solder any loose wires.
- Verify that the resistor value matches the LED's requirements.
2. Dim or Uneven Lighting
Dim or uneven lighting? Discover common causes and effective solutions to achieve perfect illumination in your home or office.
Issue:
Some LEDs appear dimmer than others, or the overall illumination is uneven.
Possible Causes:
- Voltage Drop: Long wire runs or inadequate power supply voltage can cause dimness.
- Current Imbalance: Uneven current distribution due to inconsistent wiring or resistor values.
- LED Quality: Low-quality LEDs may exhibit variations in brightness.
Solution:
- Minimize long wire runs by placing the LEDs closer to the power source.
- Use consistent wire gauges and lengths for all connections.
- Measure the current through each LED. Adjust resistor values if needed.
- Invest in high-quality LEDs for consistent brightness.
3. Flickering or Blinking LEDs
Discover causes and solutions for flickering or blinking le ds. Learn how to fix led issues and enjoy consistent lighting in your home or workspace.
Issue:
Your LEDs flicker or blink intermittently.
Possible Causes:
- Insufficient Power: Inadequate power supply or unstable voltage can cause flickering.
- PWM Interference: If using pulse-width modulation (PWM) for dimming, interference can lead to flickering.
- Loose Connections: Poor solder joints or loose wires can disrupt the circuit.
Solution:
- Ensure your power supply provides stable voltage within the LED's operating range.
- If using PWM, adjust the frequency to minimize interference.
- Recheck all connections and solder joints.
4. Overheating
Learn the main causes and solutions for the Overheating issue. Learn how to prevent and fix overheating problems effectively.
Issue:
Your LED tail lights become excessively hot during operation.
Possible Causes:
- High Current: Running LEDs at currents beyond their specifications generates excess heat.
- Inadequate Heat Dissipation: Insufficient heat sinks or poor ventilation.
- Enclosed Housing: If the LEDs are in a sealed enclosure, heat buildup can occur.
Solution:
- Use current-limiting resistors to prevent excessive current flow.
- Attach heat sinks to the LEDs if necessary.
- Ensure proper ventilation or consider using an open housing design.
5. Waterproofing Challenges
Tackle Waterproofing Challenges: Uncover common issues, possible causes, and effective solutions to keep your property safe and dry.
Issue:
Water can damage your LED tail lights.
Possible Causes:
- Exposed Components: If your tail lights are not adequately sealed, water can infiltrate.
- Improper Sealing: Poorly sealed joints or gaps allow water entry.
- Vibration: Frequent movement can compromise seals.
Solution:
- Seal all openings with waterproof silicone or rubber gaskets.
- Use heat shrink tubing to protect soldered connections.
- Test your tail lights under simulated wet conditions.
Troubleshooting is key in DIY. Be patient and methodical. Addressing common issues ensures your LED tail lights work reliably.
FAQs About How to Make LED Tail Lights
Explore FAQs on how to make led tail lights. Learn steps, materials, and tips for making your own led tail lights easily.
First, remove the old lens from the housing by heating it up and prying it off. Then, clean and sand the edges of the housing to prepare it for the new LED assembly. If you’re using a perf board, make a template of the tail light and cut it to fit inside the housing.
Arrange the LEDs on the perf board in your desired pattern. Drill holes if necessary to fit the LED legs through. Then, insert the LEDs and solder them in series, ensuring to connect the positive and negative ends correctly. Use resistors as needed to protect the LEDs from excess current.
After soldering, test the LED assembly with a power supply to ensure all lights are working. Once confirmed, secure the LED board inside the tail light housing using glue or other adhesives. Make sure the assembly is sealed and waterproof.
You can customize your LED tail lights by using different colored LEDs, making unique patterns, or adding diffusers to soften the light. Consider using acrylic sheets or vinyl to add designs or tint to the lights. Always test the lights after any modification to ensure they function properly.
Yes, you can customize the brightness of your LED tail lights. To do so, you'll need to understand the basics of LED power requirements and wiring. Here's a simple guide:
Choose the Right LEDs: The brightness of an LED is measured in lumens. For tail lights, you typically want high-luminosity LEDs for visibility.
Resistor Calculations: Use Ohm's Law to calculate the necessary resistance to achieve the desired brightness without overloading the LED. The formula is V = IRV=IR , where ( V ) is voltage, ( I ) is current, and ( R ) is resistance.
Wiring Configuration: You can wire your LEDs in series or parallel. A series configuration will ensure that the same current flows through each LED, while a parallel configuration allows for each LED to operate independently if one fails.
Test Before Installation: Always test your LED setup with a power source similar to your vehicle's output to ensure the desired brightness before final installation.
Conclusion:
In conclusion, I found joy in making my own lights. It's a fantastic way to express myself and make my car unique. If I can transform my vehicle, so can you. Take the first step today; you'll be proud of what you make!


