Making personalized water bottle labels is a fun and easy way to add a unique touch to any event, from birthday parties and weddings to corporate events and baby showers. I've been doing this for quite a while, and I've learned a few tricks along the way.
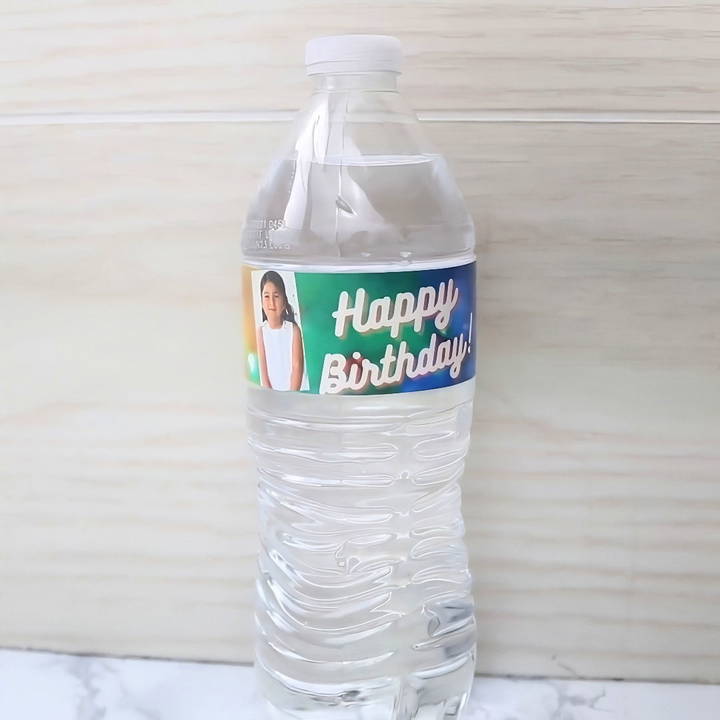
Today, I'm excited to share with you my process for designing custom water bottle labels using Canva, a free and user-friendly design platform. You don't need to have a Canva Pro account; the free version works perfectly fine for this tutorial.
What You Will Need
Before we dive in, let's quickly go over what you'll need to get started:
- Canva Account: You can sign up for free on Canva's website.
- Tape Measure: To measure the dimensions of your water bottle labels.
- Printer: Preferably a color printer for printing your designs.
- Clear Packaging Tape: This will help seal and protect your labels.
- Paper: Standard printer paper works fine, but you can also use waterproof sticker paper for a more polished finish.
- Scissors or a Paper Cutter: To cut out your printed labels.
Step by Step Instructions
Learn how to make water bottle labels easily with our step-by-step guide. From measuring and designing in Canva to printing and sealing, we've got you covered!
Step 1: Measure Your Water Bottle
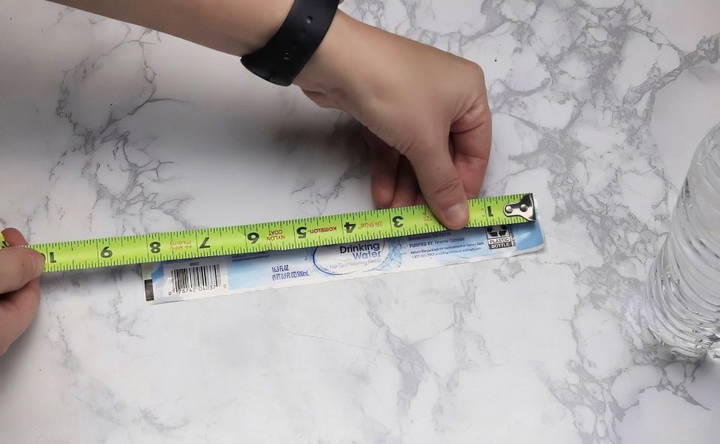
First things first, we need to know the dimensions of our labels. I typically use a tape measure to measure the existing label on the water bottle I'm using. For most standard bottles, I find that the label size is around 1.25 inches in height by 8.25 inches in width.
However, I like to add a little extra to the width—about a quarter of an inch—so that when I wrap the label around the bottle, it overlaps slightly. This prevents any gaps from showing. So, my final label size will be 8.5 inches by 1.25 inches.
Step 2: Set Up Your Custom Dimensions in Canva
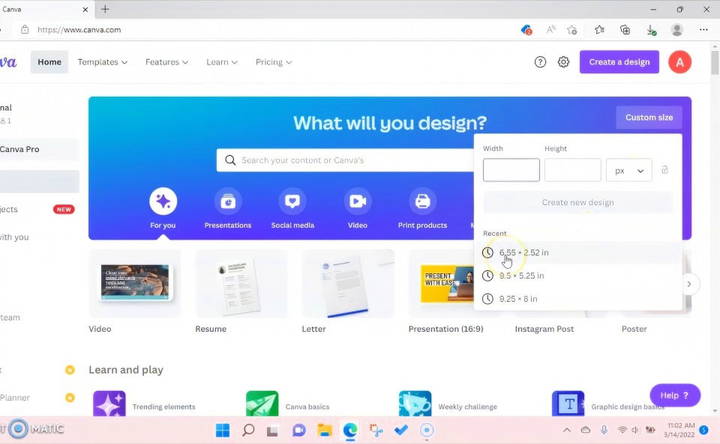
Now, let's jump into Canva. Once you're logged in to your free Canva account, navigate to the “Make a Design” button in the top-right corner. Click on it, and then select "Custom Size." Here, switch from pixels to inches and enter the dimensions you measured earlier—8.5 inches wide and 1.25 inches tall.
Click “Make New Design,” and Canva will open a blank canvas that matches your custom dimensions.
Step 3: Explore Canva's Templates or Start from Scratch
When you start, Canva might suggest some templates for you. While these can be helpful, especially for beginners, I usually prefer starting from scratch to have complete control over my design.
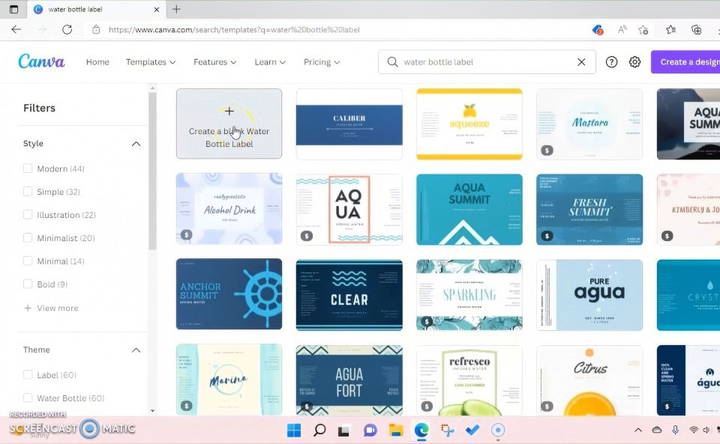
However, if you're looking for a quick start, search “water bottle label” in Canva's search bar. You might find some interesting templates to use as a base for your design.
Step 4: Choose a Background for Your Label
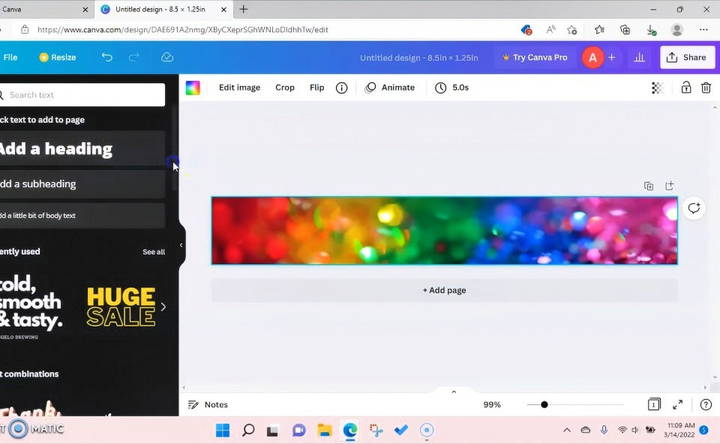
Next, let's choose a background. Canva provides a variety of backgrounds, from solid colors and gradients to patterns and textures. You can also upload your own images if you have a specific theme in mind. For this tutorial, I decided to keep it simple with a solid color background that complements the event theme.
To set a background, click on the “Background” option on the left toolbar and choose a color or pattern that suits your style.
Step 5: Add Text to Your Label
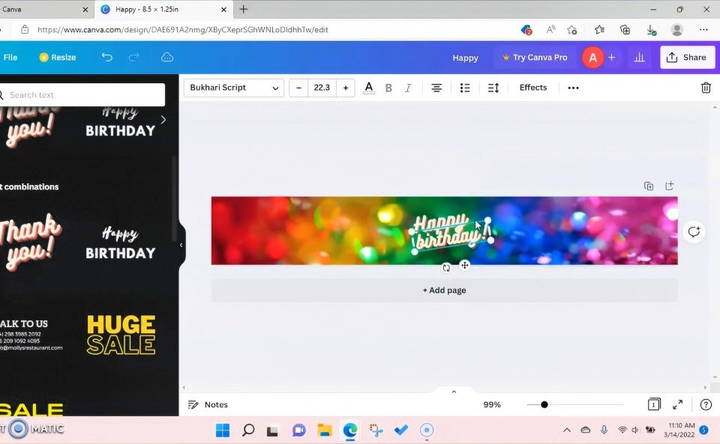
Now it's time to add some text to your label. Click on the “Text” option on the left toolbar, then choose “Add a Heading,” “Add a Subheading,” or “Add a Little Bit of Body Text” depending on what you want. You can type anything, such as "Happy Birthday," "Congratulations," or "Welcome to Our Wedding."
To customize the font, click on the text box and choose from Canva's extensive list of fonts. You can also adjust the size, color, and alignment of the text to suit your design.
- Pro Tip: Use Canva's built-in alignment guides to center your text perfectly. This ensures that everything looks neat and professional.
Step 6: Make a "Nutritional Facts" Label
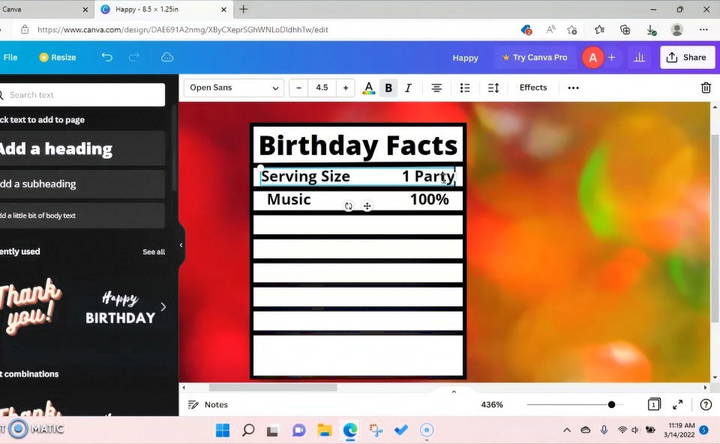
If you want to add a fun twist to your water bottle labels, consider making a “Nutritional Facts” section that's tailored to your event. For instance, for a birthday party, you could add humorous “facts” like “Laughter: 100%,” “Dancing: 100%,” “Memories: Unlimited.”
To make this, go to “Elements” on Canva's toolbar and search for “Rectangle.” Select a rectangle shape and adjust its size to resemble a typical nutritional label. Then, add lines and text as needed to complete the look.
Step 7: Finalize Your Design
Once you're happy with your design, make sure everything is aligned correctly. Check for typos or any elements that may be out of place. Canva's gridlines can help you ensure that everything is perfectly centered and spaced.
Step 8: Download and Print Your Design
When your design is complete, it's time to download it. Click on the “Share” button in the top-right corner and select “Download.” I recommend downloading your design as a PNG for high-quality print results.
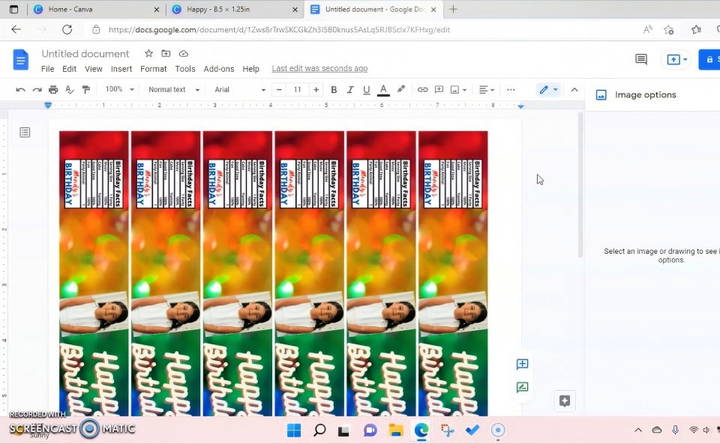
To print your labels, I use Google Docs because it allows me to easily adjust the layout and ensure that everything prints at the correct size. Open Google Docs, set your page to “Letter Size,” and insert your image. Rotate the image by 90 degrees so that it fits correctly on the page, and then copy and paste it to fill the page. You should be able to fit about six labels on one sheet of paper.
Step 9: Cut Out Your Labels
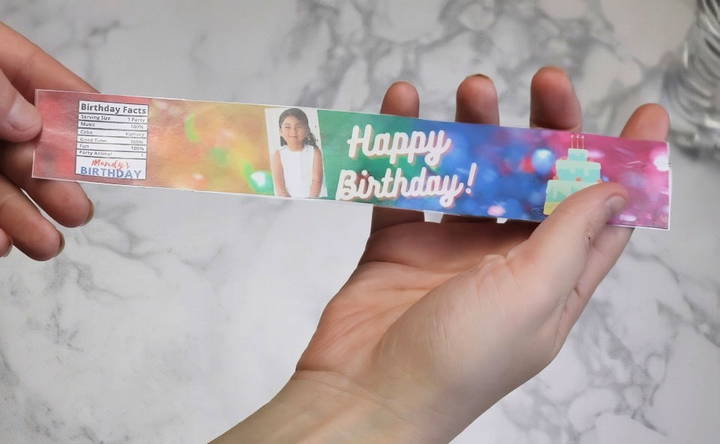
After printing, take your scissors or paper cutter and carefully cut out each label. Make sure you cut straight along the edges for a clean, professional look.
Step 10: Seal Your Labels with Clear Packaging Tape
To make your labels more durable and water-resistant, I recommend covering them with clear packaging tape. Lay the label face down and apply the tape, smoothing it out as you go to avoid bubbles or wrinkles. Then, flip it over and cover the back side in the same way.
Trim the excess tape from around the edges, leaving a slight border to ensure the label is sealed in.
Step 11: Attach the Label to Your Water Bottle
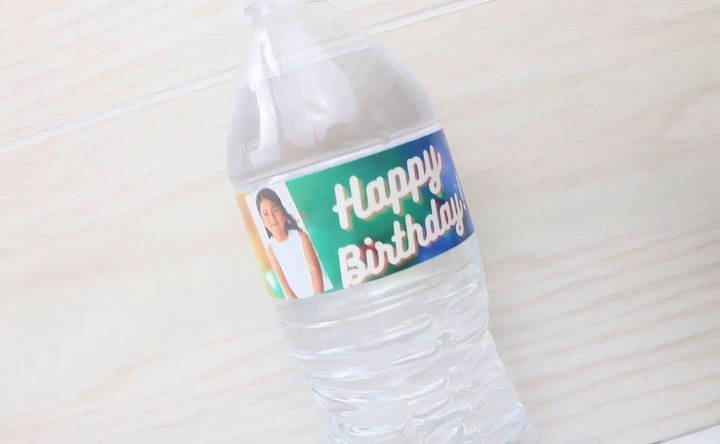
Finally, wrap the label around your water bottle. I like to use the sticky residue left behind from the original label to help position the new one. Once it's in place, use a small piece of clear tape to secure the overlapping ends.
Tips for Waterproofing and Durability
Making durable and waterproof water bottle labels ensures they look great throughout your event. Here are some practical tips to help you achieve this:
1. Choose the Right Paper
- Waterproof Paper: Use waterproof paper designed for labels. This type of paper resists water and prevents smudging.
- Vinyl Stickers: Vinyl stickers are another excellent option. They are durable and waterproof, making them perfect for water bottles.
2. Use Waterproof Ink
- Inkjet Printers: If you use an inkjet printer, make sure to use waterproof ink. Regular ink can smudge when it gets wet.
- Laser Printers: Laser printers use toner, which is naturally waterproof. This makes them a great choice for printing durable labels.
3. Lamination
- Self-Adhesive Lamination Sheets: These sheets are easy to apply and provide a waterproof layer over your labels. Simply peel and stick them over your printed labels.
- Laminating Machine: If you have access to a laminating machine, use it to laminate your labels. This adds a professional touch and ensures maximum durability.
4. Clear Tape
- Wide Clear Tape: Cover your labels with wide clear tape. This is a simple and cost-effective way to make them waterproof. Ensure the tape covers the entire label without any gaps.
5. Application Tips
- Clean Surface: Before applying the label, make sure the bottle surface is clean and dry. This helps the label stick better and last longer.
- Smooth Application: Apply the label smoothly to avoid bubbles and wrinkles. Start from one end and press down gradually.
6. Test Your Labels
- Water Test: After applying the labels, test them by submerging a bottle in water. Check if the labels stay intact and do not smudge.
- Durability Test: Handle the bottles as you would during the event. Ensure the labels remain in place and look good.
By following these tips, you can make water bottle labels that are both waterproof and durable. This ensures your labels look great and last throughout your event, providing a professional and polished appearance.
Troubleshooting Common Issues
When making DIY water bottle labels, you might encounter some common issues. Here are solutions to help you troubleshoot and ensure your labels turn out perfectly.
1. Printing Problems
- Ink Smudging: If your ink smudges, it might be due to using the wrong type of paper or ink. Ensure you use waterproof paper and ink. For inkjet printers, use waterproof ink. For laser printers, use toner-based printing.
- Color Mismatch: Colors on your screen may look different when printed. Calibrate your monitor and printer settings to ensure color accuracy. Print a test page before printing all your labels.
- Alignment Issues: If your labels are not aligning correctly, check your printer settings. Make sure the paper size and type match your label sheet. Use the print preview feature to adjust alignment before printing.
2. Cutting Issues
- Uneven Edges: If your labels have uneven edges, use a paper cutter or a craft knife with a ruler for straight cuts. Avoid using scissors as they can be less precise.
- Peeling Problems: If the labels peel off easily, ensure the adhesive is strong enough. Use high-quality sticker paper or add a layer of clear tape over the label to secure it.
3. Application Issues
- Bubbles and Wrinkles: To avoid bubbles and wrinkles, apply the label slowly from one end to the other. Use a credit card or a similar tool to smooth out the label as you apply it.
- Poor Adhesion: If the label doesn't stick well, clean the bottle surface thoroughly before applying. Ensure it is dry and free from oils or dust.
4. Durability Problems
- Labels Fading: If your labels fade over time, it might be due to exposure to sunlight or moisture. Use UV-resistant and waterproof materials to prevent fading.
- Labels Tearing: To prevent tearing, use durable materials like vinyl or laminated paper. Handle the bottles gently to avoid damaging the labels.
5. Design Issues
- Blurry Images: Ensure your images are high resolution. Low-resolution images can appear blurry when printed. Use design software to check the image quality before printing.
- Text Readability: Make sure your text is large enough to read and contrasts well with the background. Avoid using overly decorative fonts that can be hard to read.
By addressing these common issues, you can make professional-looking water bottle labels that are durable and visually appealing.
FAQs About DIY Water Bottle Labels
Discover answers to FAQs about DIY water bottle labels, including design tips, paper types, and adhesive options for crafting perfect custom labels.
Designing your labels can be fun and creative. Here are some steps to follow:
Choose a theme: Match your event's theme or your brand's identity.
Select dimensions: Measure your bottle to ensure the label fits perfectly.
Use design software: Create your design using templates or from scratch. Include text, images, and colors that align with your theme.
Proofread: Check for any spelling or design errors before printing.
For high-quality labels, follow these tips:
Use high-resolution images: Ensure your graphics are clear and not pixelated.
Set printer settings: Use the highest quality print settings available.
Test print: Print a single label first to check for any issues.
Allow drying time: Let the ink dry completely before handling the labels.
Removing old labels can be tricky, but these methods can help:
Soak in warm water: Submerge the bottles in warm, soapy water for 15-20 minutes to loosen the adhesive.
Use a scraper: Gently scrape off the label with a plastic scraper or your fingernail.
Apply adhesive remover: Products like Goo Gone can help remove any sticky residue left behind.
Here are a few creative ideas to make your water bottle labels stand out:
Event-specific themes: Design labels for weddings, birthdays, or corporate events.
Personalized messages: Include names, dates, or special messages.
Seasonal designs: Create labels with seasonal themes like summer, winter, or holidays.
Branding: Use your business logo and colors for promotional events.
While most labels are designed for single use, you can make reusable labels with these tips:
Use laminated labels: Laminate your labels and attach them with removable adhesive.
Dry-erase labels: Make labels that can be written on with dry-erase markers and wiped clean.
Velcro or magnetic strips: Attach labels with Velcro or magnets for easy removal and reuse.
Conclusion
And there you have it! Your custom water bottle labels are complete. This simple DIY project can add a unique and personalized touch to any event. The best part is that you can customize these labels to match any theme or style, and it doesn't cost much to do. I hope this tutorial was helpful, and that it inspires you to get creative with your next event!
If you have any questions or need further clarification, feel free to drop a comment. I'm here to help and would love to see what you make.


