Learn how to repair a leaking pressure tank with this step-by-step guide. Prevent costly damage, troubleshoot leaks, and ensure efficient water flow. Whether you're on city water or a well system, a leak in your water pressure tank can cause significant issues, from water damage to reduced water pressure. However, with some basic tools and a little guidance, you can repair or replace a leaking water pressure tank yourself. In this guide, you'll find a clear, step-by-step approach to completing the repair safely and effectively.
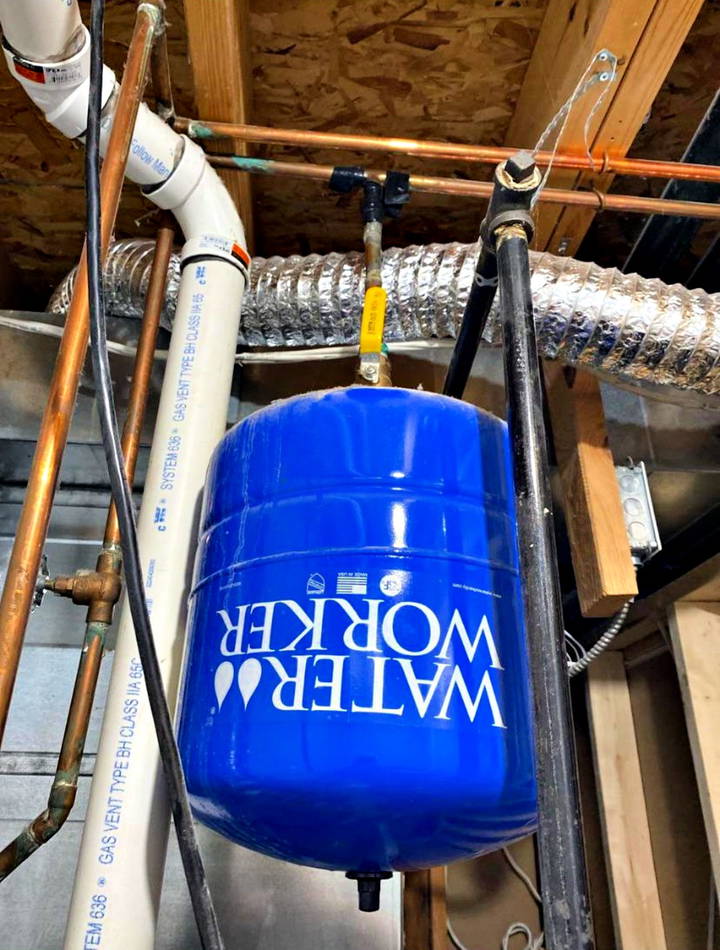
Understanding the Role of a Water Pressure Tank
A water pressure tank plays a crucial role in maintaining water pressure in homes, especially those using a well water system. However, even homes on city water can have them, often in the form of an expansion tank near the water heater. These tanks help manage water pressure changes that can occur when water is heated or when a pump kicks on and off. Without a pressure tank, water pressure could fluctuate dramatically, potentially causing damage to your plumbing.
A common issue with water pressure tanks is a leak at the connection point or the tank itself. If left unchecked, this can lead to water damage or reduced efficiency of your water system.
Tools and Materials You'll Need
Before you start, gather the necessary tools and materials. Having everything ready will make the process smoother:
- Adjustable wrench or pipe wrench
- Pipe cutter or hacksaw
- Teflon tape (plumber's tape)
- Pipe joint compound
- Replacement parts (pipe fittings, T-joint, etc.)
- Bucket or towels (for water drainage)
- Safety glasses and gloves
Step 1: Turn Off the Water Supply and Drain the Tank
The first step in repairing a leaking water pressure tank is to turn off the water supply to prevent further leakage and potential flooding. Locate the main water shut-off valve in your home and turn it off. This will stop the flow of water into the tank.
Next, you need to release the pressure in the system. Open a faucet or hose bib downstream of the tank to drain the water. Place a bucket or towels around the tank to catch any residual water that may come out when you disconnect the pipes.
Step 2: Inspect the Leak
Once the water is drained, inspect the leak's source. Common leak points include:
- The T-joint above the tank
- Pipe connections leading to and from the tank
- The tank itself, especially around the seams
If the leak is at a connection, it could be due to a loose fitting or degraded Teflon tape. If the leak is in the tank, the issue might be a corroded or damaged area, indicating a need for replacement.
Step 3: Tighten or Replace Connections
If the leak is at a connection, try tightening the fitting using an adjustable wrench. Be careful not to overtighten, as this could damage the fitting or pipes.
If tightening doesn't work, you may need to replace the connection. Use a pipe cutter or hacksaw to remove the damaged section of the pipe. Be sure to cut cleanly and squarely. Apply Teflon tape or pipe joint compound to the threads of the new fitting before connecting it. This ensures a watertight seal.
Step 4: Replace a Leaking T-Joint
Leaks at the T-joint are common and often due to stress on the fitting. Over time, the weight of the water tank can pull on the pipes, causing leaks. If this is the issue, you'll need to cut out the existing T-joint and replace it with a new one.
- Cut the Pipes: Use a pipe cutter to carefully cut away the leaking T-joint. Ensure you have enough pipe length left on either side for the new joint.
- Install the New T-Joint: Apply Teflon tape or pipe joint compound to the threads of the new T-joint. Fit the joint into place and tighten the connections using an adjustable wrench.
- Support the Tank Properly: To prevent future leaks, ensure the tank is properly supported. Install a support bracket or strap to take the weight off the pipes. This reduces stress on the connections and prevents leaks caused by tension.
Step 5: Check the Bladder Inside the Pressure Tank
Inside many water pressure tanks is a rubber bladder that separates the air and water. If the bladder is damaged, it can cause the tank to fill entirely with water, increasing the weight and stress on the pipes.
To check the bladder:
- Locate the Air Valve: The valve is usually on the top or side of the tank, similar to a valve on a bicycle tire.
- Release Some Air: Press the valve for a brief moment. If water comes out instead of air, the bladder is damaged and needs replacement.
- Replace the Tank if Necessary: If the bladder is damaged, replacing the tank is the best option. Choose a tank that matches the specifications of your current system, ensuring compatibility.
Step 6: Reassemble and Test the System
After replacing any damaged parts and ensuring all connections are tight and supported, it's time to reassemble the system:
- Turn On the Water Supply: Slowly turn the water supply back on, allowing the tank to fill gradually.
- Check for Leaks: Carefully inspect all the connections and the tank for any signs of leaks. If you notice a leak, turn off the water and check the fittings again.
- Test the System Pressure: Once you're confident there are no leaks, test the water pressure in the house by turning on multiple faucets. The pressure should be steady and consistent.
Step 7: Regular Maintenance Tips
Prevent future leaks by following these maintenance tips:
- Check the Tank Annually: Regularly inspect the pressure tank and connections for signs of wear and tear.
- Monitor Water Pressure: Sudden changes in water pressure can indicate a problem with the tank or plumbing.
- Secure the Tank: Ensure the tank is adequately supported to reduce stress on the pipes.
When to Call a Professional
If you're uncomfortable performing these repairs or the leak persists after following these steps, it's time to call a professional plumber. Complex issues, such as faulty installation or extensive corrosion, may require expert attention to prevent further damage.
Conclusion:
Repairing a water pressure tank leak can be a straightforward DIY task if approached correctly. By understanding the common causes of leaks, having the right tools, and following these steps, you can fix most leaks yourself. However, always prioritize safety and consult a professional when in doubt. Regular maintenance and proper installation are key to preventing leaks and ensuring a long-lasting water pressure system.
FAQs About Repairing Water Pressure Tank Leaks
Discover essential FAQs on repairing water pressure tank leaks. Learn expert tips to fix leaks effectively. Get answers now!
What should I do if my water pressure tank is poorly installed or not properly supported?
If your water pressure tank is not properly supported, it can lead to leaks due to the stress placed on the pipes. The weight of the tank can pull on the copper piping, causing the T-joint or other fittings to leak. In such cases, it is essential to add support brackets or straps to hold the tank securely in place. This reduces stress on the pipes and fittings and prevents future leaks. You can use galvanized metal straps with holes for nailing or other support brackets specifically designed for expansion tanks. Make sure the tank is firmly secured to a nearby joist or wall to prevent movement.
Is it safe to remove the water pressure tank if it's leaking, especially in homes with city water?
While it might seem like an easy fix to remove the leaking tank, it is not advisable to do so. Even homes with city water may require an expansion tank to manage pressure changes. Removing the tank could lead to higher water pressure in your home's pipes, resulting in leaks in pipes, fixtures, or the water heater's pressure relief valve. The Uniform Plumbing Code requires these tanks to prevent such issues, so it's best to repair or replace the tank instead of removing it.
Can I use "SharkBite" fittings to replace leaking sections of piping?
SharkBite fittings are popular for quick repairs, but they are not ideal for sections that need to support significant weight, such as those around a water pressure tank. Because these tanks can be heavy, especially when filled with water, it's recommended to use more durable materials like soldered copper or threaded brass fittings. These types of connections provide stronger support and are less likely to fail under pressure.
How can I check if the bladder inside my pressure tank is still good?
To check if the bladder in your pressure tank is functioning properly, locate the air valve on the tank, which resembles a bicycle tire valve. Press the valve momentarily; if water comes out instead of air, the bladder is damaged. If the bladder has failed, the tank will need to be replaced. When replacing the tank, ensure that the new tank is correctly pressurized to match your water system's pressure requirements to avoid future problems.
What should I do if my water heater's pressure relief valve starts leaking after removing the expansion tank?
If you notice that your water heater's pressure relief valve starts leaking after removing the expansion tank, it is likely due to increased water pressure in the system. This can happen because, without an expansion tank, there is no buffer to absorb the pressure changes that occur when water is heated. In this scenario, reinstalling an expansion tank is essential to prevent damage to your plumbing system and maintain proper pressure levels.
Are there any specific signs that indicate the need for a professional plumber?
If you encounter any of the following situations, it is wise to consult a professional plumber:
- Persistent leaks even after replacing or tightening fittings.
- Visible corrosion or rust on the pipes or tank that suggests more extensive damage.
- Lack of confidence in handling plumbing tools or unfamiliarity with local plumbing codes.
- A complex plumbing layout that might require a more thorough inspection or rerouting of pipes.
Calling a professional ensures the repair is done correctly and complies with local building codes, preventing future issues.
What are the common mistakes to avoid when repairing a water pressure tank leak?
Common mistakes when repairing a water pressure tank leak include:
- Not Draining the System Properly: Failing to fully drain the system before making repairs can lead to water damage or injury.
- Overtightening Connections: This can crack fittings or damage pipes, leading to more leaks.
- Ignoring the Need for Support: Not providing adequate support for the tank can lead to repeated leaks and potential pipe failure.
- Using Incorrect Materials: Using unsuitable fittings like SharkBite or not applying Teflon tape correctly can cause improper seals and leaks.


