Learn how to tie a tie easily with step-by-step instructions for beginners. Tying a tie is an essential life skill, whether you're preparing for a job interview, attending a wedding, or simply dressing up for a formal event. While it may seem tricky at first, learning to tie a tie is easier than you think. In this guide, we will cover everything you need to know about tying a tie, focusing on the classic Windsor knot, which is one of the most popular and versatile tie knots.
By the end of this article, you'll have the confidence to tie a sharp, neat knot every time.

Why Learn to Tie a Tie?
Before diving into the step-by-step process, it's helpful to understand why learning to tie a tie is a valuable skill:
- Professional Appearance: A neatly tied tie can enhance your professional appearance, showing that you pay attention to detail.
- Versatility: A well-tied tie works for various formal events like interviews, weddings, graduations, and more.
- Self-Sufficiency: Relying on someone else to help you tie a tie can be inconvenient. Mastering it gives you independence.
Now, let's get into how to tie a tie, focusing on one of the most classic and elegant styles: the Full Windsor Knot.
What is the Windsor Knot?
The Windsor knot, also known as the Full Windsor or Double Windsor, is a symmetrical and wide knot. It's favored for its clean, professional look and is suitable for spread or cutaway collar shirts. The knot is fuller and larger compared to other knots, making it ideal for special occasions or for making a bold fashion statement.
Preparation: Choosing the Right Tie
Before we get into the process, make sure you have a good-quality tie. Here's what to consider when selecting a tie:
- Fabric: Silk ties are classic and offer a smooth finish, while wool or knit ties provide texture and are suitable for colder months.
- Length: Make sure the tie is the correct length for your height. When tied, the tip of the tie should just reach your belt buckle.
- Width: Narrow ties give a modern, sleek look, while wider ties are more traditional. The width of the tie should complement your body frame and the lapels of your jacket.
Step by Step Instructions
Learn how to tie a tie with easy step-by-step instructions. Avoid common mistakes and choose the perfect knot for any outfit.
Step 1: Start with the Correct Length
- Position the Tie: Begin by draping the tie around your neck. Make sure the wide end of the tie is on your dominant hand side (usually the right) and the narrow end on the opposite side.
- Measure the Length: The wide end of the tie should be about two-thirds of the total length, while the narrow end should be about one-third. This ensures that you have enough material to form the knot.

Step 2: Cross the Wide End Over the Narrow End
- First Cross: Take the wide end and cross it over the narrow end. The wide end should now be on the opposite side (left if you're right-handed).
- Tighten Slightly: This first step forms the base of your knot, so make sure it's snug, but not too tight, allowing room to adjust later.
Step 3: Bring the Wide End Up Through the Neck Loop
- Form the Neck Loop: Take the wide end and bring it up through the opening at your neck, passing it over the narrow end. Pull the wide end all the way through.
- Tighten Gently: Make sure the wide end is straight and smooth as you pull it through.

Step 4: Wrap the Wide End Around
- Wrap Around: Now, wrap the wide end around the back of the narrow end, keeping it neat and flat. The back of the tie should now be facing outwards.
Step 5: Bring the Wide End Through the Loop Again
- Through the Loop: Take the wide end once again and feed it through the neck loop from the front, bringing it all the way through.
- Check for Symmetry: At this stage, you should see a small triangular shape forming at the base of your neck. This is the beginning of your Windsor knot.

Step 6: Wrap and Form the Knot
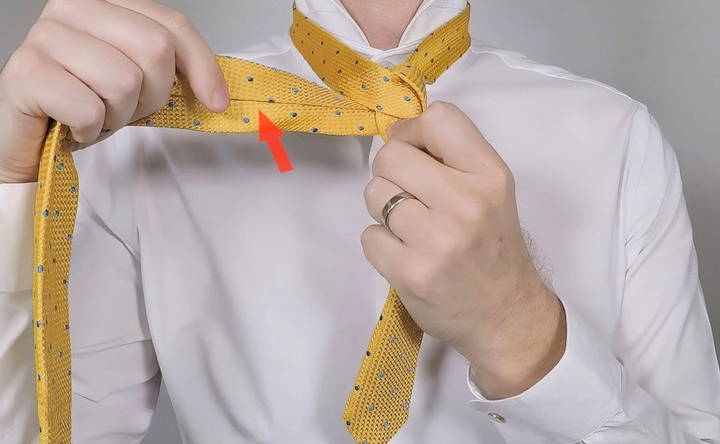
- Wrap the Wide End Again: With your left hand, hold the forming knot in place. With your right hand, take the wide end of the tie and wrap it around the knot from right to left, maintaining tension to keep it neat.
- Push the Wide End Through the Loop Again: Pass the wide end back up through the neck loop and bring it down toward the front of the knot. This motion helps form the full, symmetrical shape of the Windsor knot.
Step 7: Pull the Wide End Through the Knot
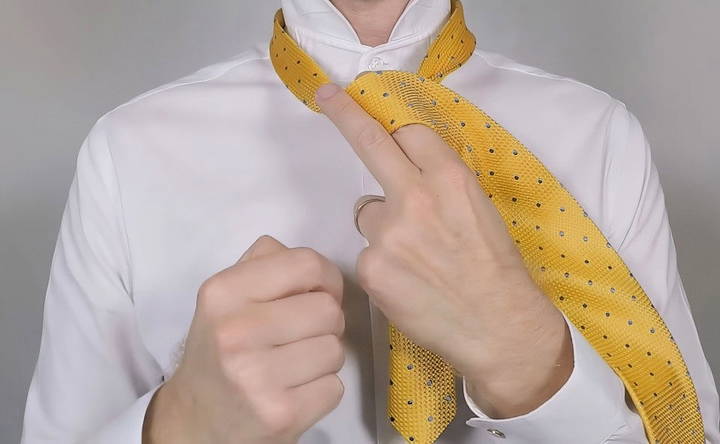
- Create a Tunnel: At this point, your forefinger has likely created a small “tunnel” or space under the final wrap of the tie. Take the wide end and pull it down through this tunnel.
- Tighten the Knot: Gradually tighten the knot by holding the narrow end and adjusting the wide end. The knot should become more defined and sit neatly in place.

Step 8: Final Adjustments
- Shape the Knot: Make sure your knot is sharp and symmetrical. Gently adjust the edges of the knot to form a neat triangle.
- Check the Length: The tip of the wide end should just touch the top of your belt buckle. If it's too long or too short, you may need to redo the knot with a slight length adjustment.
Common Mistakes and How to Avoid Them
While tying a Windsor knot is straightforward, beginners often make a few mistakes. Here are some common issues and tips to avoid them:
- Wrong Length: If the tie is too short or too long, adjust your starting position. The wide end should always be longer than the narrow end by about two-thirds.
- Crooked Knot: A crooked or uneven knot can happen if you don't maintain symmetry throughout the process. Focus on keeping the tie flat as you make each fold and pull.
- Loose Knot: A loose knot may look sloppy. Make sure to tighten the knot gently but firmly after each step, especially when pulling the wide end through the loop.

Variations of Tie Knots
While the Windsor knot is a versatile and classic choice, it's not the only knot you can use. Here are a few other popular knots:
- Four-in-Hand Knot: This is one of the simplest knots, perfect for beginners. It's narrow and slightly asymmetrical, giving it a casual, laid-back look. It works well for ties made of heavier fabrics.
- Half Windsor Knot: The Half Windsor is a smaller version of the Full Windsor, offering a more modest but still formal look. It's great for standard collars and works well for everyday business attire.
- Pratt Knot: Also known as the Shelby Knot, this knot is medium in size and creates a clean, symmetrical appearance. It's a good option if you want something between a Windsor and a Four-in-Hand knot.
How to Choose the Right Knot for Your Outfit
Choosing the right knot depends on several factors, including the occasion, your shirt's collar, and your tie's fabric.
- Occasion: For formal events like weddings, graduations, or important meetings, the Windsor or Half Windsor is your best bet. For more casual settings, a Four-in-Hand works perfectly.
- Shirt Collar: Spread collars or cutaway collars pair well with the Windsor knot due to its wider size. Narrow collars are better suited for the Four-in-Hand or Half Windsor.
- Tie Fabric: Heavier fabrics, like wool or knits, are more forgiving with simple knots like the Four-in-Hand. Lighter fabrics, such as silk, are perfect for the Windsor knot because they drape neatly.
Final Thoughts
Learning how to tie a tie is a timeless skill that can elevate your professional and formal wardrobe. With practice, you'll be able to tie a Windsor knot or any other knot with ease and confidence. Start by following the step-by-step instructions in this guide, and before long, tying a tie will become second nature.
Remember, the key to a perfect knot is patience and practice. Don't be afraid to try different styles and experiment with your ties to find what works best for you. Whether it's for a job interview, a wedding, or just a sharp business look, knowing how to tie a tie will ensure you're always dressed for success!
FAQs About Tying a Tie Made Simple
Discover easy answers to common questions on tying a tie. simplify your style with our expert faqs guide for tying ties effortlessly.
The key is to start with the correct proportions. The wide end should hang about two-thirds of the tie’s total length, with the narrow end being one-third. If your tie ends up too short, start with a longer wide end. Conversely, shorten the wide end if the tie is too long after tying.
A crooked knot typically happens if the tie isn’t kept flat and even during each step. Make sure to keep the wide end smooth and aligned while wrapping it around, and ensure each loop is snug but not twisted.
The Windsor knot works best with spread or cutaway collars due to its fullness. If you’re wearing a narrower collar, you might want to try a slimmer knot like the Four-in-Hand or Half Windsor, which creates a more proportionate look.
This usually happens because the wide end wasn’t long enough when you started. Adjust your starting position by making the wide end much longer than the narrow end before beginning the knot. Experiment with different ratios until you find the right balance.
A good trick is to stop halfway through tying the knot and check its shape. Make sure the back of the knot looks triangular. If it doesn’t, reshape it before completing the rest of the steps. Keeping even tension throughout will help maintain symmetry.
If your tie is shorter than standard, compensate by adjusting the starting length. Begin with the wide end hanging much lower, around 4:1 instead of the typical 3:1 ratio, to ensure the knot fits properly and the tie’s tip reaches your belt buckle.
It’s generally best to untie the knot to preserve the tie’s shape. However, you can loosen the knot slightly and carefully slide it over your head, but be cautious, as this might stretch the fabric over time.
If your knot looks loose or uneven, it's often because the initial loops weren't pulled tight enough. Focus on keeping the tie snug at each step. After completing the knot, adjust it by gently pulling the narrow end while holding the knot in place to tighten everything up.


