Learn how to tie dye step-by-step with easy instructions, from preparing materials to creating vibrant, unique designs. Tie-dyeing is a fun, creative, and vibrant way to express yourself through colorful patterns on clothing or fabric. This guide will walk you through three easy techniques that are perfect for beginners, with detailed steps, tips, and tricks to help you create beautiful tie-dye designs. Whether you're making a spiral shirt, stripes, or a unique sunburst (bubble) design, you'll have all the guidance you need to get started.
What You'll Need
Before we dive into the different tie-dye techniques, it's essential to gather your materials. Here's what you'll need to get started:
- Tie-dye kit: This typically includes dye in different colors, soda ash, rubber bands, gloves, and a protective cover for your workspace. For this guide, we used a Tulip One-Step Tie-Dye Kit. These kits are convenient and come with pre-measured dye that only needs water to activate.
- White 100% cotton T-shirts or fabric items (such as bandanas, socks, etc.): Cotton absorbs the dye well, resulting in vibrant colors.
- Plastic or a protective sheet: To protect your workspace from staining.
- Rubber bands: These will help create your patterns.
- Plastic bags: For sealing your dyed items overnight to allow the dye to set.
- Wire rack: Optional, but helpful to keep your project elevated while dyeing to prevent colors from bleeding too much.
- Old clothes or an apron: To avoid getting dye on your own clothes while working.
Step by Step Instructions
Learn how to tie-dye with easy step-by-step instructions. Master spiral, striped, and sunburst techniques with essential tips and troubleshooting.
Preparing for Tie Dye
- Choose Your Work Area: Make sure to cover your work surface with plastic or newspapers. Tie-dye can be messy, and you don't want to stain your furniture or floors.
- Prepare Your Fabric: Whether you're using T-shirts, bandanas, or any other fabric, make sure it's washed (without fabric softener) to remove any dirt or oils that might prevent the dye from absorbing properly. You don't need to dry the fabric; it can be damp during the tie-dye process.
- Set Up Your Dye: Your tie-dye kit will come with bottles of powdered dye. Add water to the line on each bottle, seal the top, and shake well until the dye is fully dissolved. Check the bottom of the bottle to ensure no powder is left.
Technique 1: The Classic Spiral Tie-Dye
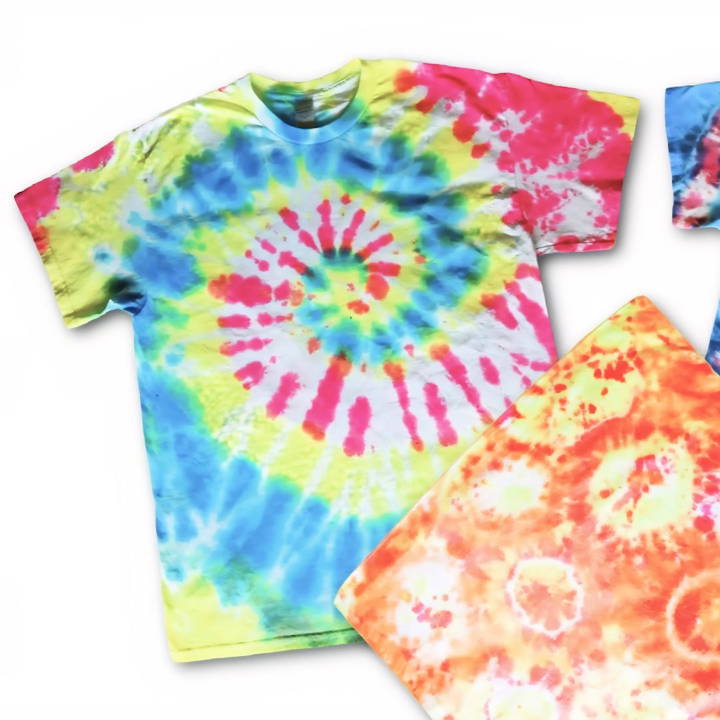
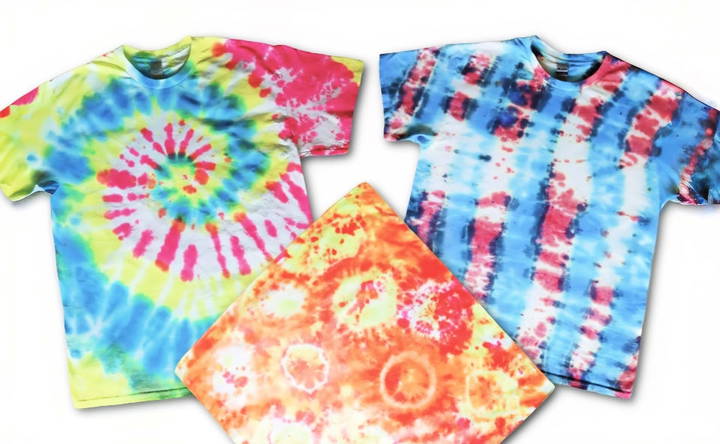
The spiral design is perhaps the most iconic tie-dye pattern. It's perfect for beginners because it's easy to do and always produces stunning results.
Steps:
- Lay the Shirt Flat: Place your white T-shirt flat on your work surface with the front of the shirt facing down.
- Find the Center of the Spiral: Pinch the center of the shirt where you want the middle of the spiral to be. You can start in the center or anywhere else for a unique effect.
- Twist: Begin twisting the fabric around the center point in a circular motion. Continue twisting until the entire shirt is gathered into a tight, flat spiral shape.
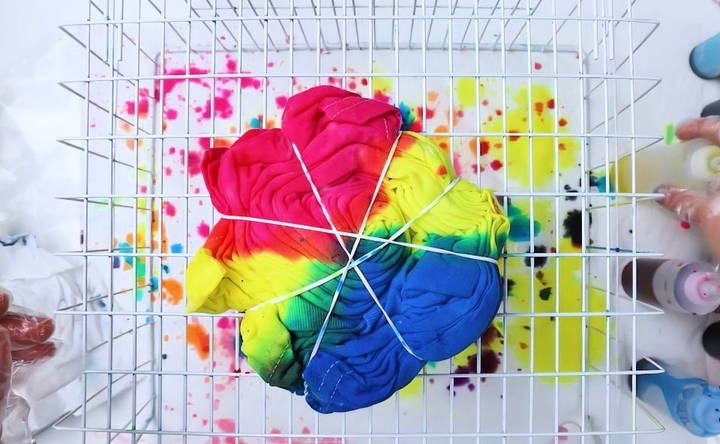
- Secure with Rubber Bands: Once twisted, use rubber bands to secure the spiral in place. The rubber bands should create six to eight segments across the shirt, like slices of a pie. Each segment will represent a different color of dye.
- Apply Dye: Apply different colors of dye to each section of the spiral. You can use the rubber bands as a guide for where to apply each color. Flip the shirt over and repeat on the other side, ensuring that both sides are evenly saturated.
- Wrap and Let Sit: Place the dyed shirt in a plastic bag and let it sit for at least 6-12 hours (overnight is ideal) to allow the dye to set.
Technique 2: Striped Tie-Dye
The striped pattern is simple but effective, creating bold, horizontal or vertical stripes across your shirt.
Steps:
- Lay the Shirt Flat: Spread out the T-shirt or fabric you're working with.
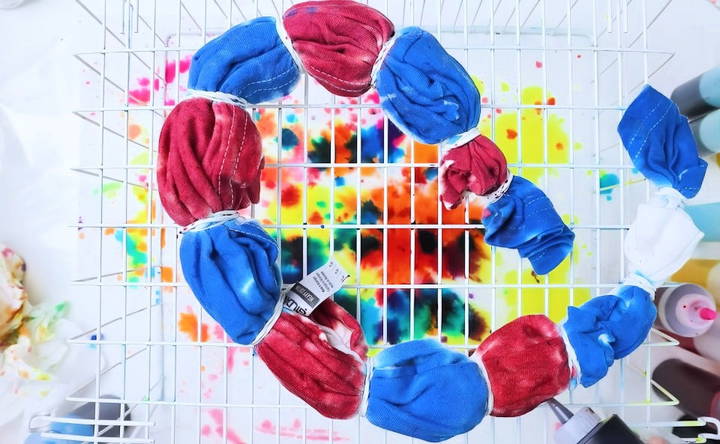
- Scrunch the Fabric: Starting at the bottom or one side of the shirt, begin scrunching the fabric up toward the other side. You're essentially creating folds in the fabric, which will become the lines of your stripes.
- Add Rubber Bands: Secure the scrunched fabric with rubber bands spaced evenly apart. Each rubber band will create a stripe on your shirt. You can place the bands close together for more stripes or farther apart for fewer, wider stripes.
- Apply Dye: Choose alternating colors for the stripes and apply dye to each section. You can add additional accents, such as black dye near the rubber bands, to create a more defined effect.
- Wrap and Let Sit: Like the spiral technique, place the shirt in a plastic bag and leave it to sit for at least 6-12 hours for the dye to properly set.
Technique 3: Sunburst or Bubble Tie-Dye
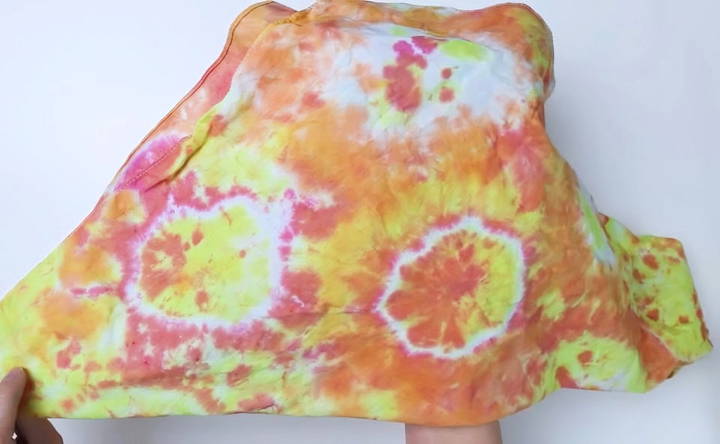
The sunburst or bubble technique creates a design where circles or bubbles of color appear throughout the fabric. It's a fun and random way to tie-dye, giving each project a unique look.
Steps:
- Lay the Fabric Flat: You can use any fabric item for this technique, from T-shirts to bandanas. Lay it flat on your work surface.
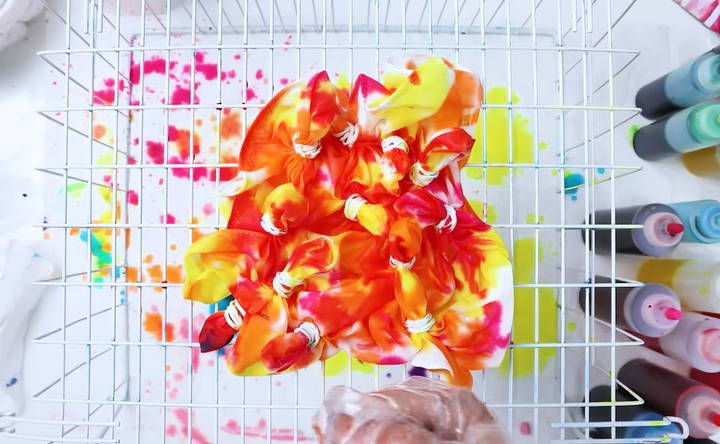
- Create the Bubbles: Pinch small sections of the fabric and secure them with rubber bands. The more sections you pinch, the more bubbles or circles will appear in the final design.
- Apply Dye: Apply dye to the entire fabric, focusing on the areas around the rubber bands. You can apply multiple colors or stick to a single color for a monochromatic effect.
- Wrap and Let Sit: As with the other techniques, place the fabric in a plastic bag and leave it to sit for at least 6-12 hours.
Applying the Dye
Now that your fabric is folded and ready, it's time to apply the dye! When applying dye, here are a few important tips:
- Use Rubber Bands as a Guide: For most tie-dye techniques, the rubber bands serve as a guide for where to place different colors of dye. The areas directly beneath the rubber bands will remain white or light-colored, creating the pattern.
- Don't Over-Saturate: Be mindful of how much dye you apply. If you oversaturate the fabric, the colors may bleed together too much, and you'll lose the definition between different parts of the design.
- Flip and Repeat: After applying dye to one side, flip the fabric over and apply the same color pattern to the other side. Make sure the dye seeps through the layers to avoid large white areas (unless that's the look you want).
- Color Placement: Consider how different colors will blend when placed next to each other. For example, placing yellow next to blue will create green at the junction. Have fun experimenting with color combinations!
Setting and Rinsing
Once you've applied the dye, the waiting game begins. Letting the fabric sit for a long time (typically 6-12 hours) is crucial for achieving vibrant results. After that time has passed, it's time to rinse and wash the dyed items.
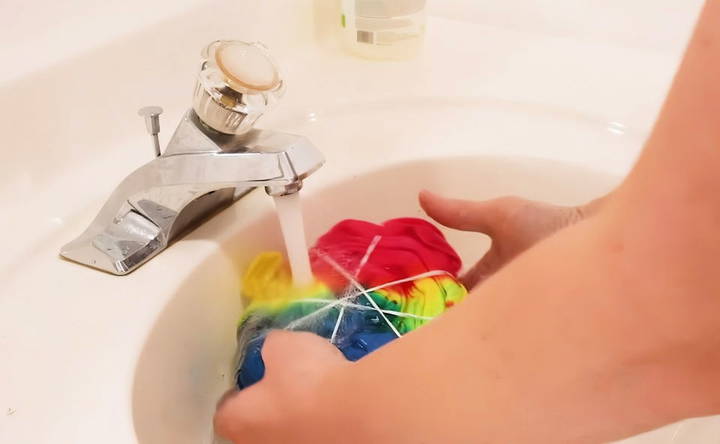
- Rinse the Fabric: After removing the fabric from the plastic bag, rinse it under cold water while it's still bundled up. You'll notice a lot of dye coming out, which is normal. Keep rinsing until the water runs mostly clear.
- Remove the Rubber Bands: Once the water runs clear, remove the rubber bands and continue rinsing. This is the exciting part when you finally see your full design unfold!
- Wash and Dry: Place your dyed fabric in the washing machine with cold water and a small amount of laundry detergent. Wash on a regular cycle, and then dry the items in the dryer.
Tips and Tricks for Perfect Tie-Dye Results
Now that you've mastered the basics of tie-dye, let's explore some additional tips and tricks that will help you achieve professional-looking results every time. These simple techniques can make a big difference in how your projects turn out.
1. Pre-Soaking in Soda Ash
Many tie-dye kits, like the Tulip One-Step kit, include soda ash already mixed into the dye. However, if your kit does not include it, or if you want to intensify the colors, you can pre-soak your fabric in a soda ash solution. Soda ash helps the fabric better absorb the dye, resulting in brighter and longer-lasting colors.
- How to Use: Dissolve one cup of soda ash in a gallon of water. Soak your fabric in the solution for about 20 minutes before applying the dye.
2. Work with Damp Fabric
Applying dye to damp fabric (not soaking wet) helps the colors spread more evenly and reduces the risk of blotchiness. If your fabric is dry, you might notice that the dye has difficulty penetrating the fibers, leading to uneven results. After washing your fabric, it's best to leave it slightly damp before starting the dyeing process.
3. Choose the Right Type of Fabric
For the best tie-dye results, always use 100% cotton or natural fibers like rayon, silk, or linen. Synthetic fabrics (like polyester) don't absorb dye well, which leads to dull colors and inconsistent patterns.
4. Use Squeeze Bottles for Precision
Most tie-dye kits come with squeeze bottles, which are essential for controlling the flow and placement of dye. Squeeze bottles allow you to apply dye in precise areas without making a mess. Make sure to shake the bottle well before use, and check the bottom of the bottle to ensure all the powder is dissolved.
5. Prevent Dye from Bleeding
To prevent colors from bleeding into each other, avoid oversaturating your fabric. If too much dye is applied, the excess can pool and bleed into other areas, making the design less distinct. Using a wire rack to keep the fabric elevated helps the excess dye drain away rather than pool underneath the fabric.
Troubleshooting Common Tie-Dye Issues
Like any craft project, tie-dye doesn't always go perfectly according to plan. Here are some common issues you may encounter and how to troubleshoot them.
1. Colors Are Too Light
This usually happens if the dye wasn't applied heavily enough, or if the fabric was not left to set for long enough. Here's how to avoid or fix light colors:
- Solution: Make sure you apply enough dye to saturate the fabric fully, especially if you want bold, bright colors. When the fabric is damp, it will absorb more dye, so don't be afraid to use more dye than you think you need. Additionally, leaving the fabric to set for at least 6-12 hours is critical for allowing the colors to develop fully.
2. Colors Bled Together Too Much
If the colors on your tie-dye project blend into each other and create muddy areas, it's likely due to either using too much dye or not using rubber bands tightly enough.
- Solution: Use less dye to avoid oversaturating the fabric, and make sure the rubber bands are tightly securing the fabric in place. Elevating your project on a rack also helps prevent the colors from pooling underneath.
3. Uneven Dye Application
Uneven dye application often results from dry fabric or improper twisting or folding techniques.
- Solution: Always use damp fabric when tie-dyeing to ensure the dye spreads evenly. When folding or twisting the fabric, try to keep the folds as neat as possible for a more consistent pattern. You can also ensure that the dye penetrates all layers by flipping the fabric over and applying dye to both sides.
4. White Patches Where There Should Be Color
Sometimes, when you unfold your project, you might notice large white areas that didn't absorb any dye. This usually happens when folds of fabric are too tightly compressed, and the dye can't reach the interior sections.
- Solution: To reduce large white patches, make sure to apply dye thoroughly on both sides of the fabric, and twist or fold your fabric looser so the dye has room to seep through. Alternatively, embrace the white areas as part of the unique look of your design!
Care Instructions for Your Tie-Dye Creations
Once you've rinsed, washed, and dried your tie-dye items, proper care is essential to maintaining the vibrancy and longevity of the colors.
1. Initial Wash
For the first wash, it's important to wash your tie-dye garments separately to avoid color bleeding onto other clothes. Use cold water and a small amount of laundry detergent. Cold water helps prevent the colors from fading, and washing separately ensures that any excess dye won't stain other fabrics.
2. Long-Term Care
After the first wash, you can wash your tie-dye garments with other items, but always use cold water to maintain the brightness of the colors. Avoid using bleach or strong stain removers, as they can fade the dye.
If possible, line-dry your tie-dye items instead of using a dryer. The heat from the dryer can cause colors to fade over time, so air drying is a gentler option.
Exploring Other Tie-Dye Designs
While the three basic tie-dye techniques (spiral, stripe, and sunburst) are perfect for beginners, there are countless other patterns and styles you can try once you've mastered the basics. Here are a few advanced techniques you can experiment with to take your tie-dye skills to the next level:
1. Crinkle Tie-Dye
The crinkle method, also known as the scrunch or marble technique, creates a more random, textured pattern on the fabric. Instead of folding or twisting the fabric neatly, you simply crumple it up in a random way before applying the dye.
- How to Do It: Lay the fabric flat, and then scrunch it together loosely. Secure it with a few rubber bands, and apply the dye randomly. This method gives the fabric a unique, marbled appearance with lots of color variation.
2. Bullseye Tie-Dye
The bullseye pattern creates a series of concentric circles on the fabric, similar to a target or bullseye.
- How to Do It: Pinch the fabric at the center point where you want the bullseye to start, then pull the fabric upward into a cone shape. Secure rubber bands at intervals along the cone, and apply different colors of dye to each section. When unfolded, the fabric will have a series of rings around the center point.
3. Heart Tie-Dye
The heart pattern is a popular and more advanced design that's sure to impress.
- How to Do It: Fold the shirt in half vertically and draw half a heart shape along the fold with a washable marker. Starting at the center of the heart, accordion-fold along the line, and secure it with rubber bands. Apply dye to the heart shape, and use different colors for the surrounding areas to make the heart stand out.
4. Ombre Tie-Dye
The ombre technique creates a gradient effect where colors fade gradually from light to dark.
- How to Do It: Lay the fabric flat and apply dye to one end. Then, use a spray bottle of water or a sponge to dilute the dye as it moves toward the other end of the fabric, creating a fading effect.
Final Thoughts: Tie-Dye for Every Occasion
Tie-dye is not only a fun craft but also a creative outlet that lets you personalize your wardrobe, accessories, and even home décor. The possibilities are endless, whether you're dyeing T-shirts, socks, bags, or pillowcases. As you experiment with different patterns, colors, and techniques, you'll find that no two projects are ever the same—each one is a unique work of art!
Remember, the key to tie-dye success is to have fun with the process. Don't worry too much about perfection—embrace the unpredictability of the dye and let your creativity run wild. With the tips, techniques, and care instructions provided in this guide, you're now fully equipped to create stunning tie-dye pieces that reflect your personal style.
FAQs About How to Tie Dye
Discover answers to your FAQs about how to tie dye, including techniques, tips, and materials for vibrant, lasting designs.
Most tie-dye kits include instructions for adding water. Generally, fill the bottle to the marked line or about three-quarters full. Shake well until all the dye powder is dissolved before applying.
Yes, for the best results, use damp fabric. Damp fabric allows the dye to spread evenly and penetrate deeper into the material, reducing the chance of uneven dye application or blotchiness.
Let the dyed fabric sit for at least 6-12 hours. For the best color saturation, leaving it overnight allows the dye to fully bond with the fabric, ensuring brighter, more vibrant results.
While 100% cotton works best for tie-dye, you can also use other natural fibers like rayon, linen, or silk. Synthetic fabrics, like polyester, don’t absorb the dye well and result in less vibrant colors.
To prevent colors from bleeding, avoid oversaturating the fabric. Use a wire rack to elevate your project while dyeing and ensure the rubber bands are tight to separate the sections effectively.
Apply dye thoroughly on both sides of the fabric to ensure the dye penetrates evenly. Also, avoid twisting or folding the fabric too tightly to allow the dye to reach the inner layers.
For the first wash, it’s best to wash each tie-dye item separately in cold water to avoid any remaining dye from bleeding onto other garments. Afterward, you can wash them together, using cold water to preserve the colors.
It's common to have unpredictable results in tie-dye, especially for beginners. Embrace the uniqueness of your design, as every tie-dye project has its own character. Practice will help improve your results!
You can make your own tie-dye solution using fabric dyes and soda ash, but kits are more convenient for beginners. Kits provide pre-measured dye powders and are an easy way to get started without extra setup.
You can use regular rubber bands, but they should be thick enough to hold the fabric tightly together. The tighter the rubber bands, the more defined your patterns will be, as they prevent the dye from seeping into those areas.


