Learning how to use a drill can make various tasks around the house much simpler and more efficient. A drill is an essential tool for anyone interested in DIY projects. It allows you to build holes, drive screws, and carry out other tasks with ease. In this guide, you'll learn the basic techniques for precision and control when using a drill, ensuring your projects turn out just right.
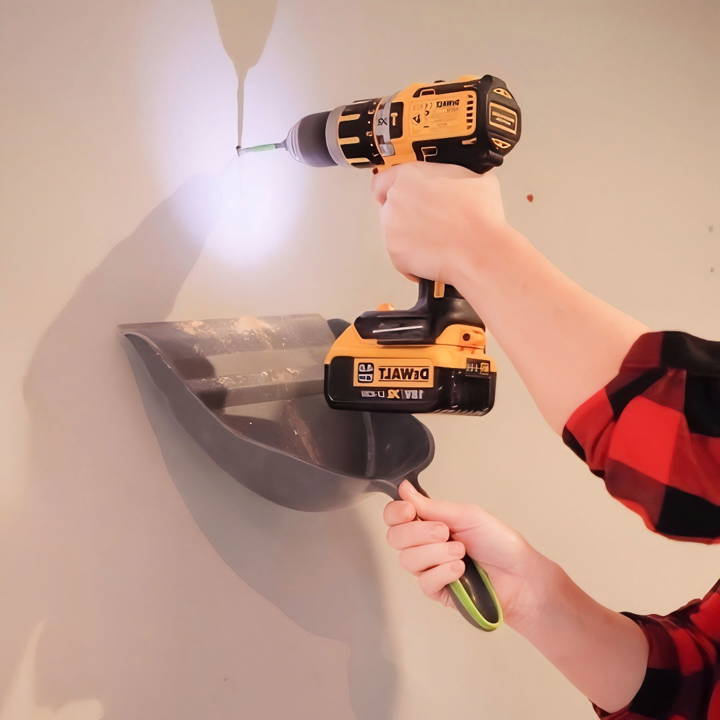
Knowing how to change a drill bit is crucial for adapting to different tasks quickly. It's a simple process that significantly extends the versatility of your drill. Different bits are suited for different materials and functions, so being able to swap them out efficiently can save you time and effort.
Choosing the Right Drill
When I decided to take on DIY tasks around the house, the first challenge was choosing the right drill. After some research and consideration, I opted for a cordless drill for its convenience and portability. Compared to a corded drill, a cordless one is more expensive, mainly because of the battery costs. However, the freedom to move around without worrying about a power source or tripping over cords outweighed the cons for me.
I chose an 18-volt model as it's considered suitable for most DIY tasks. It's a good balance between power and weight, making it easier to handle for someone not very confident in their drilling skills yet.
Materials Needed
- Cordless Drill: Essential for drilling holes and driving screws. I chose it for its versatility and ease of use.
- Drill Bits: Get a set with various sizes and types to cover different materials and tasks.
- Screws and Wall Plugs: Necessary for securing items to the wall.
- Safety Goggles: Protect your eyes from dust and debris.
- Decorator's Tape: Useful for marking drill depth to avoid drilling too deep.
Getting to Know Your Drill
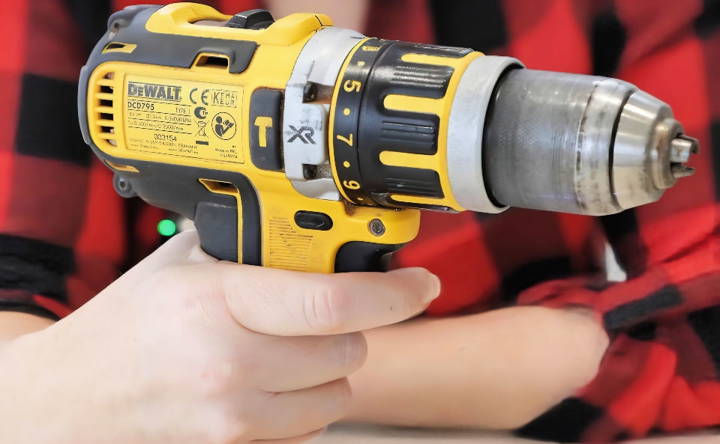
Familiarizing yourself with the drill is crucial. The key parts include:
- Battery: Powers the drill. It's removable for charging.
- Chuck: The front part where you insert the drill bits. It's keyless for easy changing of bits.
- Control Settings: Includes drill mode, screw mode, and hammer mode for drilling into harder materials like masonry.
- Variable Speed Trigger: Controls the drilling speed. Start slowly to gain more control.
Step by Step Instructions
Learn how to use a drill with our simple, step-by-step guide. Perfect for beginners and DIY enthusiasts. Get started safely and efficiently!
Choosing and Installing Drill Bits
Selecting the right drill bit depends on the material you're drilling into. For my first project, hanging a picture frame, I used a 6mm drill bit for masonry as I was drilling into a wall. Installing the bit is straightforward:
- Open the chuck.
- Insert the bit, making sure it's straight.
- Tighten the chuck securely.
Drilling Your First Hole
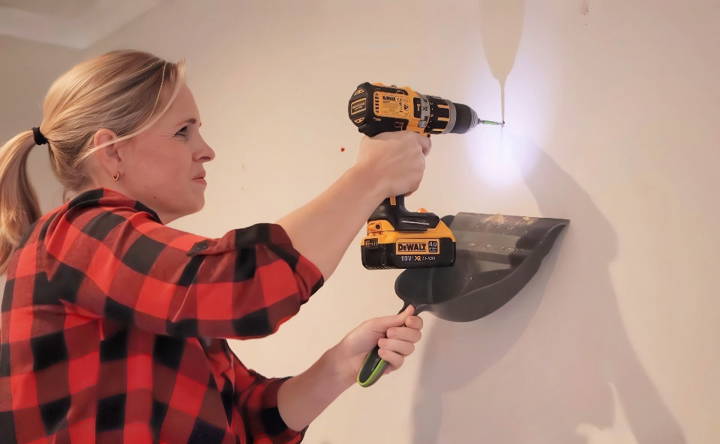
Before drilling, always check for cables or pipes behind the drilling area. Once clear, proceed as follows:
- Mark the Spot: Use a pencil to mark where you want to drill.
- Prepare the Drill: Set it to the right mode (drill or hammer mode, depending on the wall type) and speed setting.
- Start Drilling: Hold the drill perpendicular to the wall. Start slowly and increase speed gradually. Use the decorator's tape as a guide to stop drilling at the correct depth.
Screwing
For installing something like a shelf:
- Select the Right Screw Bit: Match it with the screw head.
- Adjust the Clutch Setting: Start with a lower setting to avoid stripping the screw or overdriving it.
- Drive the Screw: Hold the drill straight and drive the screw in, stopping when it's tight but not over-tightened.
Safely Removing Screws
Switch the drill to reverse mode and select a suitable clutch setting. If the screw doesn't come out easily, increase the clutch setting slightly.
Safety Tips
- Always wear safety goggles.
- Remove any dangling jewelry or loose clothing.
- Tie back long hair.
Practice Makes Perfect
It took me a few tries to get comfortable with the drill's weight and learn how much pressure to apply. Practicing on scrap pieces of wood helped me gain confidence.
Advanced Techniques
Once you master the basics of using a drill, you can learn advanced techniques for more complex projects. These need more skill and patience but improve work quality and precision.
Angled Drilling
Angled drilling is a technique used to make holes at a specific angle. This is particularly useful in joinery and cabinetry, where angled screws can provide extra strength.
How to do it:
- Mark the spot where you want the hole.
- Use an angle guide or jig to ensure consistency.
- Start drilling slowly to establish the angle, then proceed with steady pressure.
Using Hole Saws
Hole saws are great for making large-diameter holes and are perfect for things like piping or wiring.
How to use them:
- Secure the material you're drilling into to prevent movement.
- Begin with a pilot drill bit to guide the hole saw.
- Apply a moderate amount of pressure and use a low drill speed to cut through the material.
Drilling into Tile or Glass
Drilling into hard, brittle materials like tile or glass requires a special diamond-tipped drill bit and a gentle touch.
Steps to follow:
- Place masking tape over the area to prevent the drill bit from slipping.
- Use a spray bottle to keep the area a bit wet, reducing heat and preventing cracks.
- Drill at a low speed without applying too much pressure.
Extracting Stripped Screws
A stripped screw can be a real headache, but with the right technique, you can remove it without damaging your material.
Technique:
- Use a screw extractor bit that is designed for this purpose.
- Set your drill to reverse and gently engage the extractor with the screw.
- Apply slow, steady pressure until the screw begins to back out.
Master these techniques to broaden your projects and enhance your work's finish. Practice often, and don't get discouraged by mistakes.
Project Planning
Project planning is key for using a drill or doing any DIY task. It ensures efficiency, safety, and success. Here's how to plan like a pro:
Understand Your Material
Before you start, identify the material you'll be working with. Different materials require different drill bits and techniques. For example, wood is forgiving, but metal demands precision and patience.
Measure Twice, Drill Once
Accuracy is key. Always measure your drilling points carefully. Use a pencil to mark where you'll drill and double-check distances. A ruler or a measuring tape can be your best friends here.
Select the Right Drill Bit
Choose a drill bit that matches the material and the size of the hole you need. Using the wrong bit can damage both the material and the bit itself.
Make a Step-by-Step Guide
Break down your project into manageable steps. Write them down in order, and tick them off as you complete each one. This will help you stay on track and ensure you don't miss anything important.
Prepare Your Workspace
Clear the area where you'll be working. Make sure it's well-lit and free from clutter. Secure the material you're drilling into so it doesn't move.
Anticipate Challenges
Think about what could go wrong and how you'll handle it. For instance, if you're drilling into a wall, check for pipes and wires first to avoid costly mistakes.
Practice Makes Perfect
If you're trying something new, practice on scrap material first. This will help you get a feel for the process and build confidence.
By following these steps, you'll set yourself up for success in any drilling project. Remember, good planning is the foundation of good execution.
Troubleshooting Common Issues
Drilling can come with its set of challenges, but most are easy to overcome with a bit of know-how. Here's a guide to troubleshooting some common issues you might encounter while using a drill.
The Drill Bit is Stuck
Sometimes, a drill bit can get stuck in the material you're working with. This can happen if the drill is not held straight or the material is particularly tough.
Solution:
- Reverse the drill and gently pull out.
- If that doesn't work, gently tap the bit with a hammer to loosen it.
The Drill Bit is Wandering
A wandering drill bit can make it hard to start a hole where you want it.
Solution:
- Make a small indentation with a punch to guide the bit.
- Start drilling at a slow speed until the bit is secure in the material.
The Battery Dies Quickly
If you're using a cordless drill and the battery dies quickly, it could interrupt your workflow.
Solution:
- Always have a spare battery charged and ready to go.
- If the battery is old, consider replacing it with a new one.
The Drill is Overheating
Overheating can occur during extended use or when drilling through tough materials.
Solution:
- Give your drill a break to cool down.
- Use the correct speed setting for the material to reduce friction.
Screws are Stripping
Stripping screws can be frustrating and can damage both the screw and the material.
Solution:
- Ensure you're using the correct size bit for the screw.
- Apply steady pressure and make sure the drill is at the right angle.
By being prepared to handle these common issues, you'll make your drilling experience smoother and more efficient. Patience and the right technique are often all you need to solve a problem.
Drill Maintenance
Maintaining your drill is key to ensuring it operates safely and effectively for years to come. Here's a straightforward guide to keeping your drill in top condition:
Regular Cleaning
After each use, wipe down your drill to remove dust and debris. A clean drill is less likely to malfunction and will perform better.
Check for Wear
Inspect your drill bits regularly for signs of wear. Dull or damaged bits can make your work harder and even damage your drill. Replace them as needed.
Lubrication
Keep moving parts lubricated. This will reduce friction and prevent overheating. Use a light machine oil on the chuck and any other moving parts.
Battery Care
For cordless drills, proper battery care is crucial. Store batteries in a cool, dry place and recharge them before they're completely dead to extend their lifespan.
Tighten Up
Periodically check that all screws and fittings on your drill are tight. Loose parts can lead to poor performance or even accidents.
Storage
Store your drill in a dry place to prevent rust and corrosion. A dedicated case or shelf can protect it from accidental drops or spills.
By following these simple steps, you'll keep your drill working smoothly and extend its life. Remember, a well-maintained tool is a reliable tool.
FAQs About How to Use a Drill
Discover essential FAQs about how to use a drill, covering safety tips, techniques, and expert advice for both beginners and pros.
A drill is a tool that can build holes in various materials or fasten materials together with screws. It's commonly used in construction, woodworking, metalworking, and DIY projects.
For most DIY projects, a cordless drill with a voltage between 12 to 18 volts is sufficient. Consider the material you’ll be working with and the power required. Brands like Ryobi offer a good balance between quality and price.
The key parts of a drill include:
Power source: Battery for cordless drills or cord for plug-in models.
Trigger: Controls the drill’s operation.
Chuck: The clamp that holds the drill bit in place.
Clutch: Adjusts the torque for different materials.
Speed button: Changes the drilling speed.
To use a drill safely:
Choose the correct drill bit for your material.
Secure the bit in the chuck and tighten it.
Set the torque and speed according to the material.
Hold the drill perpendicular to the surface.
Apply gentle pressure and start drilling.
Always wear safety goggles and follow the manufacturer's instructions.
Yes, a drill can also be used to drive screws in or out of materials, making it a versatile tool for assembling furniture, hanging pictures, or building projects. Use the forward/reverse button to switch between drilling and driving screws.
Final Thoughts
Wrapping up, understanding how to use a drill effectively can transform your DIY projects. With the right techniques and safety tips, you can drill with confidence and precision. Remember to choose the correct drill bit, maintain a steady angle, and always wear protective gear. Master these basics, and you're ready to tackle a variety of tasks. Keep practicing, and your skills will only improve. Happy drilling!


