MIG welding, also known as Gas Metal Arc Welding (GMAW), is one of the most beginner-friendly welding techniques, making it a great starting point for anyone interested in welding. Whether you're setting up a home shop or learning for professional use, understanding the essentials of MIG welding is critical to mastering the craft. Learn how to weld with this beginner's guide to MIG welding, covering essential techniques, tools, and safety tips for successful welding projects.
How MIG Welding Works
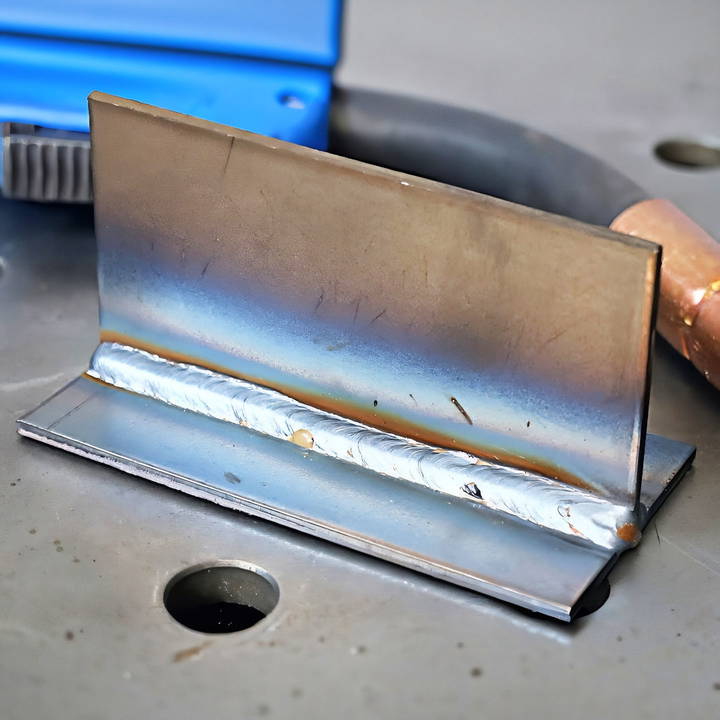
MIG welding works by making an electric arc between a wire electrode and the base metal. This arc generates heat, which melts the metal and the electrode wire, allowing them to fuse and form a weld. The wire is fed through a MIG gun, where shielding gas flows out to protect the molten weld pool from atmospheric contamination. Without this protection, the weld would be compromised by oxygen and nitrogen, leading to weak and porous welds.
Here's a quick breakdown of how the process works:
- The Arc: An electric arc forms between the wire electrode and the metal surface.
- Melting the Metal: The heat melts both the base metal and the wire.
- Adding Material: The wire feeds into the weld, reinforcing the connection.
- Shielding Gas: The gas emitted from the gun nozzle prevents the weld from contamination.
There are different variations of MIG welding, but the most common is short-circuit MIG welding, which we'll focus on.
Essential Equipment for MIG Welding
To start MIG welding, you need to have the right tools. Here's a list of the equipment you will need:
- MIG Welder: This is the core of your setup. Make sure you have a machine suited for the materials you plan to weld.
- Welding Helmet: Opt for an auto-darkening helmet with adjustable shade settings, typically ranging from 10 to 12 for MIG welding.
- Welding Gloves and Jacket: Thick welding gloves protect your hands from burns, and a cotton welding jacket shields your body from sparks and heat.
- Solid Welding Wire: The most commonly used wire for MIG welding is ER70S-6. Common diameters include .030 inches and .035 inches. Choose the right size based on the thickness of the metal you're welding.
- Shielding Gas: The standard mixture for MIG welding is 75% Argon and 25% Carbon Dioxide. For some projects, pure CO2 can also be used.
- MIG Pliers: These are useful for cutting wire, removing nozzles, and cleaning out the gun's nozzle.
- Work Clamp: This connects to the metal you're welding, completing the electrical circuit.
Step by Step Instructions
Learn MIG welding with our step-by-step guide. From installing the mig gun to perfecting your technique, master every aspect for flawless welds.
Step 1: Install the MIG Gun
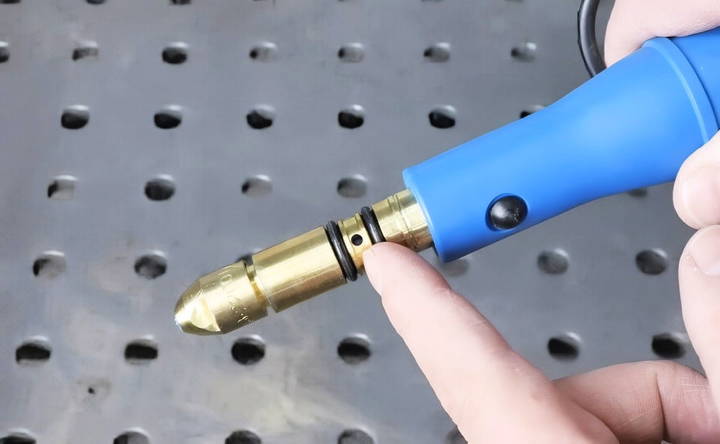
The first step in setting up your MIG welder is connecting the MIG gun. The gun connects to the machine via a large metal connector, with holes allowing gas to flow through. Most setups will have a separate plug for the trigger switch.
Step 2: Select the Correct Polarity
MIG welding requires the correct polarity for optimal results. For standard MIG welding with shielding gas, you'll use DC electropositive, meaning the gun (electrode) connects to the positive terminal, and the work clamp connects to the negative terminal. If you plan on using flux-core wire (which doesn't require shielding gas), you'll need to reverse the polarity.
Step 3: Set Up the Drive Rollers
MIG welders use drive rollers to feed the wire through the gun. Ensure that you're using the correct rollers for your wire size. For solid wire, you'll need smooth, V-shaped grooves. For flux-cored wire, knurled rollers are used.
Step 4: Install the Wire Spool
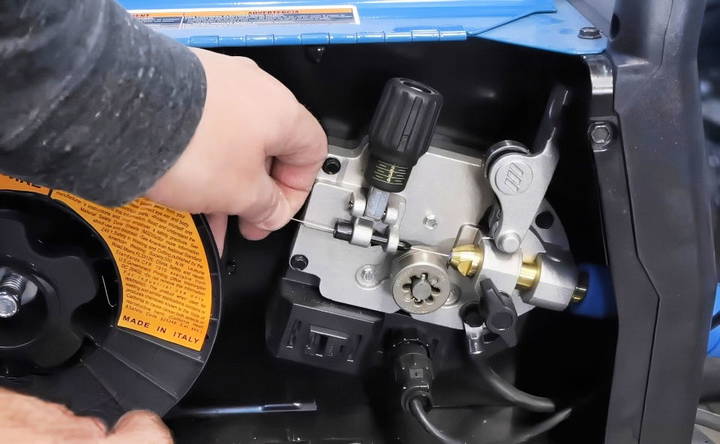
Place the spool of wire onto the machine. Make sure the spool can rotate freely, but avoid overtightening the tensioner. Feed the wire into the guide, over the drive roller, and into the liner that leads to the gun.
Step 5: Attach the Contact Tip and Nozzle
Remove the contact tip and nozzle from the MIG gun before feeding the wire. Once the wire feeds through the gun, install the correct-sized contact tip (which allows the wire to make an electrical connection) and nozzle.
Step 6: Connect the Shielding Gas
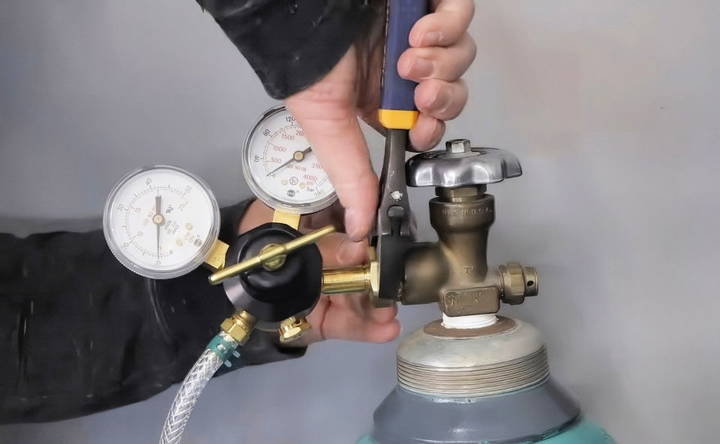
Secure the gas regulator to your gas cylinder and set the flow rate to around 25-30 cubic feet per hour (or 13-15 liters per minute). Make sure there are no leaks by cracking open the valve momentarily before fully opening it.
MIG Welder Settings
The two most important settings on a MIG welder are voltage and wire feed speed. These parameters directly impact the quality of your weld.
- Voltage: Controls the arc length. Too low, and the arc won't maintain; too high, and you'll get excessive spatter.
- Wire Feed Speed: Controls the amount of material and heat input. The higher the speed, the hotter your weld will be.
Most machines come with recommended settings for common material thicknesses. Start by following these recommendations and adjust as needed.
MIG Welding Technique
Welding technique is where practice and precision come into play. Here's a step-by-step guide to proper MIG welding technique:
1. Maintain Proper Stick-Out Distance
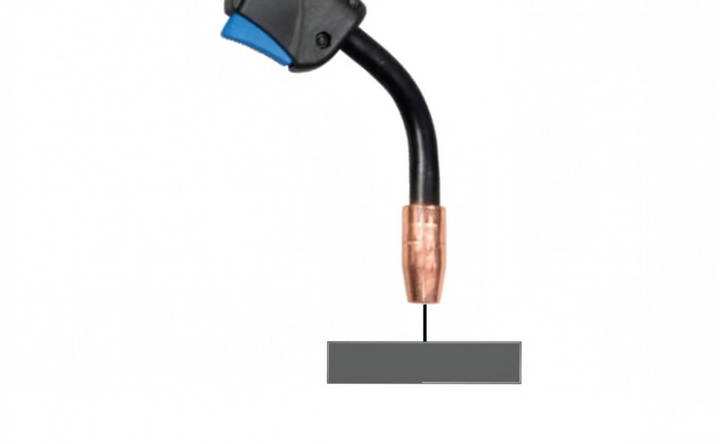
Stick-out refers to how much of the wire protrudes from the tip of the gun before you start welding. Ideally, your stick-out distance should be about 1/2 inch. Too much stick-out will reduce the effectiveness of the arc, while too little may cause spattering.
2. Gun Angle
There are two aspects to the angle:
- Work Angle: This is the angle between the gun and the workpiece in the perpendicular direction. On a flat surface, aim for 90 degrees, while in corners or joints (called fillet welds), a 45-degree angle works best.
- Travel Angle: In the direction of travel, aim for a 10-15 degree push angle.
A common mistake is inconsistent angles along the length of the weld. Pay close attention to your gun's position, and avoid twisting your wrist as you weld.
3. Travel Speed
Your travel speed controls the weld size. Move too fast, and your weld will be too narrow with undercut edges; move too slowly, and you'll risk burning through the material. Aim for a steady, consistent speed to avoid defects.
4. Movement or Manipulation
While some welders employ various patterns like loops or weaves, they are not necessary for most MIG welds. Simply moving in a straight line, maintaining a steady speed and consistent distance from the workpiece, is usually sufficient. In some cases, a small weave can help on vertical welds, but keep it minimal.
Common Problems and Fixes
Even experienced welders encounter issues. Here are some common problems beginners might face and how to solve them:
- Porosity in the Weld: This can happen if your shielding gas is insufficient or contaminated. Check for gas leaks or increase the gas flow rate.
- Too Much Spatter: Excessive spatter can occur if the voltage is too high or the wire feed speed is too fast. Adjust these settings to reduce spatter.
- Undercut: Undercut happens when the weld doesn't properly fill the joint, leaving a groove at the edge of the weld bead. Reduce your travel speed or adjust the voltage to allow more material to fill the joint.
Improving Comfort and Positioning
Welding can be physically demanding, especially if you're working in awkward positions. Comfort and stability are crucial for producing clean, strong welds. Use your free hand to stabilize yourself by propping it on the work surface or another part of your project. This will reduce hand fatigue and help maintain consistent technique.
Final Tips for Beginner MIG Welders
MIG welding is a versatile and accessible technique, but like any skill, it takes time and practice to master. Here are some final tips for beginners:
- Start Simple: Focus on welding flat surfaces first before moving on to more complex joints like corners and vertical welds.
- Practice, Practice, Practice: Run multiple practice welds, making small adjustments to settings and technique. The more you practice, the more intuitive welding becomes.
- Experiment with Settings: Don't be afraid to experiment with different voltage and wire feed speed combinations. This will help you understand how changes affect the weld quality.
By understanding how the equipment works, setting it up properly, and practicing correct techniques, you'll be well on your way to becoming proficient at MIG welding. Happy welding, and always remember—safety first!
FAQs for MIG Welding for Beginners
Discover essential FAQs for mig welding for beginners. Get answers to common questions and start your welding journey with confidence!
For most general MIG welding projects, a mix of 75% Argon and 25% CO2 is the best option. It offers a good balance between cost, weld quality, and ease of use. For aluminum welding, 100% Argon is required. Always choose the gas based on the material you're welding.
Yes, you can use flux-cored wire, which does not require shielding gas. This is ideal for outdoor work where wind might blow away shielding gas. However, for a cleaner weld, especially indoors, using gas with solid wire is preferred.
Start by following the recommended settings provided by your machine’s chart, usually found inside the machine cover. Voltage controls arc length while wire feed speed controls the heat going into your weld. Adjust these based on the material thickness and practice to find the right balance.
Excessive spatter can result from incorrect settings. If you're experiencing too much spatter, reduce your wire feed speed or lower the voltage slightly. Ensure proper shielding gas flow to avoid contamination.
Generally, pushing the MIG gun (leading the weld pool with the arc) results in a flatter bead with better visibility of the weld. Pulling (dragging) is sometimes used for deeper penetration, but pushing is recommended for most beginner welders.
A strong weld comes from a combination of good technique and correct settings. Proper stick-out (about 1/2 inch), a consistent travel speed, and maintaining a steady arc are essential. Also, make sure to clean the metal surface before welding to ensure proper adhesion.
Holes, also known as porosity, are caused by contamination in the weld pool. This can happen if there isn't enough shielding gas or if the workpiece is dirty. Make sure to clean your material well and check the gas flow to avoid this problem.
No. Steel requires a CO2-Argon mix, while aluminum welding uses pure Argon. Each material has its specific shielding gas needs, so always check before starting your project.
Stick-out refers to the distance between the tip of the contact tube and the workpiece. A stick-out of about 1/2 inch is recommended for MIG welding. Too much stick-out can cause an unstable arc and spatter, while too little can burn through the material.
If you're experiencing erratic wire feed or unusual resistance when feeding the wire, it might be time to replace the liner. Regularly check for dirt buildup, as a clogged liner can affect weld quality.


