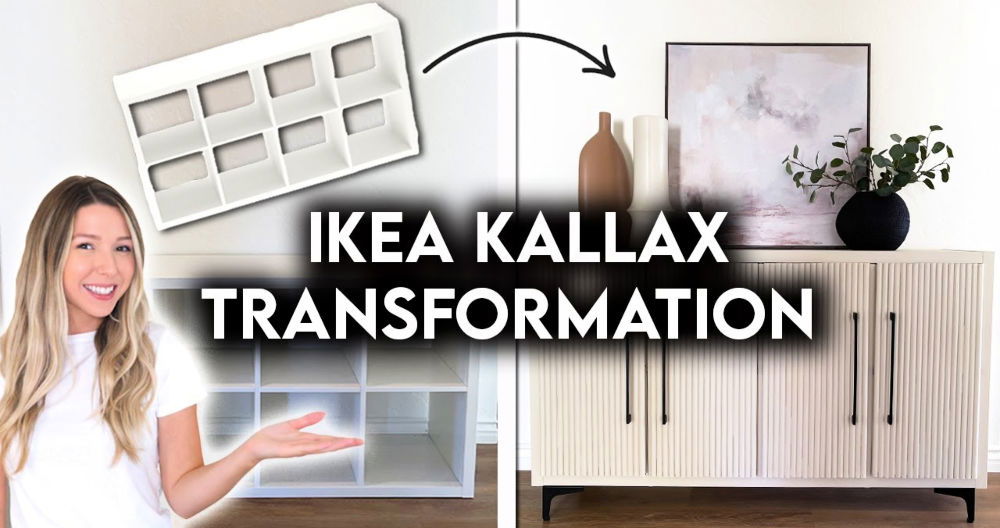
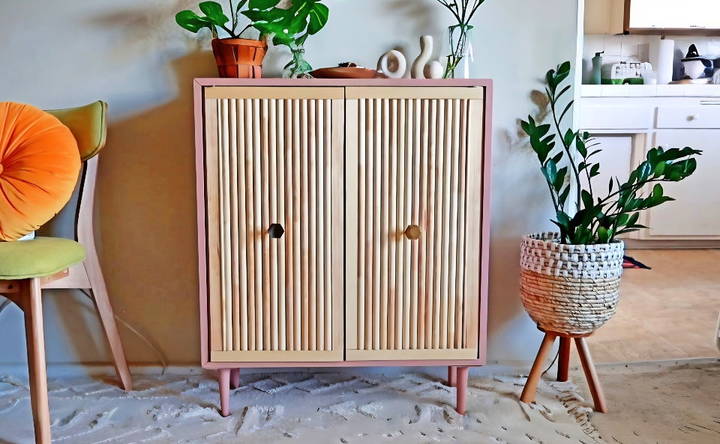
Today, I'll guide you step-by-step on my experience of transforming an IKEA Eket cabinet into a stunning piece of home décor. Whether you're sprucing up a small apartment or a cozy corner, this DIY IKEA eket hack project is for you. Let's dive in!
Understanding the IKEA Eket Cabinet Makeover
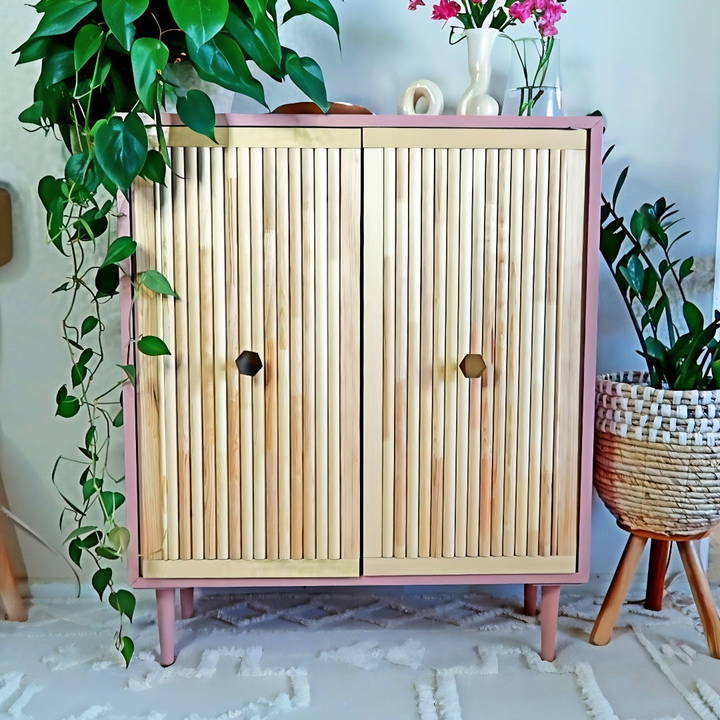
The IKEA Eket cabinet is a simple and versatile piece that can fit perfectly into small spaces. With dimensions of 27.5 inches by 27.5 inches and a depth of about 10 inches, it's compact yet functional. My makeover idea came from pieces I stumbled upon online—a Target furniture piece I adored and a Pinterest post that offered a beautiful color combination. I aimed to combine these inspirations into one unique masterpiece.
Materials and Why They're Needed
- Ikea Eket Cabinet: A compact and versatile storage piece perfect for small spaces.
- Half Round Molding: Chosen to add a decorative texture to the cabinet surfaces, giving it a unique, customized look.
- Flat Molding: Used to frame the decorative molding, accentuating the design and providing a polished finish.
- Primer and Paint: Essential for preparing and coloring the cabinet, turning it into a piece that matches your space perfectly.
- Polyurethane: A sealing agent to protect the paintwork and ensure durability.
- Legs (optional): To elevate the cabinet off the ground, enhancing its appearance and making it easier to clean underneath.
- Gorilla Glue: For securely attaching the wood pieces to the cabinet.
- Wood Stain: To finish the wood with a natural look that complements the paint color.
- Handles: The final touch to make the cabinet both functional and aesthetically pleasing.
Step by Step Instructions
Discover step-by-step instructions on the IKEA Eket hack to build stylish, custom furniture. Easy, creative tips for transforming IKEA shelves.
Cutting and Sanding the Molding
I began with the woodwork, cutting the half-round molding to length. Each piece measured 23 inches and 7/8, though I found that a slight adjustment to 23 inches and 3/4 would have eliminated a tiny overlap. After cutting, I smoothed out the edges with sanding blocks. This step ensures that your cabinet has a professional, clean look with no rough edges.
Priming and Painting the Cabinet
Next, I applied a coat of Bullseye's one-two-three primer with a roller, preparing the surface for painting. Choosing "Retro Pink" from Bear provided a mature yet vibrant color, distinguishing it from more juvenile pinks. Once the paint dried, I sealed the surface with a satin finish polyurethane for protection and a subtle sheen.
Adding Legs (Optional)
To enhance the cabinet's design, I opted for six-inch-long legs, which I painted and sealed following the same steps. Adding legs not only boosts the aesthetic appeal but also increases functionality by making cleaning easier.
Attaching the Molding
Initially, I attempted to apply Gorilla Glue directly from the tube but found spreading it with a paintbrush offered a more even application, ensuring every piece adhered well.
Solving a Small Snag
After attaching the molding, I realized the cabinet door wouldn't open due to the wood obstructing its path. A quick adjustment by removing one piece allowed for the necessary clearance. This hiccup reminded me of the importance of measuring and considering the functionality of moving parts in DIY projects.
Drilling and Attaching Handles
Selecting stylish handles from CB2, I measured and drilled the holes, ensuring they were perfectly centered on each door. Attaching the handles marked the culmination of the transformation, providing both function and a sleek finish.
Reflections and Tips
- Measure Twice, Cut Once: Always double-check your measurements, especially when working around moving parts like cabinet doors.
- Ventilation and Safety: When staining and using strong adhesives, work in a well-ventilated area and wear protective gear.
- Personalization: Don't be afraid to mix and match inspirations or add personal touches. This project was a hybrid of styles I loved, and I would encourage you to bring your unique vision to life.
Challenges and Solutions
When it comes to customizing IKEA EKET units, enthusiasts often encounter a few common challenges. Here's a helpful guide to overcoming these obstacles:
Limited Space
- Solution: Measure your space accurately before starting. Use EKET's modular design to build vertical or horizontal arrangements that fit snugly into your area. Wall-mounted configurations can save floor space and add a modern touch.
Matching Decor
- Solution: EKET's simplicity makes it versatile. Choose paint or finishes that complement your existing decor. Adding legs or knobs that match other furniture can also help to integrate your EKET hack seamlessly.
Sturdy Assembly
- Solution: Ensure all connections are tight and secure. Use the right tools for assembly, and if you're stacking units, always anchor them to the wall to prevent tipping. This is crucial for safety, especially in homes with children.
Personalization
- Solution: Make your EKET unit one-of-a-kind by adding personal touches. This could be through unique color schemes, decorative decals, or even integrating it with other IKEA pieces for a custom look.
Budget Constraints
- Solution: Plan your project carefully to avoid unnecessary expenses. Look for sales or second-hand EKET units. DIY some elements, like handles or legs, from inexpensive materials.
Tool Availability
- Solution: If you don't have all the tools needed, consider borrowing from friends or renting from local hardware stores. Many communities also have tool libraries or maker spaces where you can access tools for your project.
By anticipating these challenges and preparing solutions, you'll be well on your way to making a functional and stylish EKET unit that meets your needs.
Safety Precautions
When undertaking any DIY project with IKEA EKET units, safety should always be your top priority. Here are some key safety precautions to keep in mind:
Personal Protective Equipment (PPE)
- Wear the right gear. Always use safety glasses to protect your eyes from dust and debris. If you're painting or drilling, wear a dust mask and ear protection.
Safe Workspace
- Keep your area tidy. Ensure your workspace is well-lit and free of clutter. A clean space minimizes the risk of accidents.
Tool Safety
- Handle tools with care. Use tools according to their instructions and only for their intended purpose. Keep sharp tools away from children and store them securely after use.
Lifting Techniques
- Lift properly. When moving your EKET unit, bend at the knees and keep your back straight to avoid strain. If it's too heavy, get help.
Chemical Safety
- Be cautious with chemicals. If you're using paint or solvents, work in a well-ventilated area. Keep these substances out of reach of children and pets.
Electrical Safety
- Watch for wires. If you're drilling holes, be aware of the location of electrical wires to avoid shocks or damage.
Fire Safety
- Prevent fires. Keep flammable materials away from heat sources. Have a fire extinguisher nearby, just in case.
Follow these safety tips to customize your EKET furniture safely. A little preparation ensures a safe and successful DIY project.
FAQs About IKEA EKET Hacks
Discover answers to common faqs about IKEA eket hacks, including customizing your storage solutions in creative and functional ways.
One of the easiest ways to personalize your EKET cabinet is by using contact paper or peel-and-stick wallpaper. You can choose a design that complements your room and apply it to the doors and sides of the cabinet for an instant makeover. Another option is to replace the top of the cabinet with a wooden board or add stylish handles to give it a unique look.
Absolutely! The EKET series is versatile enough to be transformed into various types of furniture. For example, you can create a slim console table by turning the cabinet on its side and adding legs. It’s also possible to build a play kitchen for children by combining different EKET units and adding knobs and pulls.
To add more character, consider painting the cabinet in a color that stands out or matches your decor. Adding custom legs with unique designs, such as woven leather details, can also elevate the look of your EKET cabinet. Some people even use washi tape to create geometric patterns on the cabinet doors.
Yes, EKET cabinets are ideal for small spaces because they can be wall-mounted or stacked. You can use them to build a tall storage unit that takes up minimal floor space but offers ample vertical storage. This is particularly useful in areas like playrooms or home offices where floor space is at a premium.
Certainly! For a creative yet simple hack, you can arrange EKET shelves in a funky pattern or use them to build a DIY dressing table by mounting them on the wall and adding a tabletop. Another idea is to replace the cabinet doors with plywood and cane detailing for a more textured and natural look.
Conclusion
In conclusion, embracing an IKEA eket hack can transform your living space with creative and personalized storage solutions. With a bit of time and effort, you can design stylish and functional pieces that suit your needs. Explore different ideas and get inspired to give your home a unique touch. This approach not only maximizes space but also adds a personal flair to your decor. Get started today and see how an ikea eket hack can upgrade your home!


