Making something with my own hands has always given me a sense of accomplishment. So, when I stumbled upon the idea of a DIY industrial mirror for my dining room, I knew I had to bring it to life. Not only was this an opportunity to flex my creative muscles, but it also promised to be a cost-effective alternative to buying a ready-made mirror.
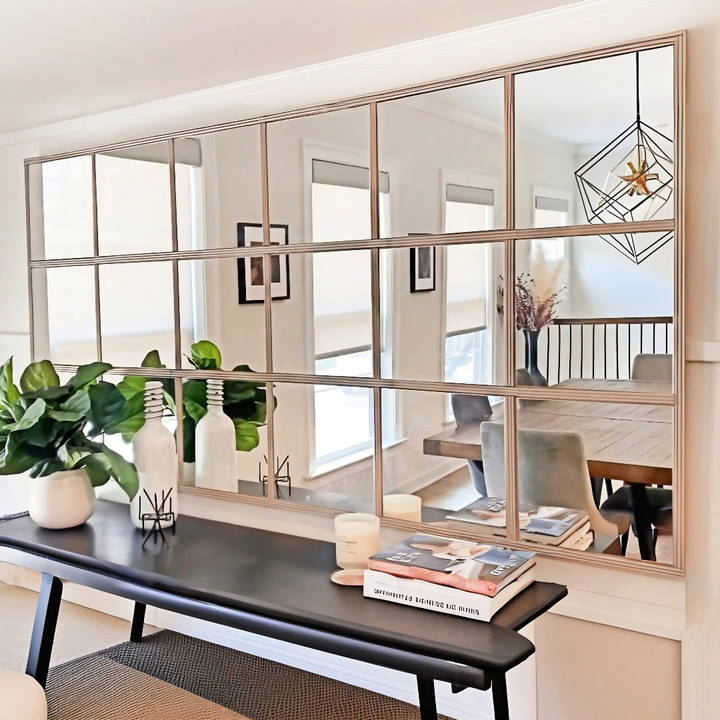
Here's how I transformed my dining space with an IKEA mirror hack and how you can.
Understanding IKEA Mirrors
When it comes to interior design, mirrors are more than just tools for reflection; they're essential elements that can transform a space. IKEA mirrors, in particular, stand out for their affordability, quality, and aesthetic versatility. They come in a wide array of sizes, shapes, and styles, making them suitable for almost any design concept.
Why Choose IKEA Mirrors?
IKEA mirrors are popular because they offer practical solutions without compromising elegance. Whether you're aiming to enhance a room's natural light or add an unexpected element to your decor, IKEA mirrors can integrate into and elevate the aesthetic of any space. Their adaptability ensures that they can fit into various design narratives, from modern minimalism to classic elegance.
Maximizing Small Spaces
Using IKEA mirrors is a smart way to make small areas look more spacious and welcoming. By placing mirrors strategically, they can amplify natural light and build the illusion of depth, making tight spaces feel larger and more open. This is especially useful in small apartments or rooms where you want to build an airy atmosphere without major renovations.
Personalization
One of the joys of IKEA mirrors is the ability to personalize them. With a bit of creativity, you can transform a standard mirror into a piece that reflects your unique style. Paints, artistic decals, or distinctive frames can turn an IKEA mirror into a statement piece that resonates with your personal taste and complements your home's decor.
Understanding IKEA mirrors' potential is key. They're functional and powerful design elements that enhance your space's beauty. Customization options are nearly endless, letting your home reflect you.
Materials and Their Purpose
- IKEA Mirrors: I chose these for their affordability and simplicity. You'll want a few packs depending on the size of your intended mirror.
- Plywood or MDF Board: This serves as the foundation. I found mine at Lowe's and cut it to my desired dimensions.
- Wooden Battens: Used to build sections between the mirrors for that industrial look.
- Spray Paint: Opt for a 2-in-1 paint and primer to save time. Select a color that complements your dining room palette.
- Keyhole Fasteners: These will help securely mount your mirror to the wall.
- Mirror Adhesive: A must-have for securing your mirrors to the foundation without relying solely on the provided stickers, ensuring a durable hold.
Step by Step Instructions
Learn step-by-step instructions on ikea mirror hack to transform your space with affordable, stylish, and customized mirror designs.
1. Planning Your Layout
Before diving in, it's crucial to plan. Measure your IKEA mirrors and decide on your layout. For my project, I aimed for a 3x6 mirror array. After doing some math with the dimensions of the mirrors (12 inches each) and the wooden battens (0.75 inches each), I determined that my foundation needed to be 39 inches tall and 77.25 inches wide.
2. Preparing the Foundation
After purchasing my plywood, I cut it to the required dimensions (39" x 77.25"). Then, I laid out four 2x4 MDF boards and marked where I needed to cut, allowing me to achieve the width and height necessary for my design.
3. Assembling the Foundation
Next, I secured the MDF boards together using wood glue and short screws for extra stability, especially at the joints. This step is crucial for ensuring your foundation is solid and capable of supporting the weight of your mirrors.
4. Painting the Battens
I chose a sleek, dark grey spray paint for my wooden battens to contrast nicely with the mirrors. Painting before assembly helped avoid overspray on the mirrors. Always paint in a well-ventilated area and let dry according to the paint's instructions.
5. Laying Out the Mirror and Battens
First, I laid my mirrors on the foundation without adhesive to perfect my design. Then, I cut and placed my painted wooden battens between each row and column of mirrors, using wood glue to secure them. It's easier to make adjustments at this stage before anything is permanently fixed.
6. Securing the Mirrors
Once satisfied with the layout, I lifted each mirror, applied a generous amount of mirror adhesive to the back, and pressed them firmly in place. The adhesive I used was designed for mirrors, ensuring a stronghold that's essential for a hanging piece.
7. Adding Finishing Touches
Finally, I installed keyhole fasteners on the back of the plywood for mounting. This step required precise measurement and drilling but was straightforward. Ensuring these were evenly spaced and aligned was critical for a stable and level hang on the wall.
Customization Tips
Customizing an IKEA mirror is a fantastic way to add a personal touch to your home decor. These mirrors are like blank canvases waiting for your creative expression. Here are some tips to help you personalize your IKEA mirror:
Choose Your Style
First, think about the style you want to achieve. Do you prefer a modern look, or are you more inclined towards a vintage aesthetic? Your style choice will guide the customization process, ensuring that the end result complements your space perfectly.
Paint It Up
A simple and effective way to customize your mirror is by painting the frame. Choose a color that matches your room's palette or go bold with a contrasting hue for a statement piece. Use high-quality paint and apply it evenly for a professional finish.
Add Texture
If you're feeling adventurous, consider adding texture to your mirror frame. You can use materials like rope, fabric, or even recycled items to build a unique look. This not only adds visual interest but also tactile appeal.
Decorative Decals
Decals are an easy way to add intricate designs to your mirror without permanent changes. They come in various patterns and are easily removable, so you can change them as often as you like.
Make a Gallery Wall
Combine multiple IKEA mirrors of different shapes and sizes to build a gallery wall. This not only personalizes your space but also turns your wall into a focal point of the room.
Lighting
Adding lights around your mirror can transform it into a functional piece that's perfect for areas like the vanity. LED strip lights or fairy lights can build a warm ambiance and enhance the mirror's utility.
Customize an IKEA mirror to reflect your style and enhance your space with these tips. Transform a basic mirror into a unique decor piece.
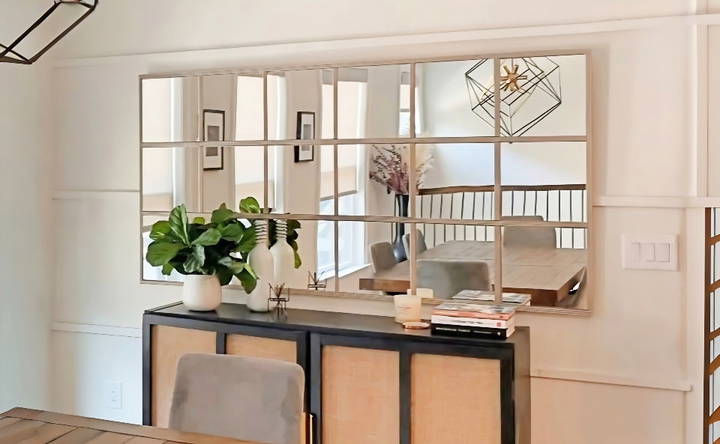
Challenges and Solutions
Embarking on an IKEA mirror hack can be an exciting project, but it's not without its challenges. Here, we'll explore some common obstacles you might face and provide practical solutions to help you achieve a flawless finish.
Measuring and Placement
- Challenge: Finding the perfect spot for your mirror and ensuring it fits can be tricky. Incorrect measurements can lead to a mirror that looks out of place or doesn't fit the intended space.
- Solution: Always measure your space twice before starting. Consider the mirror's proportions in relation to the room. Use painter's tape to outline where the mirror will go, which helps visualize the final placement without commitment.
Secure Installation
- Challenge: Installing a mirror securely can be daunting, especially if you need to drill holes in walls.
- Solution: If you're not comfortable with power tools, consider using strong adhesive strips designed for hanging mirrors. For heavier pieces, seek professional help to ensure a safe and secure installation.
Alignment
- Challenge: Aligning multiple mirrors for a cohesive look requires precision. Even a small misalignment can disrupt the visual flow.
- Solution: Use a level and mark guidelines on the wall with a pencil. Start from the center and work your way out, checking alignment as you go.
Customization Techniques
- Challenge: Personalizing a mirror to match your decor can be challenging if you're unsure about the materials or techniques to use.
- Solution: Research different customization methods, such as painting, adding decals, or attaching frames. Test your technique on a small, inconspicuous area first.
Durability
- Challenge: Ensuring your customized mirror withstands the test of time is important. Some materials may not adhere well or could damage the mirror surface.
- Solution: Choose high-quality, mirror-safe materials. If you're applying paint or adhesive, make sure it's compatible with the mirror's surface.
IKEA mirror hacks can be tricky but doable with planning. Anticipate and solve issues to add a personal touch to your space.
Maintenance and Care
Keeping your IKEA mirrors clean and well-maintained is key to ensuring they continue to brighten your space effectively. Here's a straightforward guide to help you take care of your mirrors:
Regular Cleaning
- Dust and Clean Regularly: To maintain the clarity of your mirror, dust it gently with a microfiber cloth. For a deeper clean, use a solution of water and vinegar – this helps to avoid streaks and keeps your mirror sparkling.
Dealing with Stains
- Remove Stains Promptly: If you notice spots or stains, tackle them immediately with a soft, damp cloth. Avoid harsh chemicals that can damage the mirror's surface.
Safe Removal
- Removing Mirrors Safely: If you need to remove your IKEA mirror, do so carefully. Use a heat source like a hairdryer to loosen adhesive tapes. Slide a ruler or a plastic card behind the mirror to gently pry it off the wall. Always protect the wall and the mirror to prevent damage.
Preventing Damage
- Avoid Moisture Build-up: In damp areas like bathrooms, ensure your mirror is not constantly exposed to moisture. This can cause the edges to deteriorate over time. Ventilate the room well after showers or baths.
Longevity Tips
- Protect the Edges: The edges of mirrors are most susceptible to damage. You can apply a clear sealant to the edges to prevent them from “foxing,” which is when they start to darken or show age.
Keep your IKEA mirrors looking great with simple maintenance. This ensures they remain functional and stylish, adding lasting charm to your home.
FAQs About IKEA Mirror Hack
Discover answers to all your ikea mirror hack questions. Learn tips, tricks, and solutions for DIY mirror projects with our comprehensive faq guide.
IKEA mirror hacks are creative modifications and personalizations that individuals can apply to IKEA mirrors. These hacks can range from simple additions like unique frames or decals to more complex projects like constructing a mirror wall or integrating lighting.
Hacking an IKEA mirror allows you to customize a standard product to better fit your personal style and the decor of your space. It's a cost-effective way to build a piece that looks high-end or to add functionality, such as storage or lighting, to a basic mirror.
Strategically placing IKEA mirrors in small spaces can reflect light and give the illusion of a larger area. Positioning mirrors to bounce light around a room can make compact spaces feel more open and airy.
Some simple hacks include adding a new frame to an existing mirror, applying decorative stickers, or painting the mirror's edges. These are all easy ways to add a personal touch without needing extensive DIY skills.
The main challenges might include ensuring the mirror is securely attached to the wall and finding the right materials for your project. It's important to follow safety guidelines and manufacturer instructions when mounting mirrors to prevent accidents.
Conclusion
This DIY industrial dining room mirror project was more than just a decor enhancement; it was a journey of creativity and practical ingenuity. The satisfaction derived from combining store-bought elements and personal touches is unmatched.
Whether you're experienced in DIY projects or a complete novice, this guide should provide the insights and steps needed to build your own statement mirror. So, embrace your inner artisan and transform your space with this IKEA mirror hack.


