When my husband and I decided it was time to refresh our bathrooms, we wanted to ensure that the new look was both functional and stylish. We turned to our trusted go-to, IKEA, not just for affordability but also for the possibilities it offered in customization. Follow me on this journey as I walk you through our IKEA vanity hack that turned our spaces into elegant and practical sanctuaries.
Choosing the Right IKEA Modules
Our home features two bathrooms, each requiring a different approach due to their sizes. My goal was to enhance them aesthetically and functionally without breaking the bank. After careful consideration, I chose IKEA's classic bathroom modules as my base. The flexibility and straightforward design of these modules made them an ideal candidate for a bespoke hack.
Materials Needed and Why
- IKEA Bathroom Modules: The heart of this hack, chosen for their affordability and customizability.
- Primer and Paint: To give the modules a color refresh. I opted for a high-quality, semi-gloss paint for durability and ease of cleaning.
- Brush or Paint Sprayer: I used both, depending on the piece I was working on. While brushes offer precision, sprayers speed up the process and ensure an even coat.
- Screws and Tools for Assembly: Necessary for combining modules and making adjustments.
- Knobs or Handles: To add a personal touch to the vanities. I went for brass knobs to complement my grey and brass color scheme.
- Countertops and Sinks: I chose Carrera marble for its elegance and durability.
- High-Quality Sealant: To protect the countertops and vanity from water damage.
Step by Step Instructions
Transform your space with our step-by-step instructions on ikea vanity hack. Easy guide for a stylish, budget-friendly vanity makeover.
Step 1: Planning and Designing Your Space
Before embarking on any physical work, I buildd a mood board combining paint swatches, tile samples, and potential fixtures. This step was crucial in settling on a cohesive color scheme and ensuring that all elements would harmonize in the final design.
Step 2: Preparing and Painting the Modules
After purchasing the IKEA modules, I decided to add a personal flair by painting them. Using a quality primer, I prepared the surfaces to ensure the paint would adhere well. Painting was perhaps the most gratifying part of the process. While it required patience, especially waiting for layers to dry, the transformation was immensely rewarding. For spaces between modules that wouldn't be visible, I skipped painting to save time and material.
Step 3: Assembly and Customization
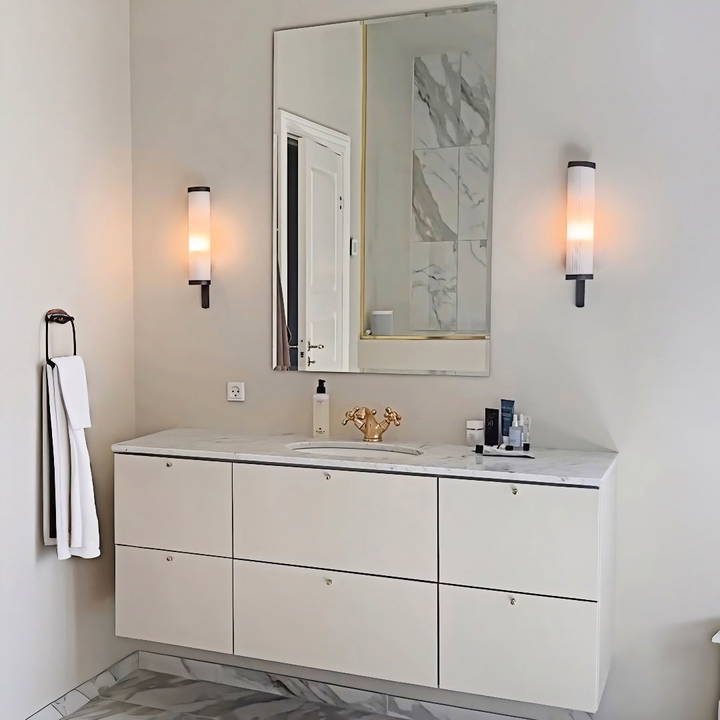
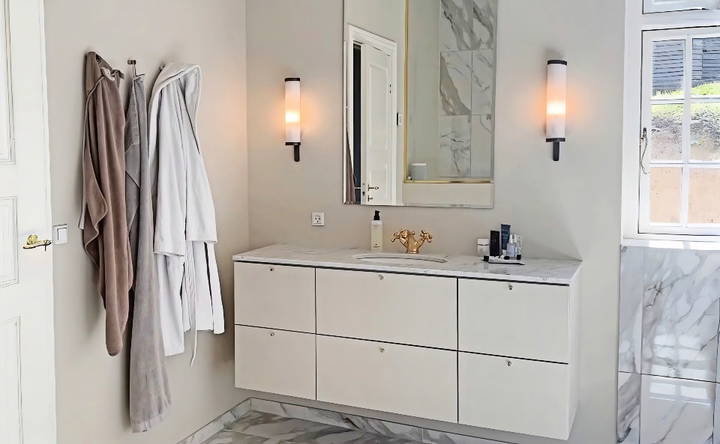
Once the paint had dried, assembly was done next. The clearer the vision for your space, the smoother this step will go. For our master bathroom, I connected a 60-centimeter module flanked by two 40-centimeter modules to build ample storage. In the smaller bathroom, a single 100-centimeter module sufficed. Adjusting drawer slides and ensuring everything was level took precision, revealing why a keen eye for detail is vital in DIY projects.
Step 4: Countertop and Sink Installation
The countertops and sinks elevate the IKEA modules from basic to chic. While I had professionals handle this part, especially the plumbing, choosing the right materials was my domain. The marble counters added a luxurious feel, and the under-mount sinks kept the lines sleek and modern.
Step 5: Adding the Finishing Touches
With the structure in place, I focused on the details that personalize a room. Brass knobs, chosen for their classic look, were added to drawers. Opting for fixtures that would patina over time meant embracing change as a part of the room's character.
Personalization Ideas for Your IKEA Vanity
Personalizing your IKEA vanity can transform a simple piece of furniture into a unique and stylish statement in your home. Here are some creative ideas to inspire your own vanity project:
- Choose a Theme: Start by deciding on a theme that reflects your personality. Whether it's minimalist, bohemian, industrial, or vintage, let your theme guide your choices in colors, textures, and accessories.
- Paint It Up: A fresh coat of paint can do wonders. Choose a color that complements your bathroom or dressing area. For a more durable finish, consider using a paint designed for furniture.
- Change the Hardware: Swapping out the knobs and handles on your vanity is an easy way to make a big impact. Look for hardware that matches your chosen theme and adds a touch of elegance or whimsy.
- Add a Personal Touch: Consider adding elements that are uniquely you. This could be a monogrammed towel, a favorite piece of artwork, or a decorative tray to hold your perfumes and lotions.
- Light It Right: Good lighting is crucial for a vanity. You can add LED strip lights around the mirror or change the existing fixtures to something more stylish and functional.
- Organize Smartly: Use drawer dividers, small boxes, or trays to organize your makeup and accessories. This will keep your vanity looking neat and make getting ready in the morning a breeze.
- Mirror Magic: The mirror is the focal point of any vanity. Consider framing your existing mirror with wood or tile for a custom look, or replace it with a statement mirror that fits your style.
- Top It Off: If your vanity top looks worn, consider covering it with contact paper or replacing it with a new material like marble or butcher block for a high-end look without the high price.
- Go Green: Adding plants or flowers to your vanity can bring life and color to the space. Choose low-maintenance plants that thrive in bathroom environments.
- Accessorize: Finally, accessorize your vanity with functional and decorative items. A beautiful soap dispenser, a chic jewelry stand, or a stylish chair can all enhance the overall look of your personalized vanity.
The key to personalizing your IKEyA vanity is to make it your own. Have fun with the process, and don't be afraid to experiment with different ideas until you find the perfect combination that speaks to you.
Maintenance and Care Tips for Your IKEA Vanity
Keeping your IKEA vanity in top shape is key to ensuring it lasts for years to come. Here are some straightforward and practical tips to help you maintain and care for your vanity:
- Regular Cleaning: Dust and wipe down your vanity weekly with a soft, damp cloth. For tougher stains, use a mild soap solution but avoid harsh chemicals that can damage the finish.
- Protect from Water: Water can damage wood and cause mold. Make sure to quickly wipe up any spills and consider using a water-resistant sealant on wood surfaces.
- Avoid Direct Sunlight: Prolonged exposure to sunlight can fade the color of your vanity. Try to position it away from direct sunlight or use curtains to minimize exposure.
- Gentle Use: Treat drawers and doors with care. Avoid slamming them shut, which can loosen joints and hardware over time.
- Update Hardware: If knobs or drawer pulls become loose, tighten them promptly. Replacing them periodically can also prevent wear and tear.
- Organize Wisely: Use organizers inside drawers to prevent scratching the interior with sharp objects like scissors or tweezers.
- Check Joints and Hinges: Once a year, check all the joints and hinges to ensure they're tight and secure. This can prevent wobbling and misalignment.
- Surface Care: If your vanity has a glass top, use a glass cleaner to keep it sparkling. For wood surfaces, a wood cleaner can enhance its natural beauty.
- Freshen Up: Every few years, consider giving your vanity a fresh coat of paint or a new finish to keep it looking modern and new.
- Seek Professional Help: If there's significant damage or wear, consult a professional for repair or refinishing services.
By following these simple tips, you can keep your IKEA vanity looking as good as new. Regular maintenance not only extends the life of your vanity but also makes your daily routine more pleasant.
FAQs About IKEA Vanity Hack
Discover answers to common questions about IKEA vanity hacks, including design tips, DIY steps, and best practices for a stylish bathroom upgrade.
An IKEA vanity hack involves modifying or combining IKEA furniture pieces to build a custom vanity that fits your space and style needs. It's a creative and cost-effective way to personalize your bathroom or makeup area.
You can customize an IKEA vanity by choosing different color schemes, materials, knobs, or handles. Additionally, you can paint parts of the IKEA modules, assemble drawers differently, or even alter the structure to fit specific sinks and countertops.
Popular IKEA products for vanity hacks include the GODMORGON bathroom series, MALM dressing table, and ALEX drawer units. These provide a good balance of style and functionality for custom vanities.
Yes, many IKEA vanity hacks are designed to be DIY-friendly. However, for certain steps like installing countertops, sinks, and fixtures, it might be safer and more precise to have professionals handle those parts.
Before starting your hack, consider the following:
The dimensions of your space to ensure everything fits properly.
The plumbing requirements for your bathroom.
The overall cost, including any additional materials or professional help you might need.
The time commitment required to complete the project.
Conclusion: My Personal Experience and Advice
In conclusion, this IKEA vanity hack brought together design, functionality, and personal style, transforming our bathrooms into pieces of art. If you're contemplating a similar project, I hope my experience provides you with the inspiration and guidance needed to make your own stunning bathroom transformation.


