I found making stuffed animals to be really comforting. Once, I wanted to surprise my little sister with a handmade gift. I decided to make a stuffed animal for her. I gathered all my materials: fabric, stuffing, needle, and thread. It wasn't difficult at all, and I had a lot of fun.
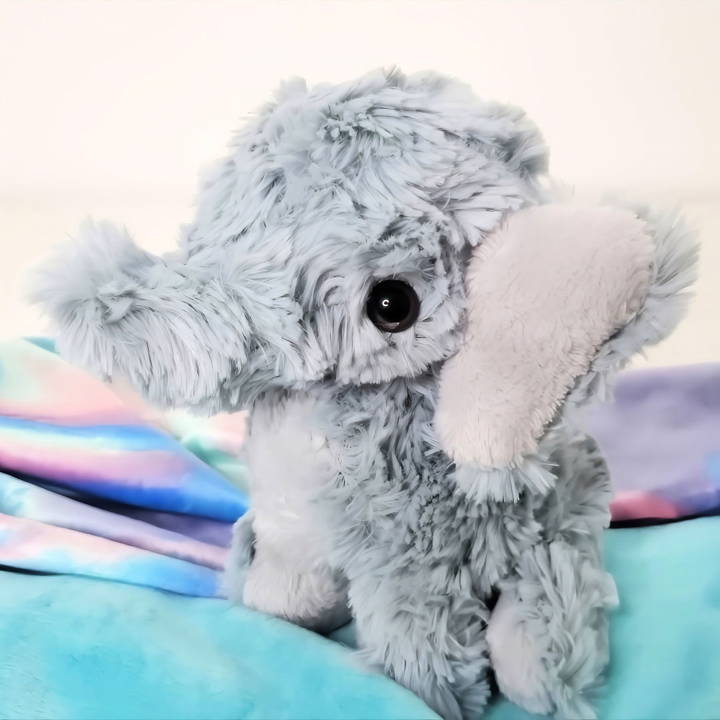
Starting on this DIY project was the best decision. I followed simple steps to make a lovable plushie. Seeing my sister's smile when she hugged the stuffed animal made all the effort worth it. Making your own stuffed animal is a rewarding experience.
This guide will help you make your own stuffed animal. I hope you find these steps as helpful as I did.
Gathering Materials: Why Each Is Crucial
Before diving into the how-to, let's talk about materials and why each plays a pivotal role in the crafting process:
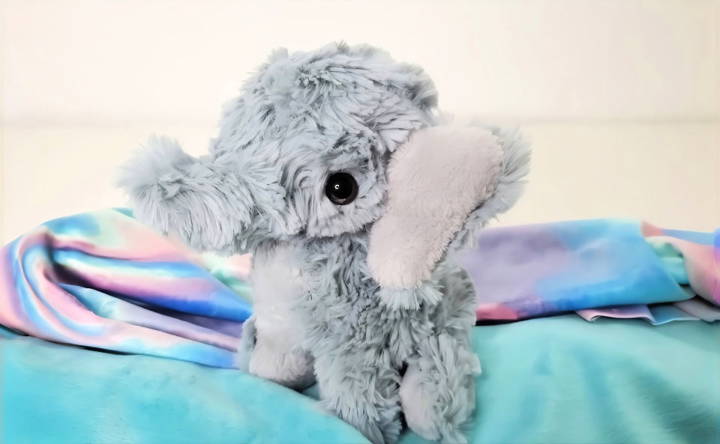
- Soft Fabric: For the elephant's body, I chose a gray-blue furry fabric. The texture and color mimic an elephant's skin, giving a lifelike feel to the plushie.
- Accent Fabric: A lighter gray fabric for the ears, belly, and feet adds contrast and brings character to your creation.
- Thread and Bobbin: Essential for holding everything together. Color-match them to your fabric for a seamless look.
- Scissors and Pins: Precision cutting and securing patterns to fabric are a must for accurate shapes.
- Sewing Machine: Speeds up the sewing process, especially for long, straight stitches.
- Stuffing (Polyfill): Bring your stuffed animal to life, transforming it from flat fabric to a huggable friend.
- Safety Eyes: These add personality and are easy to install. Choose a color that complements your fabric.
Step by Step Instructions
Learn the step-by-step instructions for making a DIY stuffed animal, from sketching patterns to final touches. Perfect for all DIY enthusiasts!
Sketching and Making Your Pattern: The Roadmap to Success
My first step is sketching the elephant. Without precise measurements—I lean on a more intuitive approach—I sketched what felt right. Remember, this is about making, not perfection. I drew individual parts: the body, head, ears, trunk, and feet, and then cut these sketches out. This makeshift roadmap, albeit unconventional, was the foundation of my plushie.
From Sketch to Fabric: Cutting with Intent
Laying my patterns onto the chosen fabric, I made sure to pin them securely before the cut. This step is messy, especially with furry fabric, so prepare for a cleanup. Each piece was cut with care, understanding that these shapes would soon morph into a three-dimensional friend.
Sewing Begins: Threading the Bobbins and Beyond
After threading my sewing machine—a task that sounds simpler than it is—I started with the elephant's head. Sewing the pieces together and watching the fabric take shape was nothing short of magical. The process, however, required patience, especially when joining the head gusset to the face, ensuring the eventual expression of our stuffed friend would be just right.
The Art of Stuffing: A Lesson in Fluff
Stuffing the elephant was an adventure in itself. Previously, I may have been heavy-handed with polyfill, but a tip from a kind commenter changed my approach: fluff before you stuff. This method ensures even distribution, giving your plushie a firm yet cuddly feel.
Final Touches: Bringing Life to Fabric
Attaching the ears and sewing in the safety eyes gave character to the once-flat fabric. It's these details that turn a project into a companion. The very last step, closing up the remaining open seam, felt like sealing a letter—filled with effort and affection.
Making my elephant plushie was a lesson in patience, creativity, and problem-solving. A ragged fabric piece turned into a proud creation, with an unplanned success: the elephant sitting upright, showing that imperfections can bring joy.
Customization Ideas for DIY Stuffed Animals
Making a DIY stuffed animal is a fun and rewarding project that allows for a high degree of personalization. Here are some ideas to customize your stuffed animals, making them unique and special:
- Choose Your Fabric: Selecting the right fabric can set the tone for your stuffed animal. Consider soft fleece for a cuddly feel, or patterned cotton for a vibrant look. For a vintage touch, repurpose old clothing or blankets.
- Pick the Stuffing: The stuffing you choose affects the firmness of your toy. Polyester fiberfill is common, but for a more eco-friendly option, consider using wool or cotton batting.
- Add Textures: Mix and match different textures to make your stuffed animal more tactile. Use smooth satin for the inner ears or paws and corduroy or velvet for the body.
- Incorporate Sounds: Insert a small squeaker or a rattle inside your stuffed animal to make it more engaging, especially for babies and pets.
- Embroider Features: Hand-embroidered eyes, noses, and mouths give your stuffed animal a charming, one-of-a-kind expression.
- Insert a Weighted Pouch: For a soothing effect, add a small pouch filled with weighted beads. This can be comforting for children and even adults as a stress reliever.
- Personalize with Accessories: Craft tiny accessories like scarves, hats, or bow ties. These can be removable, allowing the owner to change the look.
- Use Colorful Threads: When sewing pieces together, use threads in contrasting colors for a bold statement or match the thread to the fabric for a seamless look.
- Add a Scent: For a special touch, include a sachet of dried lavender or rose petals inside the stuffing to give your stuffed animal a pleasant fragrance.
By incorporating these customization ideas, you'll make a stuffed animal that's not just a toy but a cherished keepsake with its own character and story.
Troubleshooting Common Issues in DIY Stuffed Animal Projects
When crafting DIY stuffed animals, you might encounter a few hiccups along the way. Here's a helpful guide to troubleshoot common issues, ensuring your project turns out just as you envisioned:
Fabric Bunching Up
- Solution: Ensure you're using the correct needle size and thread tension for your fabric. If you're sewing by machine, a walking foot can help manage layers.
Uneven Stuffing
- Solution: Break apart clumps of stuffing before filling. Use a chopstick or pencil to push stuffing into smaller sections like limbs for an even fill.
Lumpy Shape
- Solution: After stuffing, roll the animal between your hands gently to smooth out any lumps. Add or remove stuffing as needed to achieve the desired shape.
Thread Snapping
- Solution: Use a stronger thread, such as upholstery thread for areas under tension. Also, check for any sharp edges on your needle or sewing machine.
Misaligned Parts
- Solution: Pin pieces together and check alignment before sewing. Baste stitch larger pieces to keep them in place as you sew.
Closed Sections Not Sealing
- Solution: Use a ladder stitch for a seamless closure. Ensure you're pulling the thread tight enough to close the gap without puckering.
Embroidery Difficulties
- Solution: Use an embroidery hoop to keep fabric taut. Sketch your design with a fabric marker first to serve as a guide.
Fabric Fraying
- Solution: Apply a small amount of fray check solution to cut edges, or use a zigzag stitch on the edges before assembling.
Safety Concerns
- Solution: For children's toys, avoid small detachable parts. Ensure all elements are securely attached and use child-safe materials.
By anticipating these issues and knowing how to address them, you'll be better prepared to make a beautiful, high-quality stuffed animal.
Maintenance and Care for DIY Stuffed Animals
Taking care of your DIY stuffed animals is essential to ensure they last long and remain safe for use, especially if they are for children. Here's a straightforward guide to maintaining and caring for your handmade creations:
- Cleaning: Stuffed animals can collect dust and germs, so regular cleaning is important. For most, hand washing with a gentle detergent is best. Use cold water to avoid color bleeding. If the fabric is machine washable, place the toy in a pillowcase and use a gentle cycle.
- Drying: Never wring out stuffed animals, as it can distort their shape. Instead, press out the water gently and let them air dry. For quicker drying, you can use a hairdryer in a cool setting, keeping it at a distance to prevent heat damage.
- Repairing: Check regularly for loose seams or tears. Early repair can prevent further damage. Use a thread that matches the fabric and sew with small, tight stitches to make the repair less noticeable.
- Storage: Store your stuffed animals in a cool, dry place to prevent mold and mildew. Avoid direct sunlight, which can fade colors. If you're storing them long-term, consider a breathable container to protect them from dust.
- Refreshing: Over time, stuffed animals can lose their shape. Fluff them up by gently massaging the stuffing and redistributing it evenly. If necessary, add more stuffing to bring them back to life.
- Safety Check: Regularly inspect your stuffed animals for any loose parts or sharp edges that could be hazardous, especially if children play with them.
By following these simple care instructions, your DIY stuffed animals will remain clean, safe, and huggable for years to come.
FAQs About DIY Stuffed Animal
Explore FAQs about DIY stuffed animals to get tips and answers on making your own plush creations. This is perfect for crafters and hobbyists!
Select a fabric that is soft to the touch and easy to sew. Fleece and minky are great for cuddly animals, while cotton is good for a more durable option. Consider the recipient’s preferences and the intended use of the stuffed animal when choosing your fabric.
Absolutely! There are many patterns designed for beginners that require basic sewing skills. Start with a simple design and as you gain confidence, you can try more complex patterns. Online tutorials can be very helpful in guiding you through the process.
To ensure safety, avoid small, detachable parts like buttons for young children. Instead, opt for embroidered or fabric appliqué features. Make sure all seams are secure and that the stuffing is not accessible through any gaps in the stitching.
Start by stuffing the extremities and work your way to the larger body parts, ensuring an even distribution of stuffing. Use a chopstick or pencil to push the stuffing into small areas. The amount of stuffing will determine the firmness, so add gradually until you achieve the desired result.
Personalizing your DIY stuffed animal adds a special touch that makes it truly one-of-a-kind. Consider adding a heart-shaped patch with the recipient's initials, using fabric that has sentimental value (like a piece of clothing), or incorporating colors and patterns that reflect the recipient's personality. You can also add accessories like a small scarf, a hat, or a bow to give your stuffed animal character.
Final Words of Wisdom
Wrapping up, learning how to make a stuffed animal for your loved ones can be a wonderful and rewarding experience. With basic materials and some creativity, you can craft a unique and heartfelt gift. Follow the steps and tips outlined in this guide on how to make a plushie, and you'll have a cherished handmade creation in no time.


