I remember the first time I made my DIY dog bowl stand. My dog, Max, was always spilling water and food everywhere. I thought it couldn't be that hard to make a stand. With just some wood, nails, and paint, it came together pretty well. I felt proud seeing how it made mealtime so much cleaner for Max.
Making your own DIY dog food stand is not only fun but also very practical. You get to customize it to fit your dog's height and your home's style. Plus, it's a great weekend project that doesn't require advanced skills.
Trust me, it was simple, and you will enjoy the result. These steps will help you get started and make your own stand.
Health Benefits of a DIY Dog Bowl Stand
When it comes to caring for our furry friends, their comfort and health are top priorities. A DIY dog bowl stand can contribute significantly to both. Here's how:
- Improved Digestion: Eating from a bowl that's set at a more natural height allows dogs to swallow more easily and helps prevent air from being gulped down along with their food, which can reduce the risk of bloating—a serious health concern for many dogs.
- Better Posture: Just like humans, dogs can suffer from poor posture. A stand that raises their food and water to mouth level means they don't have to stoop. This can help prevent strain on their neck, hips, and shoulders, leading to better overall musculoskeletal health.
- Reduced Mess: Elevated bowls are less likely to be pushed around during mealtime, which means less spilled food and water for you to clean up. This also helps maintain a cleaner eating area, reducing the risk of mold and bacteria growth that could potentially harm your pet.
- Joint Relief: For older dogs or those with arthritis, bending down to eat or drink can be painful. An elevated bowl stand can provide much-needed relief, making mealtime a more comfortable and enjoyable experience.
- Hygiene and Cleanliness: Keeping bowls off the ground means they're less likely to collect dust, dirt, and germs. This is especially important for dogs with allergies or immune system issues.
By building your own dog bowl stand, you can tailor the height and design to your dog's specific needs, ensuring they reap all these health benefits.
Materials and Why They're Needed
- Metal Pet Bowls: I picked up two inexpensive metal bowls from the Dollar Tree. Ensure they're appropriately sized for your pet's needs.
- Wood (New and Pallet): The combination of new and repurposed wood adds strength and a rustic appeal. A 1x12 scrap piece serves as the main platform, while pallet wood is great for the frame and legs.
- Jigsaw and Drill: Essential tools for cutting out the bowl recesses and assembling the stand.
- Sandpaper: To build a smooth, splinter-free finish on the wood.
- Chalk Paint and Polyacrylic Sealer: These protect the wood and allow for a customizable design.
- Measuring Tape and Pencil: For accurate measurements and markings.
Step by Step Instructions
Learn how to build a DIY dog bowl stand with these easy step-by-step instructions. Perfect for a stylish and functional feeding area!
Step 1: Preparing the Main Platform
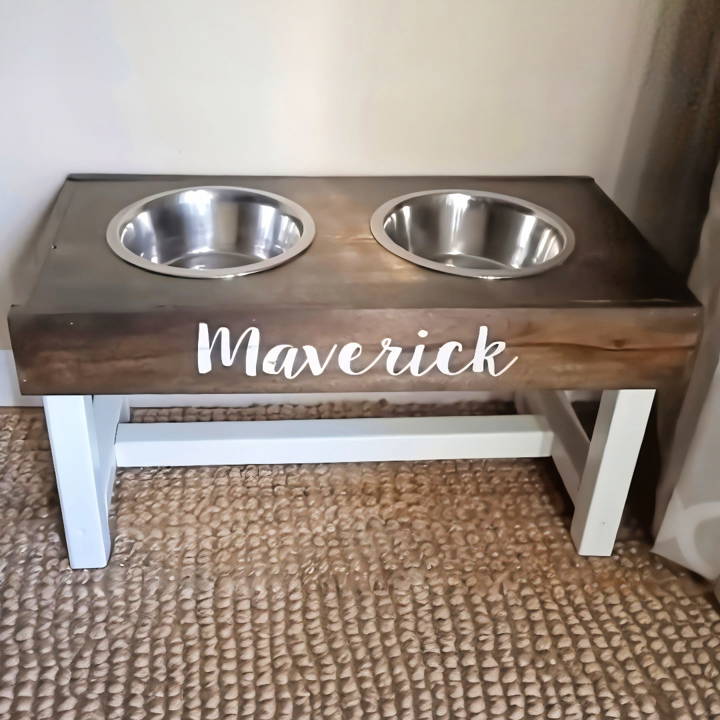
My journey started with a piece of 1x12 scrap wood, pre-cut to 23 inches long, which I found to be an ideal size. I measured the diameter of my dog bowls and drew two circles on the wood where I wanted the bowls to fit. A pro tip here: Make sure you draw your circles slightly smaller than the top of your bowls to ensure they sit snugly without falling through.
Step 2: Cutting the Bowl Recesses
Using a drill, I buildd starter holes inside my drawn circles, allowing my jigsaw blade to commence its work. Carefully following the inside of my markings, I cut out the circles. After some sanding, the bowls fit perfectly into the recesses. This step required patience and precision.
Step 3: Building and Attaching the Frame
For the frame, I repurposed some pallet wood, cutting it to size to fit around the base of the top platform. This not only added stability but also prevented the metal bowls from being visible from the side. I secured the frame using wood glue and screws, ensuring a durable and aesthetically pleasing finish.
Step 4: Crafting and Fixing the Legs
I opted to use some excess two-by-twos for the legs, cutting them to my desired length. The height of your stand will depend on your dog's size; you want them to comfortably eat without straining their neck. After cutting, I sanded down the legs to prevent any splinters and attached them securely to the underside of the platform.
Step 5: Painting and Sealing
This is where creativity shines. I chose a neutral chalk paint for a cozy, matte look but feel free to pick a color that matches your home decor. Remember, two coats might be necessary for an even finish. The polyacrylic sealer is vital, especially for messy eaters, as it protects the wood from moisture and makes cleanup a breeze.
Final Touches
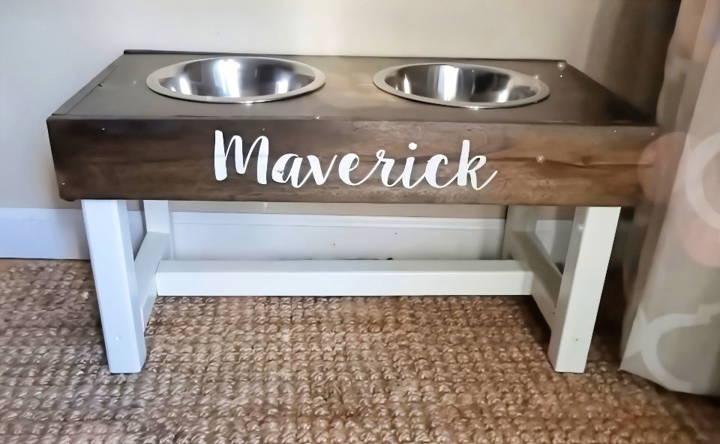
Before sealing, I decided to personalize the stand by adding my dog's name to the front. This step is optional but adds a lovely, custom touch. Finally, I applied two coats of the sealer, allowing ample drying time in between.
The Big Reveal
After letting everything fully dry, the moment of truth arrived. I placed the bowls into their recesses and introduced my dog to their new feeding station. The height was perfect, making meal times more comfortable and enjoyable.
Customization Ideas for Your DIY Dog Bowl Stand
Building a DIY dog bowl stand is not just about functionality; it's also an opportunity to add a personal touch that reflects your style and your pet's personality. Here are some customization ideas to inspire you:
- Choose Your Material Wisely: Start by selecting the right material. Wood is a popular choice for its natural look and ease of customization. Consider bamboo for a sustainable option, or go for metal if you're looking for durability.
- Pick a Paint or Stain: Color can make a big difference. Choose a paint or stain that complements your home decor. Use non-toxic, pet-safe products to ensure your dog's safety.
- Adjustable Height: Incorporate adjustable legs into your design. This allows you to change the height of the stand as your dog grows, ensuring it's always at the perfect level.
- Add Nameplates: Personalize the stand with a nameplate for your dog. You can use paint, stencils, or even metal plaques for a more permanent addition.
- Incorporate Storage: If you're handy with tools, add a drawer or a shelf underneath the bowls to store dog food, treats, or toys. This keeps essentials handy and helps reduce clutter.
- Non-Slip Surface: Apply a non-slip coating to the area where the bowls sit. This will keep the bowls in place and make mealtime less messy.
- Decorative Elements: Get creative with decorative elements. Attach figurines, use stencils to add patterns, or add trimmings like moldings for a more finished look.
- Protective Coating: Finish your stand with a protective coating to make it water-resistant and easy to clean. This will help your stand last longer and stay looking great.
With these customization tips, you can craft a dog bowl stand that's functional and unique, enhancing your home. Aim to make mealtime better for your pet and add your style to the space.
Maintenance Tips for Your DIY Dog Bowl Stand
Keeping your DIY dog bowl stand in top condition is crucial for the health and happiness of your pet. Here are some straightforward maintenance tips:
- Regular Cleaning: Clean the bowls and stand regularly to prevent the buildup of bacteria and food residue. Use warm, soapy water and rinse thoroughly.
- Check for Wear and Tear: Inspect the stand periodically for any signs of damage, such as splinters on a wooden stand or rust on a metal one. Address these issues promptly to ensure the stand remains safe for your pet.
- Stability Check: Make sure the stand remains stable over time. Tighten any loose screws and ensure that the stand doesn't wobble to prevent spills and potential injuries.
- Refresh the Finish: If you've painted or stained your stand, it may need a touch-up from time to time to keep it looking fresh and to maintain its protective coating.
- Non-Slip Pads: If you've applied non-slip pads to the bottom of the stand, check them occasionally to make sure they're still secure and replace them if they're worn out.
- Seasonal Adjustments: If your stand is used outdoors, make adjustments for different weather conditions. This might include moving it inside during extreme weather or applying a waterproof sealant for rainy seasons.
- Pet-Safe Cleaners: Always use pet-safe cleaners when cleaning the stand. Harsh chemicals can be harmful if ingested by your pet.
By following these simple maintenance tips, you can ensure that your DIY dog bowl stand remains a safe, clean, and attractive piece of your home for years to come.
FAQs About DIY Dog Bowl Stand
Learn the top faqs about DIY dog bowl stands, including benefits, materials, and step-by-step instructions for making the perfect pet feeder.
A DIY dog bowl stand can help reduce mealtime messes, make it easier for older or larger dogs to eat, and may even help reduce the chances of bloat. Additionally, many stands offer storage space for dog food or other items.
You can customize your dog bowl stand by choosing materials and designs that match your home's aesthetic and your dog's size. For example, you can select the type of wood, the finish, and the height of the stand to build a comfortable and functional eating area for your pet.
Yes, there are various plans available that cater to different skill levels. Some plans are designed for beginners and use simple tools and materials, while others may require more advanced woodworking skills. You can find plans that include step-by-step instructions and materials lists to help you get started.
Yes, the height of the dog bowl stand can be adjusted to suit your dog's needs. It's important to choose a height that allows your dog to eat comfortably without straining their neck or back. You can measure your dog's shoulder height and compare it to the stand's height to ensure a good fit.
To ensure stability and safety, select a sturdy material like solid wood or metal for the frame. Make sure the stand is well-balanced and the bowls are securely fitted. You can add rubber feet to the bottom to prevent slipping. Always check for any sharp edges or loose parts before letting your dog use it.
Conclusion:
Conclusion
Wrapping up, making your DIY dog bowl stand is a rewarding and practical project. With just a few materials and some simple steps, you can build a functional and stylish DIY dog food stand for your furry friend. Not only will it improve the feeding experience for your pet, but it will also add a personal touch to your home decor.


