As the summer heat approached its peak, I found myself in desperate need of cooling relief. Central air conditioning wasn't an option, and store-bought portable units were out of my budget. That's when I stumbled upon a DIY solution that seemed too good to be true: building a portable AC, also known as a swamp cooler, from scratch. Inspired and a little skeptical, I decided to give it a whirl, and the results were surprisingly effective. Here's how I did it, step by step.
Materials Needed and Why Each Is Essential
- Large Bucket with a Lid: Serves as the housing for your DIY AC. It needs to be large enough to hold a significant amount of ice for effective cooling.
- Drill with a Large Diameter Drill Bit: Used for making holes in the bucket for air circulation.
- Blade Styrofoam or Plastic Insulation (Optional): Improves the efficiency of your cooler by insulating the ice, slowing down its melting process.
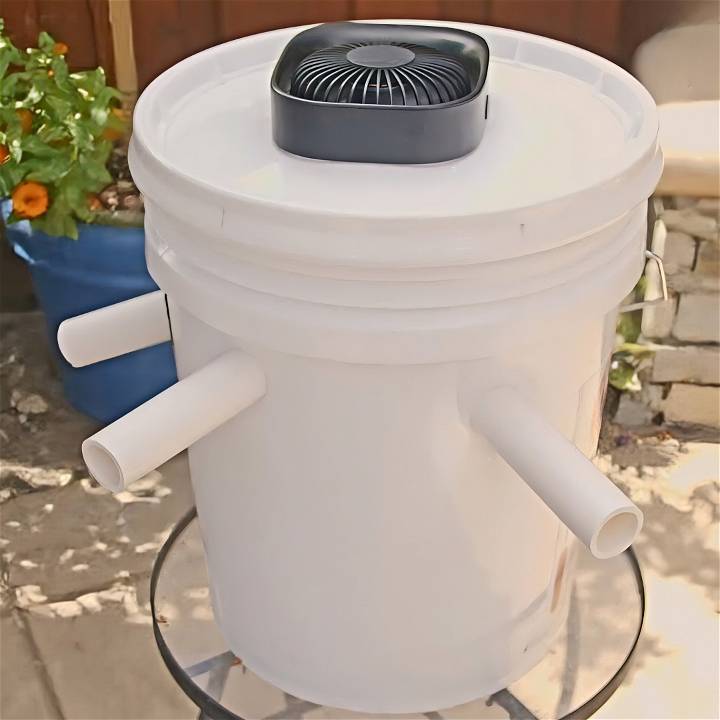
- Small Fan: This will push air into the bucket, allowing it to cool before it's expelled out of the PVC pipes. I opted for a rechargeable USB desktop fan for its portability and ease of use.
- PVC Pipe: Acts as the conduits for the cool air to pass from the bucket to the room. I used one 24-inch piece cut into three 8-inch pieces.
- Ice: The cooling agent. You can use regular ice cubes, ice packs, or frozen water bottles.
Step by Step Instructions
Learn how to make your own DIY swamp cooler with easy step-by-step instructions. Stay cool this summer with this budget-friendly project!
Step 1: Preparing the Bucket
The first step involves drilling three evenly spaced holes on the side of the bucket, a few inches from the bottom, to fit the PVC pipes. It's crucial to be cautious during this step to avoid any accidents. Depending on the size of your PVC pipes, ensure your drill bit is just a tad larger to avoid too loose a fit. I found that a drill bit with a diameter of 1 and 1/4 inches was perfect for my 1-inch diameter PVC pipes.
Step 2: Insulating (Optional)
If you have styrofoam or a plastic liner, place it inside the bucket before inserting the PVC pipes through the drilled holes. This step is optional but highly recommended for enhanced efficiency. It not only insulates the ice, making it last longer but also ensures the bucket remains leak-proof as the ice melts.
Step 3: Setting Up the PVC Pipes
Next, insert the PVC pipes into the holes. They should fit snugly; if not, some duct tape or caulk can help seal any gaps. This step might seem straightforward, but ensuring airtight seals around the pipes makes a significant difference in performance.
Step 4: Preparing the Fan
For the fan, cut a hole in the center of the bucket's lid, tracing around the fan's circumference before cutting. This hole will house the fan, which, once turned on, will draw air into the bucket over the ice, cooling it before expelling it out through the PVC pipes.
Step 5: Adding Ice
With the structure now complete, it's time to add the ice. I experimented with both regular ice cubes and frozen water bottles, finding the latter to be more efficient as they melted slower, thus requiring less frequent replacements.
Step 6: Enjoy the Cool
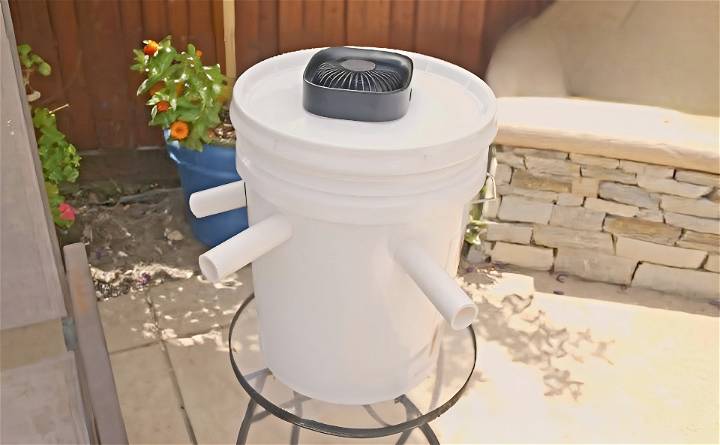
All that was left was to place the fan onto the lid, turn it on, and enjoy the fruits of my labor. The cool air emanating from the PVC pipes was impressively refreshing, making my DIY project feel like a grand success.
Additional Tips
- Waterproofing: Consider placing a plastic bag inside the bucket before adding ice to prevent any leakage.
- Maintenance: Regularly check the ice level and replace it as needed to maintain optimal cooling.
Optimal Placement and Setup for Your DIY Swamp Cooler
When making your own swamp cooler, proper placement and setup play a crucial role in maximizing its cooling efficiency. Follow these practical guidelines to ensure your homemade cooler keeps you comfortable during hot days:
Choose the Right Location
- Near Windows or Doors: Position your swamp cooler close to windows or doors. This allows easy access to fresh air and ensures efficient circulation.
- Avoid Obstacles: Keep the cooler away from furniture, curtains, or other obstacles that might obstruct airflow. Clear the area around it for optimal performance.
- Proximity to Sleeping Areas: If you plan to use the cooler in bedrooms, place it strategically so that the cool air reaches sleeping areas without causing discomfort.
Set Up the Cooler Correctly
- Level Surface: Place the swamp cooler on a flat, stable surface. Uneven placement can affect water distribution and overall functionality.
- Water Reservoir Access: Ensure easy access to the water reservoir for refilling. Avoid placing the cooler in tight corners or cramped spaces.
- Ventilation: If possible, position the cooler near an open window or door. This allows the warm air to escape while cool air is drawn in.
Consider Airflow Patterns
- Cross-Ventilation: If you have multiple windows, set up the cooler near one window and open another window on the opposite side of the room. This makes cross-ventilation, enhancing cooling efficiency.
- Fan Direction: Align the swamp cooler's fan with the direction of prevailing winds. This encourages better air circulation and helps distribute cool air evenly.
Monitor Sun Exposure
- Shade vs. Sun: While some sunlight is beneficial for evaporation, excessive exposure to direct sunlight can reduce the cooler's effectiveness. Place it in a partially shaded area for optimal results.
- Adjust Throughout the Day: As the sun moves, adjust the cooler's position accordingly. Morning and late afternoon sun exposure is usually more favorable.
Experiment and Fine-Tune
- Trial and Error: Don't hesitate to experiment with different placements. Observe the cooling effect and adjust as needed.
- Temperature Sensitivity: Pay attention to temperature variations in different parts of the room. Move the cooler if you notice any hot spots.
Each room may have unique characteristics, so adapt these guidelines to your specific space. By strategically placing your DIY swamp cooler, you'll make a refreshing oasis without breaking a sweat!
Humidity Management Tips for Your DIY Swamp Cooler
Maintaining the right humidity level is essential for the effective operation of your homemade swamp cooler. Here are practical tips to help you manage humidity and enhance cooling efficiency:
Understand Ideal Humidity Levels
- Low Humidity Is Key: Swamp coolers work best in dry climates with low humidity. They rely on the process of evaporative cooling, where water absorbs heat from the air and evaporates, resulting in cooler air.
- Target Range: Aim for indoor humidity levels between 30% and 50%. Too much humidity can reduce the cooling effect, while too little can lead to discomfort.
Monitor and Adjust
- Use a Hygrometer: Invest in a hygrometer (humidity gauge) to measure indoor humidity. Place it near the swamp cooler to get accurate readings.
- Adjust Water Flow: Experiment with the water flow rate. Too much water can oversaturate the cooling pads, while too little may not provide sufficient cooling. Find the right balance.
Optimal Cooling Pad Maintenance
- Regular Cleaning: Clean the cooling pads periodically. Dust and mineral deposits can accumulate, affecting their efficiency. Rinse them gently with water to remove debris.
- Soak the Pads: Before using the cooler, soak the pads in water for a few minutes. This ensures they are thoroughly wet and ready for efficient evaporation.
Nighttime Strategies
- Night Cooling: Swamp coolers are most effective during cooler hours, such as late evenings and early mornings. Open windows and let the cooler draw in fresh air.
- Adjust Fan Speed: Lower the fan speed at night to maintain a comfortable humidity level without excessive cooling.
Ventilation and Air Circulation
- Cross-Ventilation: Open windows or doors on opposite sides of the room to make cross-ventilation. This helps distribute cool air evenly.
- Ceiling Fans: If you have ceiling fans, use them in conjunction with the swamp cooler. Proper air circulation enhances cooling efficiency.
Prevent Mold and Bacterial Growth
- Regular Cleaning: Clean the water reservoir, pump, and any other components regularly. Stagnant water can lead to mold and bacteria.
- Use Clean Water: Always use clean, filtered water to prevent mineral buildup and microbial growth.
Adjust Based on Outdoor Conditions
- Humidity Forecast: Check local weather reports for humidity levels. Adjust your swamp cooler settings accordingly.
- Avoid Rainy Days: Swamp coolers are less effective during rainy or high-humidity days. Consider alternative cooling methods during such conditions.
Remember, maintaining the right humidity balance ensures efficient cooling and a comfortable indoor environment.
FAQs About DIY Swamp Coolers
Discover everything you need to know about DIY swamp coolers with our comprehensive FAQs guide. Learn how to build and maintain your own cooling system at home.
1. What Is a DIY Swamp Cooler?
A DIY swamp cooler, also known as an evaporative cooler, is a simple and cost-effective way to cool indoor spaces using water evaporation. It works by drawing warm air through water-saturated cooling pads, which lowers the air temperature. These coolers are especially effective in dry climates.
2. How Does a Swamp Cooler Work?
- Evaporative Cooling: A swamp cooler operates on the principle of evaporative cooling. Water from the cooler's reservoir wets the cooling pads. As warm air passes through these wet pads, it evaporates the water, resulting in cooler air.
- Fan Circulation: The fan inside the cooler pushes this cooled air into the room, providing relief from heat.
3. What Are the Benefits of Using a DIY Swamp Cooler?
- Energy Efficiency: Swamp coolers consume less energy compared to traditional air conditioners.
- Eco-Friendly: They use natural processes without harmful refrigerants.
- Cost-Effective: Building your own cooler is budget-friendly.
4. Can I Make a Swamp Cooler at Home?
Absolutely! Here's how:
- Materials: Gather a fan, water pump, water reservoir (like a plastic container), cooling pads (often made of aspen wood), and some basic tools.
- Assembly: Attach the cooling pads to the fan, place the water reservoir above the pads, and connect the pump to circulate water.
- Water Flow: Water flows down the pads, and the fan blows air through them, making cool air.
5. What Maintenance Does a DIY Swamp Cooler Require?
- Regular Cleaning: Clean the cooling pads and water reservoir to prevent mold and mineral buildup.
- Water Quality: Use clean, filtered water to avoid clogging and ensure efficient evaporation.
- Seasonal Checks: Inspect the pump, fan, and other components before each cooling season.
6. Are There Any Limitations to Swamp Coolers?
- Humidity Dependency: Swamp coolers work best in dry climates. High humidity reduces their effectiveness.
- Cooling Range: They are most effective in smaller spaces. For larger areas, consider multiple coolers.
- Noise Level: Some swamp coolers can be noisy due to the fan and water pump.
A well-maintained DIY swamp cooler can provide affordable and eco-friendly cooling during hot summer days!
Final Thoughts
Building this DIY portable AC was not only a fun weekend project but also an effective solution to my summer heat problem. The total cost was significantly lower than buying a commercially available portable air conditioner, and the satisfaction of building something functional with my own hands was incredibly rewarding. Whether you're looking to save money, reduce energy consumption, or simply enjoy a DIY challenge, this project ticks all the boxes.


