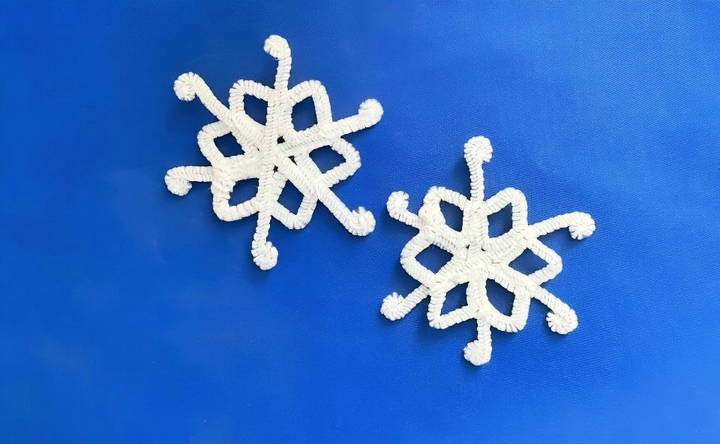
Making snowflakes out of pipe cleaners is a fun, easy craft that adds a personal touch to winter decorations. This project is perfect for crafters of all ages and requires minimal materials, making it a great activity for families or classroom projects. Here's a comprehensive guide to making beautiful, decorative pipe cleaner snowflakes that you can hang in windows, use as ornaments, or even string together to make garlands.
What You'll Need
For this simple DIY, gather the following materials:
- Four white pipe cleaners – White gives a classic snowflake look, but feel free to choose other colors for a custom touch.
- A large marker or cylindrical object – This will be used to shape loops for your snowflake.
- Fingernail clippers or scissors – For cutting the pipe cleaners and trimming excess.
Step by Step Instructions
Learn to craft stunning pipe cleaner snowflakes with our step-by-step guide. Perfect your DIY skills easily with creative and unique designs!
Step 1: Making the Snowflake Frame
- Join Two Pipe Cleaners: Take two pipe cleaners and twist them tightly together at one end. This makes the base for your snowflake and makes it sturdy.
- Wrap Around the Marker: Hold the middle of the twisted pipe cleaners against the large marker and bend them to form a loop. Twist the pipe cleaners around the marker twice to secure the loop. Remove the marker afterward, and repeat this process along the length of the pipe cleaners until you have six loops in total. These loops will serve as the structure of your snowflake.
- Form the Circle: Bend the pipe cleaner loops into a circular shape. Insert one end of an extra pipe cleaner into one of the loops to bring the ends together, and twist them securely to close the circle. Trim any excess with your fingernail clippers and tuck the trimmed ends out of sight for a clean look.
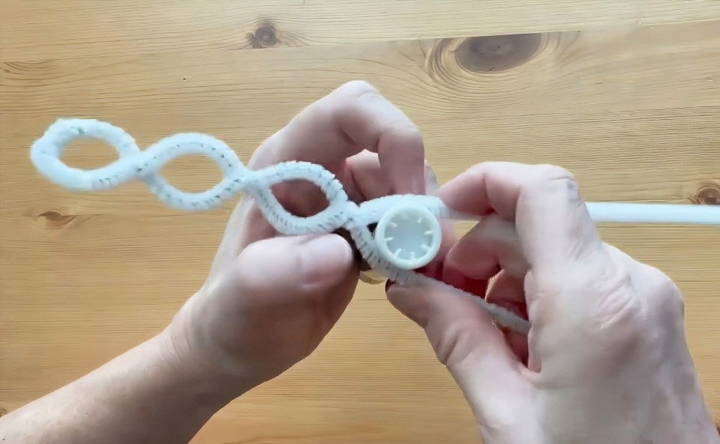
Step 2: Shaping the Snowflake's Points
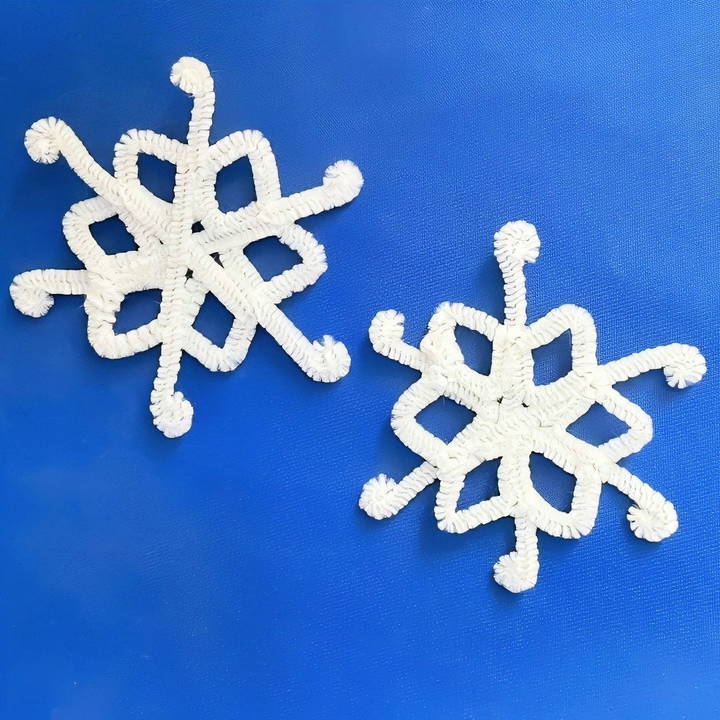
- Make Points from the Loops: For each loop in the circle, bend the sides inward to form a pointy shape, giving the appearance of snowflake “arms” with defined tips. Repeat this step for each loop to make the characteristic points that make it resemble a snowflake.
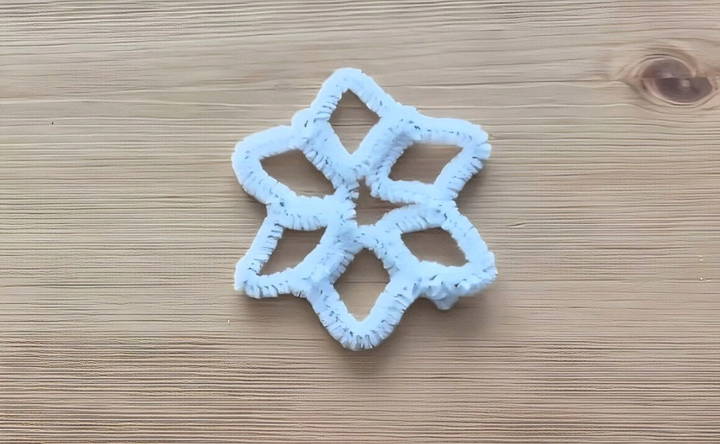
Step 3: Adding Support to the Structure
- Cut Remaining Pipe Cleaners: Take the other two pipe cleaners and cut each in half, so you have four short pieces. These pieces will be used to reinforce the snowflake's arms and add visual interest.
- Attach Support Bars: Place one of the short pipe cleaner halves across the center of the snowflake frame so it lies evenly between two points. Secure it by wrapping each end around the sides of the snowflake, weaving between the loops if necessary. Repeat this for the remaining pieces to make a crisscross effect in the center of the snowflake.
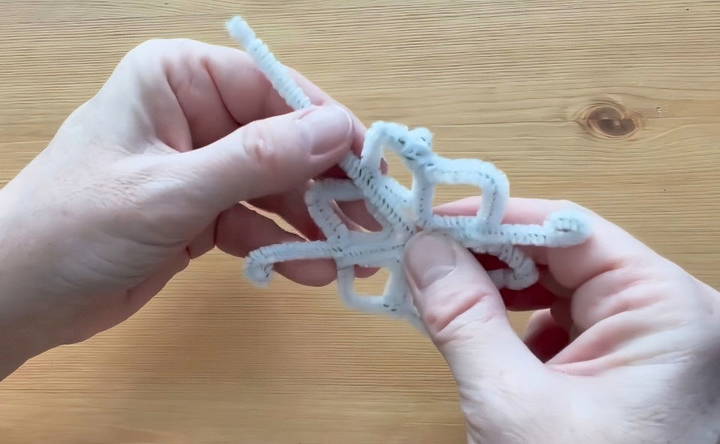
Step 4: Adding Final Touches
- Curl the Ends: Coil down the very ends of each pipe cleaner segment, creating small loops or spirals. This detail not only prevents the ends from being sharp but also gives the snowflake a more polished and delicate appearance.
- Finishing Touches: Inspect your snowflake for any uneven points or loose pieces. Adjust any elements to ensure symmetry and trim any stray ends for a tidy finish.
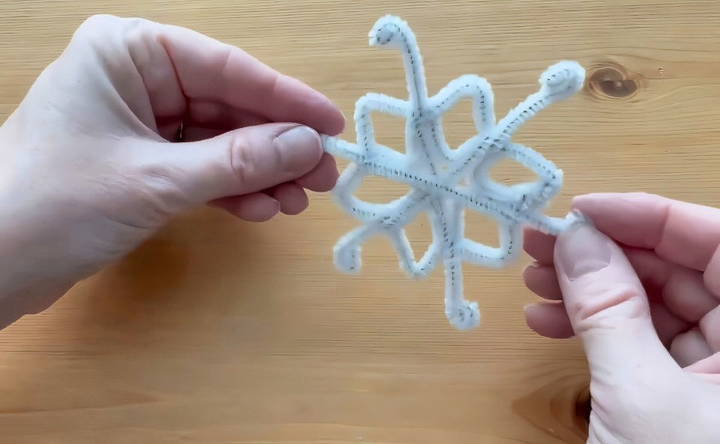
Display Ideas
Once you've made your pipe cleaner snowflake, you'll find many creative ways to display it:
- Window Decoration: Attach fishing line or a clear thread to hang the snowflake in your window, where it can catch the light and add a wintery touch.
- Ornament: These snowflakes are perfect as holiday ornaments. Simply loop a ribbon or string at the top and hang it on your tree.
- Garland: String several snowflakes together with fishing line or twine to make a garland that can decorate your fireplace, doorways, or banisters.
Tips for Making Your Pipe Cleaner Snowflakes Unique
- Experiment with Colors: While white pipe cleaners give a classic snowflake look, using shades of blue, silver, or even glittery pipe cleaners can add a unique flair to your decorations.
- Add Beads or Sequins: For a bit of sparkle, slide small beads or sequins onto the pipe cleaners before shaping the loops. This can make your snowflake shimmer, especially if displayed in a well-lit area.
- Layer with Different Sizes: Try making a few snowflakes in varying sizes. Layering smaller snowflakes on top of larger ones can make a stunning 3D effect for a wall or window display.
Why Make Pipe Cleaner Snowflakes?
Pipe cleaner snowflakes are not just a craft project; they're a wonderful opportunity for kids to learn about shapes and symmetry while honing their fine motor skills. Additionally, these DIY snowflakes are an inexpensive way to make winter decor that lasts. Since pipe cleaners are durable and reusable, your snowflakes can be stored and used for multiple holiday seasons.
Final Thoughts
Pipe cleaner snowflakes are a wonderful way to bring a bit of handmade charm to your winter decor. With just a few materials and easy-to-follow steps, you can make beautiful, unique snowflakes that reflect the cozy spirit of the season. This craft is ideal for everyone, from beginners to seasoned crafters, and allows for plenty of creative freedom. So, gather your pipe cleaners, and start crafting your own winter wonderland today!
FAQs About Pipe Cleaner Snowflakes
Discover everything about creating pipe cleaner snowflakes, including materials, step-by-step instructions, and tips for stunning DIY crafts.
Yes! For larger snowflakes, use more pipe cleaners or extend the loops further when shaping. For smaller ones, simply trim the pipe cleaners to a shorter length before starting.
Pipe cleaner crafts are generally safe, but adult supervision is recommended, especially when using scissors or clippers to cut the wire. Also, young kids might need help with twisting the pipe cleaners tightly.
Absolutely! If you don’t have a large marker, any cylindrical object with a similar diameter, like a thick pen or dowel, can work.
To keep your snowflakes in good shape, wrap them gently in tissue paper or store them in a shallow box. This will prevent any bending or tangling, so they’re ready to display next winter.
To add stability, twist the pipe cleaners tightly at every connection point. Also, when creating the circle and attaching additional pieces, ensure each twist is secure. Adding extra support bars or layering smaller snowflakes within a larger one can further reinforce the structure.
Regular scissors can also work, but ensure they are sharp enough to handle wire. If your scissors struggle, try using wire cutters or sturdy household scissors to avoid dulling your tools.
If loops look uneven, gently reshape them by hand, using the marker or cylindrical object again if necessary. Don't be afraid to untwist sections and reshape them for symmetry. Pipe cleaners are forgiving, so minor adjustments are easy to make.
Yes! Instead of loops, try bending pipe cleaners into triangles or squares for a more geometric snowflake. You can also add small coils or curls for a unique design. Experiment with shapes to make various styles.
To prevent scratching, tuck or coil down all exposed wire ends after shaping. You can also use a dab of clear glue or wrap the ends with a small piece of tape to secure them out of sight.
For young children, supervise closely and handle all cutting steps yourself. Provide blunt-end pipe cleaners if possible and let kids focus on shaping the loops and points, which are safer and help build fine motor skills.


