Making a tree stump fairy house is a fun and imaginative project that brings magic to any garden or home. This project involves transforming an ordinary tree stump into a charming and whimsical dwelling. Use materials like paint, small decorative elements, and natural objects to craft doors, windows, and other features that make your fairy house come to life.
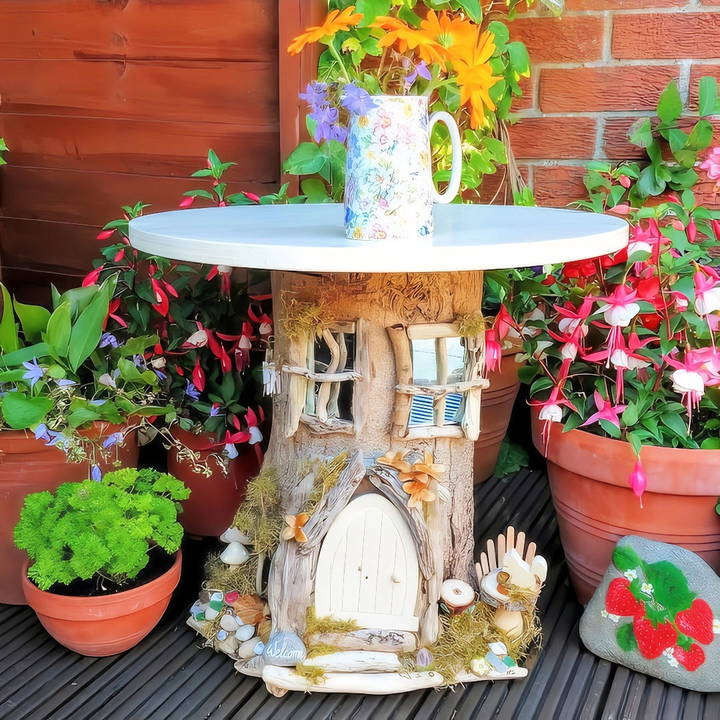
Building a tree-stump fairy house can be a relaxing and rewarding experience. You can use found objects, recycled materials, and your creativity to design a personalized fairy abode. This DIY activity is perfect for anyone who enjoys hands-on work and adding unique touches to their space.
Ready to get started? The next section will guide you through the materials needed and step-by-step instructions.
Materials Needed
Before diving into the process, let's gather all the materials. Each item serves a purpose, and here's why they are essential:
- Tree stump: The base of your fairy house.
- Fairy door: This acts as the main entrance, adding a whimsical touch.
- Lollipop sticks: Versatile for crafting windows, seats, or ladders.
- Mushrooms (real or crafted): Adds authenticity and charm to the fairy home.
- Driftwood: Perfect for making steps, arches, and other structural elements.
- Glue (tacky glue and hot glue gun): Essential for sticking materials together.
- Panel pins: Provides extra support for glued items.
- Twine: Useful for decorative purposes.
- Miniature squirrel or other animals: Adds life and character to the setting.
- Natural items (bark, sea glass, pebbles, shells, moss): Enhances the natural environment.
- Painters' markers (e.g., Derwent paint pens): Great for adding details and personal touches.
Step by Step Instructions
Learn how to make a tree stump fairy house in 8 easy steps! From stump prep to weatherproofing, make a magical fairy home in your garden.
Step 1: Prepare the Stump
First things first, ensure your tree stump is clean and dry. If it's not level, you might want to trim any uneven spots. This will make it easier to attach other elements.
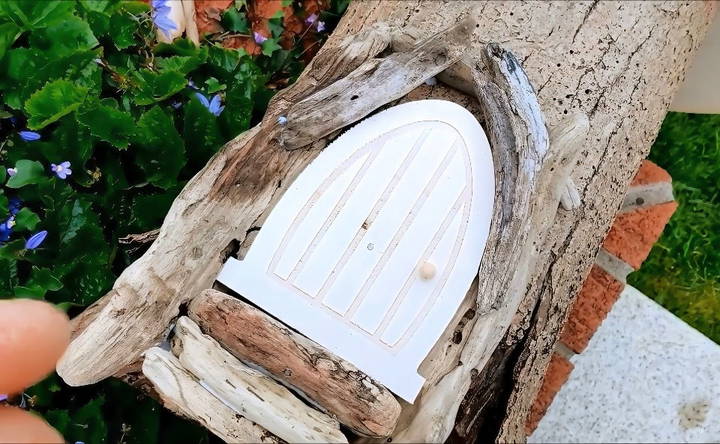
Step 2: Attach the Fairy Door
I started with a charming fairy door that I had lying around. Here's how to attach it:
- Support the Door: Use small pieces of driftwood to make supports on the sides of the stump where the door will go. Glue and secure them with panel pins.
- Fix the Door: Apply a generous amount of tacky glue to the back of the door. Position it on the stump and hold it in place until it sets.
Step 3: Build the Steps and Arch
Now, it's time to add some structure:
- Make Steps: Utilize small pieces of driftwood. Glue each piece in a staggered fashion ascending from the ground to the door. Let each step dry before adding the next one.
- Construct the Arch: Form an arch over the door using more driftwood. Glue the pieces together, using panel pins for extra stability.
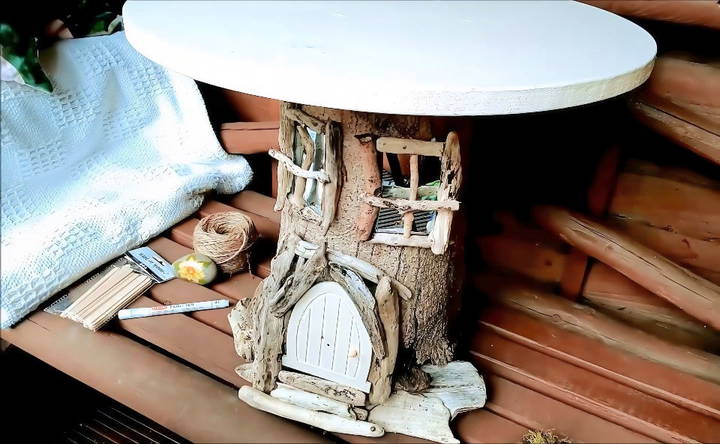
Step 4: Add Windows
Windows bring charm and realism to your fairy house:
- Cut Small Mirrors: I used some small, roughly cut mirrors as windows. You don't need perfection here—rough edges add to the fairy tale aesthetic.
- Frame the Windows: Use tiny twigs and pieces of driftwood to frame the mirrors. Glue the frames around the mirrors and then attach them to the stump.
Step 5: Make Furniture and Decor
To make the fairy house feel lived-in, add some basic furniture and other decorations:
- Garden Seat: Glue lollipop sticks together in a staggered formation on a small rectangular piece of wood. This simple seat adds a touch of homeliness.
- Gluing Items in Place: Attach the seat and any other decorations like the miniature squirrel or mushrooms to the stump with your glue gun.
Step 6: Add Natural Elements
Gather some natural items to enhance the fairy home's surroundings:
- Attach Moss and Toadstools: Moss not only adds a lovely green touch but also hides any screws or panel pins used. Glue toadstools in sections around the base.
- Place Stones and Shells: Carefully position pebbles, shells, and bits of sea glass aroung the house to add character.
Step 7: Personal Touches
Now it's time to personalize the fairy house:
- Make a Welcome Sign: Take a small, flat stone and write "Welcome" on it using the Derwent paint pen. Glue it near the door.
- Paint Little Details: Use paint pens to draw flowers or other tiny designs on surrounding stones. These add vibrant splashes of color and make the scene more inviting.
Step 8: Final Touches and Weatherproofing
If you live in an area with unpredictable weather, consider these tips:
- Hot Glue for Enhanced Hold: Use the hot glue gun for weather-affected areas.
- Temporary Indoors: If possible, move your fairy house indoors during extreme weather.
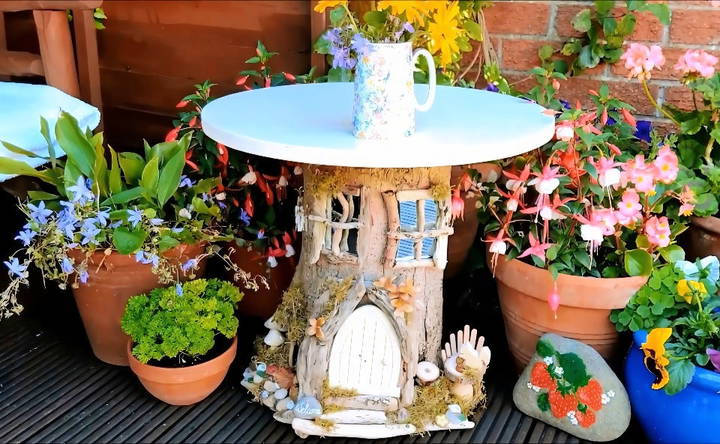
Once you've finished, step back and admire your creation. You've just added a sprinkle of magic to your garden. My little tree stump fairy house turned out delightful, and it continues to be a centerpiece of wonder and joy.
Design Variations for Your Tree Stump Fairy House
Building a fairy house from a tree stump can be a magical and rewarding project. Here are some design variations that cater to different tastes and skill levels:
For the Beginner: The Rustic Retreat
Start with something simple. Use moss to cover the stump, making a soft, green exterior. Add a small door made from bark and round windows using slices of branches. Decorate with pebbles to make a pathway leading to the door.
For the Intermediate: The Enchanted Cottage
Take your design up a notch by carving out rooms within the stump. Use a chisel to hollow out windows and doors. Make a thatched roof effect with straw or dried grass. Incorporate small furniture made from twigs and leaves to give it a homely touch.
For the Advanced: The Fairy Castle
If you're experienced with woodworking, consider transforming your stump into a multi-level castle. Carve staircases, add balconies, and use clay or putty to make intricate designs on the walls. Paint the exterior with non-toxic paint to bring your castle to life.
For the Artist: The Whimsical Wonderland
Let your creativity flow by adding artistic elements. Use bright colors, glitter, and small mirrors to reflect light. Make a theme, like a mushroom village or a butterfly garden, and use materials like colored glass or sculpting resin to bring your vision to reality.
For the Naturalist: The Eco-Friendly Habitat
Focus on using materials that will blend in with the natural surroundings and provide a habitat for wildlife. Use hollowed-out acorns as pots for small plants, and leave some areas of the stump untouched to attract insects and birds.
For the Community Builder: The Neighborhood Nook
Invite friends and family to contribute to your fairy house. Each person can add their own touch, like a personalized sign or a handcrafted figurine. This variation not only makes a diverse look but also builds a sense of community.
For the Seasonal Decorator: The Festive Hideaway
Adapt your fairy house for different seasons. Use autumn leaves, pinecones, and pumpkins for fall. In winter, decorate with fake snow and miniature Christmas trees. Rotate decorations to keep the fairy house festive year-round.
Enjoy your DIY project by letting your creativity flow. Experiment with materials and styles for a unique tree stump fairy house that will delight everyone in your garden.
Safety Precautions for Building a Tree Stump Fairy House
When making a fairy house from a tree stump, safety is paramount. Here's a guide to ensure you stay safe while crafting your enchanting project:
Personal Protective Equipment (PPE)
Always wear the right PPE:
- Gloves: Protect your hands from splinters and sharp tools.
- Safety glasses: Keep your eyes safe from flying debris.
- Dust mask: Prevent inhalation of sawdust or other fine particles.
Tool Safety
- Read manuals: Before using any tool, familiarize yourself with its operation and safety features.
- Inspect tools: Check for damage before use. Damaged tools can be dangerous.
- Use tools properly: Don't force tools or use them for unintended purposes.
Workspace Safety
- Keep it clean: A tidy workspace helps prevent accidents.
- Good lighting: Ensure you have enough light to see what you're doing.
- Stable surface: Work on a flat, stable surface to avoid the stump tipping over.
Chemical Safety
- Non-toxic materials: Use non-toxic paints and glues, especially if children will be involved.
- Ventilation: Work in a well-ventilated area when using substances that emit fumes.
Child Safety
- Supervise children: Always supervise young ones during the project.
- Age-appropriate tasks: Give children tasks suitable for their age and skill level.
First Aid
- Have a kit handy: Keep a first aid kit nearby in case of minor injuries.
- Know basic first aid: Be prepared to treat cuts or scrapes.
Fire Safety
- Keep flammable materials away: If you're working with anything that could ignite, keep it away from heat sources.
By following these safety precautions, you can enjoy building your tree stump fairy house without worry. Taking the time to prepare and work safely is the most important step in any DIY project.
FAQs About DIY Tree Stump Fairy House
Discover answers to common questions about making your own DIY tree stump fairy house. Learn tips, tricks, and ideas for your magical project!
A tree-stump fairy house is a creative way to repurpose an old tree stump into a whimsical, miniature home that resembles those from fairy tales. It’s a decorative feature that can add charm to any garden.
Absolutely! A hollow stump is perfect for making a more intricate fairy house. You can use the space to install miniature furniture, make rooms, or even plant a small garden inside.
To ensure longevity, use weather-resistant materials and finishes. Regular maintenance, like clearing debris and touching up paint, will keep your fairy house looking magical for years to come.
Select a spot in your garden that's visible and gets a mix of sun and shade. Ensure the stump is not in a low-lying area that could collect water. A place where the fairy house can be a focal point yet blend naturally with its surroundings is ideal.
Get creative with materials like acorns for lampshades, seashells for bathtubs, and pebbles for pathways. Consider adding a roof made of bark or leaves, and use non-toxic paint to add color. For a magical touch, install solar-powered LED lights to illuminate the fairy house at night.
Conclusion
Transforming a tree stump into a fairy house is not just about crafting; it's about infusing a bit of enchantment into your everyday space. Whether you're doing it alone, with friends, or family, this project brings joy and creativity to everyone involved.
Happy crafting! If you decide to make your own fairy house, don't forget to share pictures—I'd love to see your magical creations!


